Table of Contents |
To keep your document looking clean and easy to read, it is important to set it up properly from the start. Page setup controls the document’s basic structure, including paper size, page orientation, and document margins (Microsoft, n.d.).
Paper size affects how much space you have to work with. Let’s review some common paper sizes.
| Paper Size | Dimensions | Common Use |
|---|---|---|
| Letter (standard) | 8.5 x 11 in. | Business letters, reports, and memos |
| Legal | 8.5 x 14 in. | Legal documents and contracts |
| Tabloid | 11 x 17 in. | Posters, newsletters, and large spreadsheets |
Page orientation controls whether the document prints vertically (portrait) or horizontally (landscape). The table below compares these two options.
| Orientation | Description | Common Use |
|---|---|---|
| Portrait orientation | Tall layout (height > width) | Letters, reports, memos, and most business documents |
| Landscape orientation | Wide layout (width > height) | Charts, tables, brochures, and visual presentations |
EXAMPLE
A marketing team prepares client proposals using 8.5 x 11-in. paper in portrait orientation so the pages print cleanly and fit neatly into standard folders and binders.Margins add white space around the text, making content easier to read. The table below details common margin settings.
| Margin Type | Size | When to Use |
|---|---|---|
| Standard | 1.00 in. (all sides) | Most business letters, memos, and reports |
| Left binding | 1.25 in. (left) | Printed reports that need space for binding |
| Narrow | 0.75 in. (all sides) | Internal documents or drafts where space is limited |
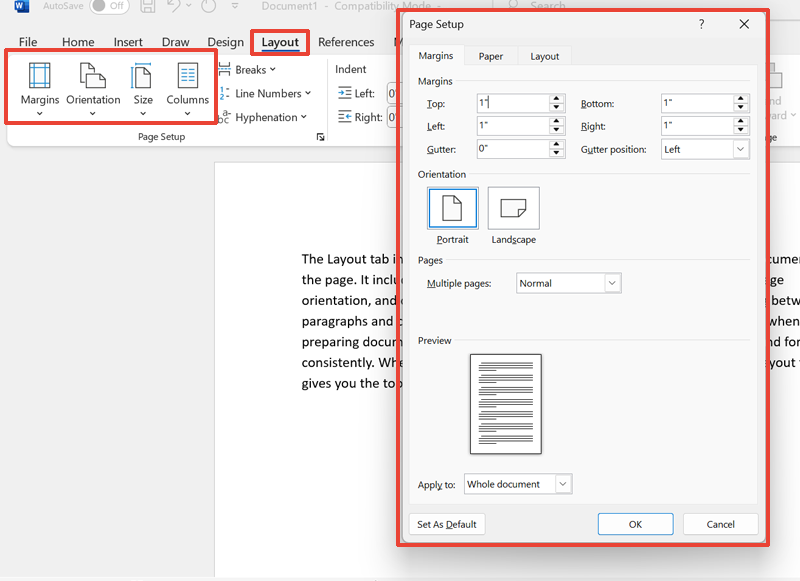
The screenshot below shows the Page Setup dialog box in Microsoft Word, accessed through the Layout tab. It highlights key formatting options, like margins, page orientation, and size.
Once your page setup is in place, it is time to add details that appear on every page—without having to type them over and over.
Headers and footers provide consistent information across every page in multipage documents (Google, n.d.). The table below shows the common content of these elements.
| Element | Common Content |
|---|---|
| Header | Document titles, company branding, or section names |
| Footer | Page numbers, dates, or contact details |
Running headers and footers are repeating elements that automatically appear at the top or the bottom of every page. They eliminate the need to manually retype details like titles or page numbers on each page.
EXAMPLE
A student writing a research paper uses a running header to show the paper title on every page and a footer to display page numbers. This keeps the document organized and easy to follow.The screenshot below shows the Header & Footer tools in Microsoft Word.
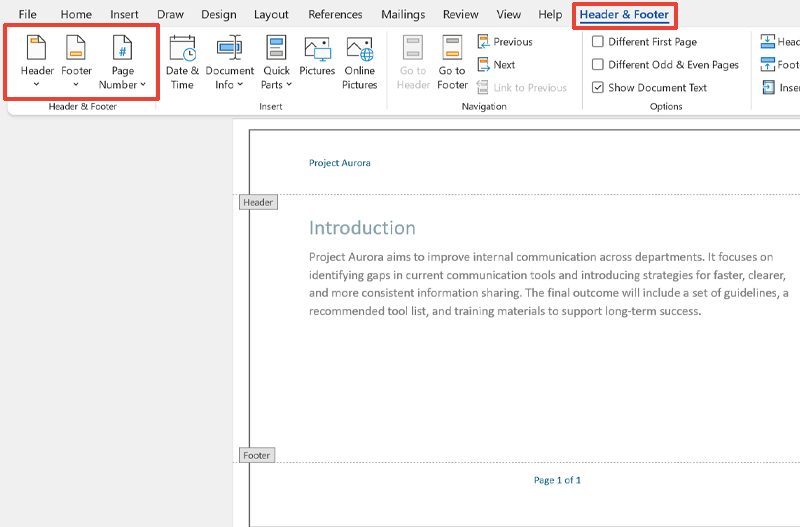
To add a header or footer, first make sure you are in Editing mode, as these are not available in Reviewing mode. Go to the Insert tab, click Header or Footer, choose a style or select Edit, type your text, then click “Close Header and Footer” on the toolbar to return to the main document.
Once your headers and footers are in place, the next step is to add clear and consistent page numbers. This helps organize your document and makes it easier for readers to find information.
Page numbering helps readers navigate documents and reference specific information (Microsoft, n.d.). Effective numbering systems consider document type, length, and professional standards.
The following tables show common page numbering styles and placements.
| Numbering Style | Purpose |
|---|---|
| Simple (1, 2, 3 ... ) | Works well for short or informal documents |
| Page X of Y | Helps readers track their progress in longer documents |
| Placement | Effect |
|---|---|
| Center-bottom | Traditional look, commonly used in reports |
| Right-bottom | More modern appearance, often used in digital formats |
EXAMPLE
A project report uses “Page 1 of 10” in the bottom-right corner so readers can easily track how far along they are while reading.The screenshot below shows how to insert page numbers in Microsoft Word.
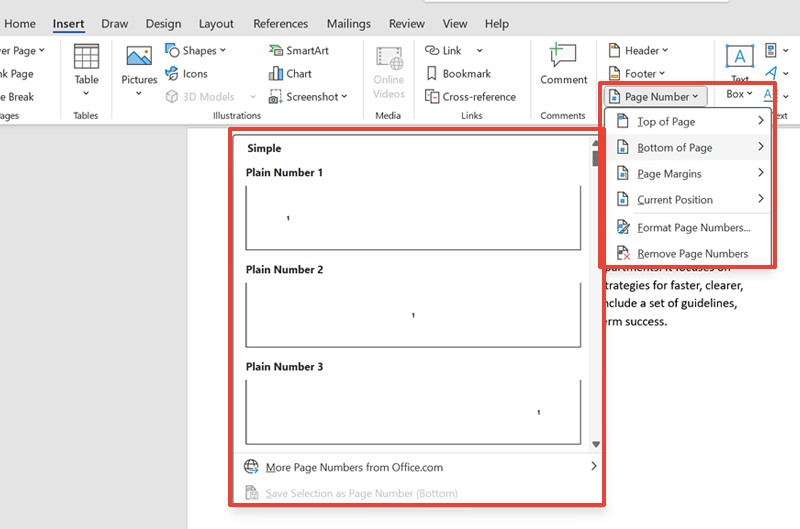
To insert page numbers, go to the Insert tab, click Page Number, and choose where and how you want the numbers to appear.
Ideally, page numbers should not appear on title pages as they can look unprofessional and distract from the document’s presentation. To exclude numbering from the title page, enable the “Different First Page” setting in the Header/Footer tools.
Now that you have structured your document with page setup, headers, footers, and page numbers, the next step is to ensure everything looks consistent.
Document styles are formatting templates that ensure consistent appearance throughout your documents (Google, n.d.). Styles combine font, size, color, spacing, and alignment settings (which we have already explored in the previous lessons) into reusable formats. Instead of formatting each section manually, you can apply a style to make everything match.
Using consistent styles makes headings and body text look uniform, which creates a professional impression. This builds on the paragraph formatting you learned in the previous lesson and extends consistency across the whole document.
Word processors provide both built-in styles and custom styles. The table below explains the differences between these two types.
| Style Type | Description | When to Use | Examples |
|---|---|---|---|
| Built-in style | Ready-made style that covers common elements, like headings and normal text | Use for fast formatting with standard options. | Heading 1, Heading 2, Normal, and Title |
| Custom style | User-created style tailored to specific branding or formatting preferences | Use when you need to match branding or set consistent formatting across documents. | “Company Header” and “Blue Subsection Title” |
EXAMPLE
Daiva uses built-in styles for headings and creates a custom style to match their company’s brand colors.Using styles improves your workflow and helps others who use your document in the following ways:
EXAMPLE
In a user guide, Rajan uses Heading 1 for main sections, Heading 2 for smaller sections, and Normal for instructions. When the company changes the font, Rajan updates the styles once, and the whole document updates automatically.The screenshot below shows the Styles gallery in Microsoft Word and a document using built-in styles (Title, Subtitle, Heading 1–2, and Normal) to create a clear, professional layout.
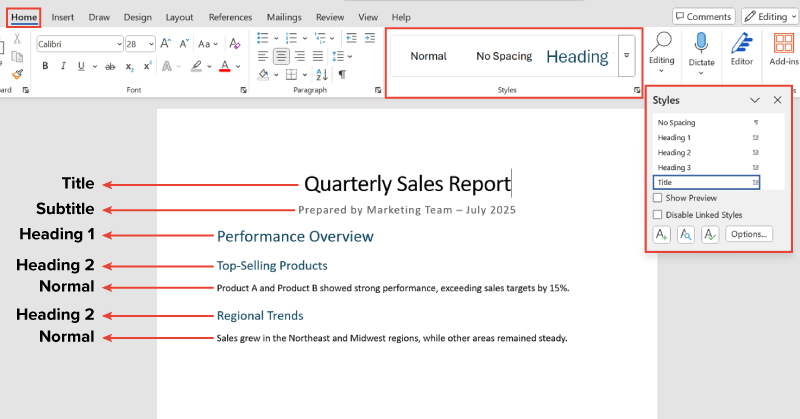
You can apply styles by selecting text and then choosing a style from the Styles group on the Home tab.
As you finalize formatting choices like styles, margins, and layout, it is important to ensure your document is usable for everyone.
Accessibility standards are rules that help make documents usable for everyone, including people with disabilities. These standards support the use of assistive technologies like screen readers, which read text out loud for people with visual impairments (WebAIM, 2020).
Let’s review some important accessibility guidelines for document formatting.
IN CONTEXT: Making an Onboarding Manual Accessible for All Users
A company is designing an internal onboarding manual that all employees can use, including those who rely on screen readers.
To make the manual accessible, the team uses proper heading styles, like Heading 1 and Heading 2, to organize content. It avoids simply bolding section titles.
Each image includes alt text, such as “A screenshot of an HR portal homepage with the Benefits tab highlighted.”
The team also chooses black text on a white background for strong contrast, uses consistent spacing, and sets margins evenly to reduce clutter.
These steps help all employees navigate and use the document with ease, whether reading on screen, printing it, or using assistive technologies.
If a document is not accessible, some people may not be able to read or use it. For instance, screen readers will not work correctly without proper headings, and people with low vision may struggle to read low-contrast text.
Inaccessible documents can cause confusion, exclude users, and even break legal rules in some workplaces. Making documents accessible helps everyone.
Source: THIS TUTORIAL HAS BEEN ADAPTED FROM OPENSTAX "WORKPLACE SOFTWARE AND SKILLS." ACCESS FOR FREE AT OPENSTAX.ORG/DETAILS/BOOKS/WORKPLACE-SOFTWARE-SKILLS. LICENSE: CREATIVE COMMONS ATTRIBUTION 4.0 INTERNATIONAL. Accessed by June 2025.
REFERENCES
Google. (n.d.). Use headers, footers, page numbers & footnotes. Google Docs Editors Help. support.google.com/docs/answer/86629?hl=en&co=GENIE.Platform%3DDesktop
Microsoft. (n.d.). Change document layout. support.microsoft.com/en-us/office/change-document-layout-d8eae84b-756b-4e7d-8b3d-7fbcb41e50cc
WebAIM. (2020, April 14). Introduction to web accessibility. webaim.org/intro/