Table of Contents |
Site surveys are absolutely imperative to designing a premium-quality, or even just a reasonably viable, enterprise wireless network. You should carry out a predeployment survey and a postdeployment survey, but keep in mind that your predeployment survey is not actually your first step to begin this key process.
Because it is vital to know how to formulate and implement a solid site survey, we are going to walk through executing the three major steps to doing that effectively. And just to be really thorough, we are also going to cover some issues commonly encountered as we progress through these steps.
During this phase, a key goal is to create a coverage model that maps to all areas that need coverage, along with those that do not, and have the client sign off in agreement with this document before doing anything else.
It can be challenging to provide enough capacity in areas where many wireless stations will be competing for airwaves. Remember that stations share access to the RF environment with all other stations in the BSS, as well as with the AP, so really, the only way to increase capacity is by increasing the number of APs in an area requiring serious density.
EXAMPLE
This can get complicated but, basically, it comes down to placing APs on nonoverlapping channels while still sharing the same SSID. The image below demonstrates this: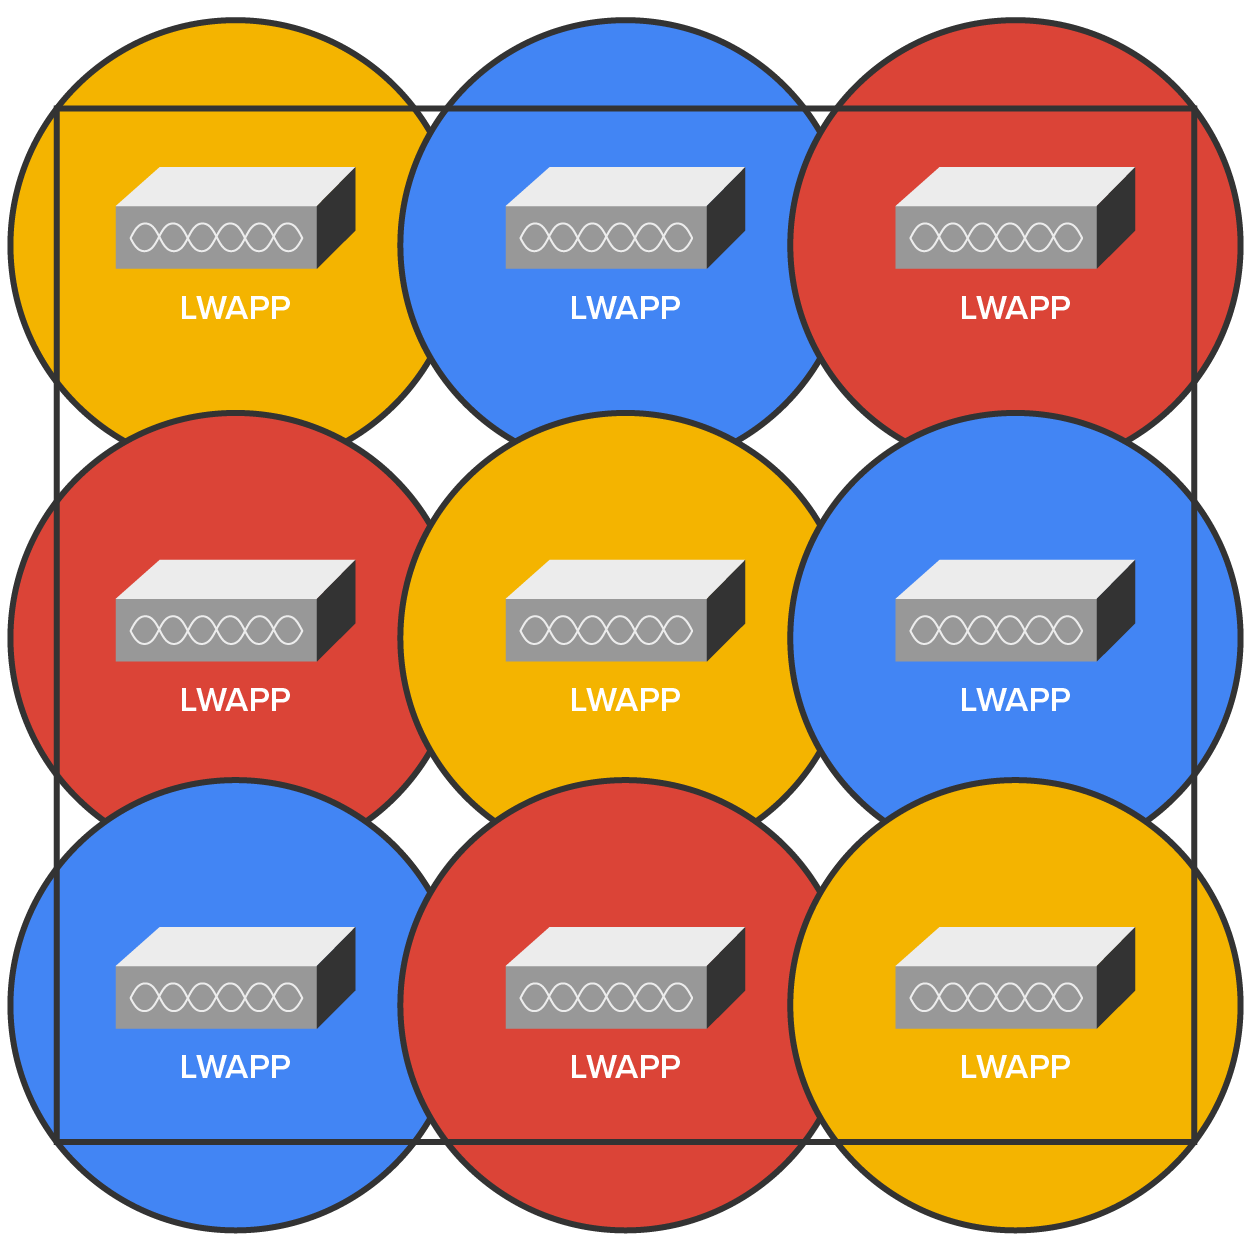
In the diagram above of a Lightweight Access Point Protocol (LWAPP), the nine APs have been configured in the same area using the three nonoverlapping channels in the 2.4 GHz frequency (1, 6, and 11). Each shade represents a different channel. Even though the APs on the same channel have been positioned far enough away from one another so that they don’t overlap much and/or cause interference, surprisingly, it is actually better if there is some overlap. But bear in mind that the channels should be used in a way such that no APs on the same channel overlap in a detrimental way.
Another thing to note that is not ideal about this arrangement is that all the APs would have to run at full power. This is generally not a good way to design a WLAN because it does not provide much fault tolerance.
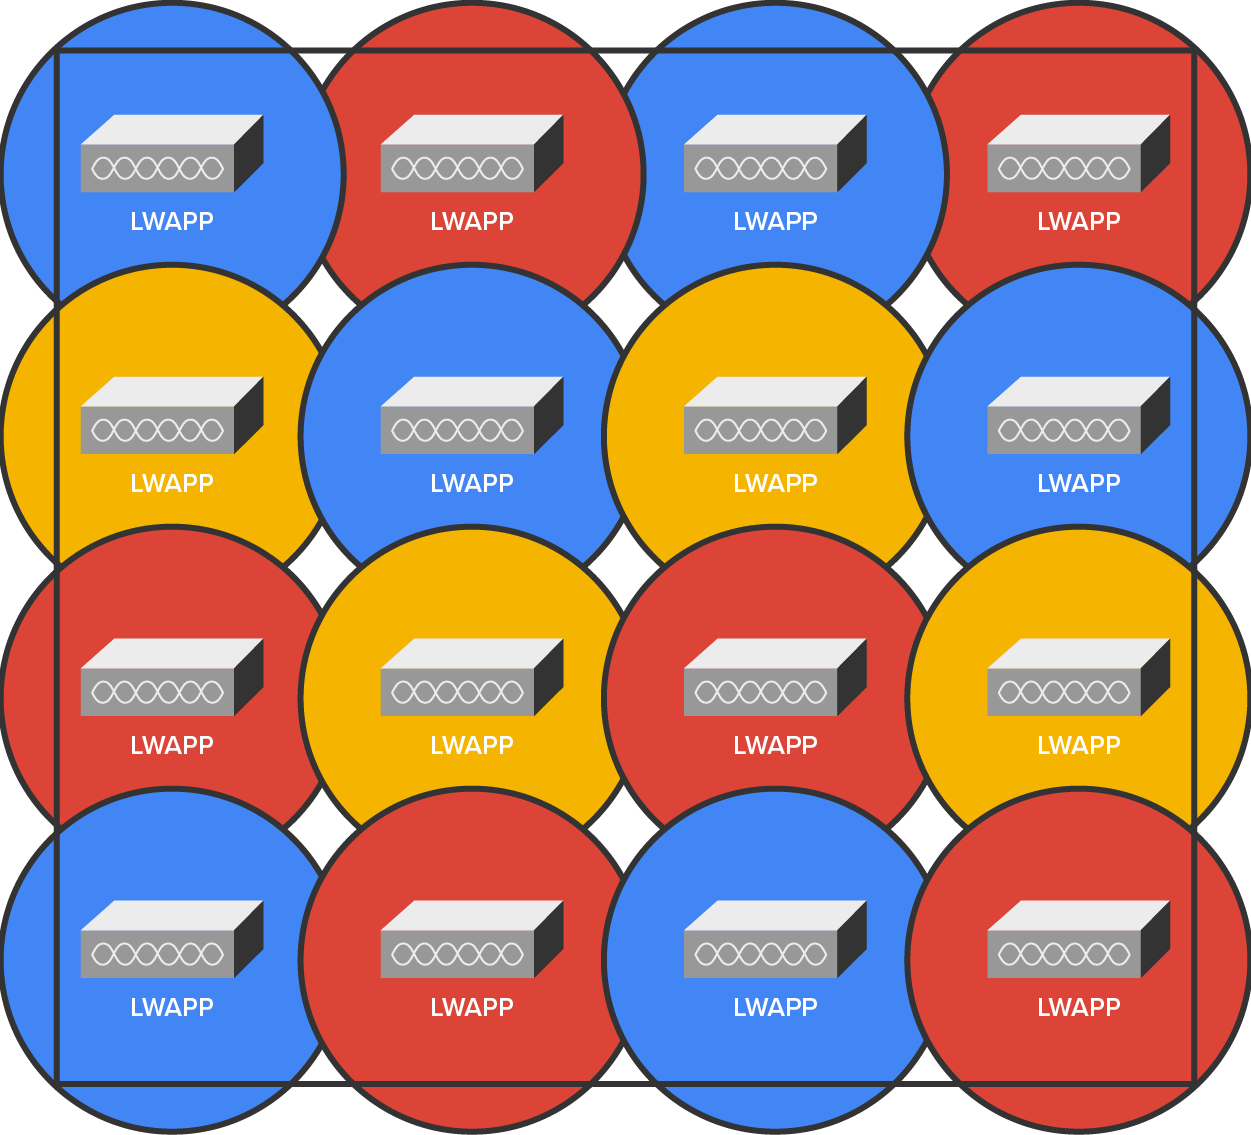
There are two problems with this design: lack of overlap and lack of fault tolerance. To address both issues, you need more APs, which would get you more channels and provide better throughput, as shown below.
When you know exactly the type of applications and activity a WLAN will need to support, you can then determine the data rate that must be attained in a particular area. Since received signal strength indicator (RSSI), signal-to-noise ratio (SNR), and data rate are correlated, the required data rate will tell you what the required RSSI or SNR should be, as seen at the AP from the stations. Keep in mind that stations located at the edge of the cell will automatically drop the data rate and that the data rate will increase as a station moves toward the AP.
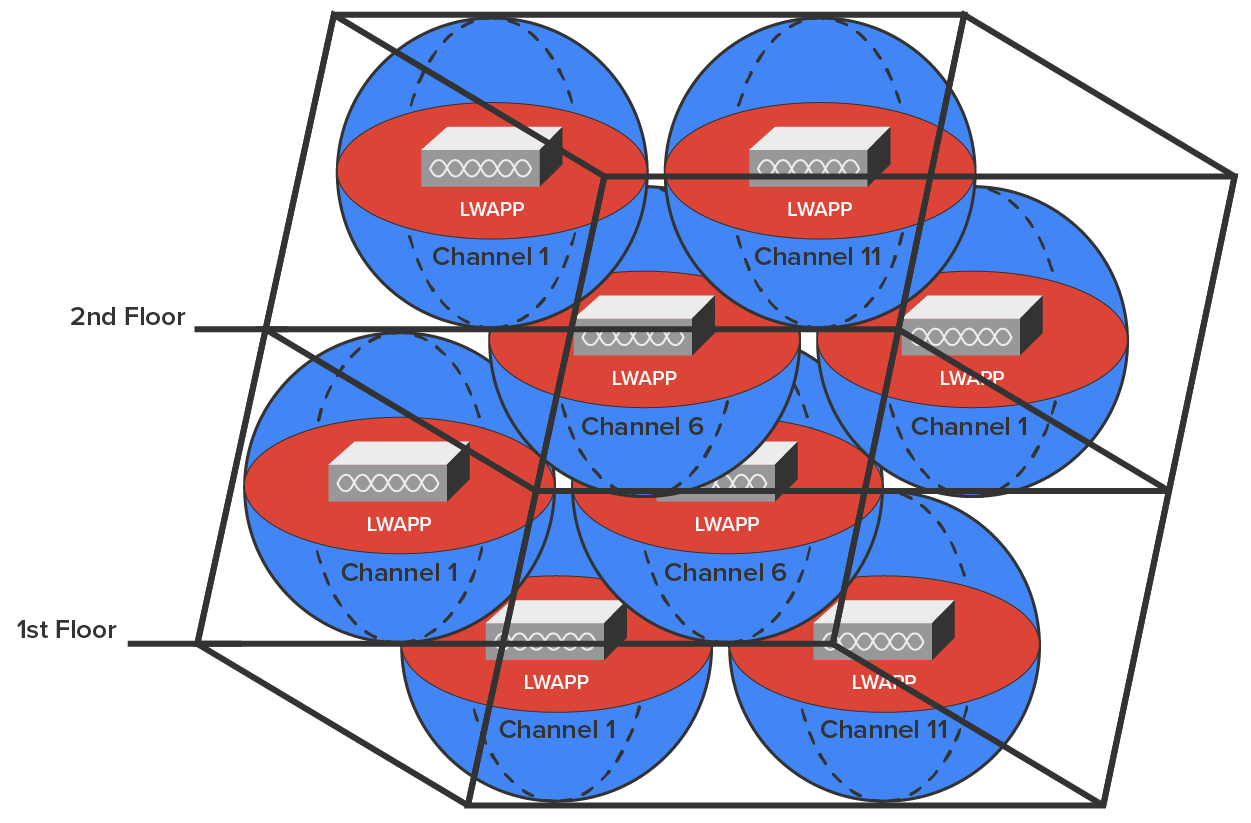
Another special challenge is found in a multistory building where WLANs are located on all floors. In these conditions, you have to think about channel usage in a three-dimensional way, and you may need to coordinate with the other administrators of different WLANs to make this work well. Facing this scenario, your channel spacing should be deployed as shown below.
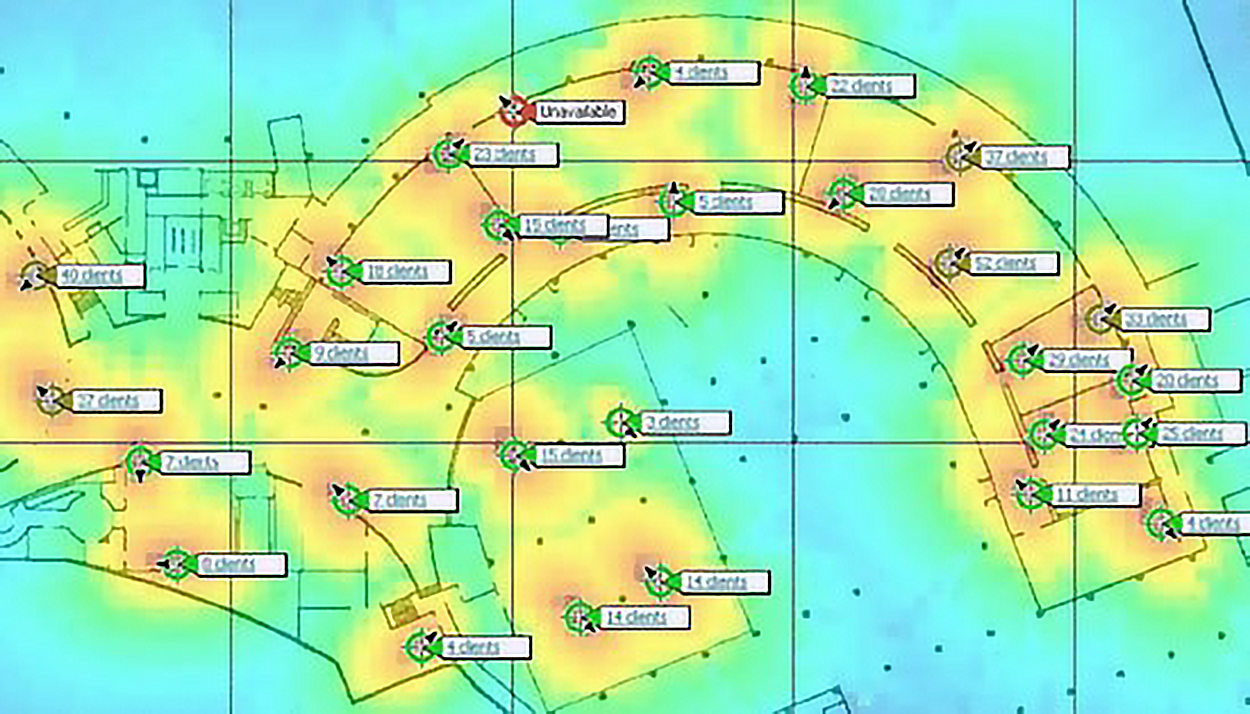
As we touched upon at the beginning of our site survey section, there are some highly specialized site survey tools that can help you achieve your goals. The AirMagnet Survey and Ekahau Site Survey tools make it possible to do a client walk-through with the unit running, and you can click each location on the map.
These tools will gather RSSI and SNR from each AP in the range, and at the end of your tour, global heat map coverage will be magically displayed, as shown below.
It is fairly simple to install 802.11 equipment. There are only two main types of components in 802.11 networks: APs and NICs. Wireless NIC installation is just like installing any other network card; however, at present, most (if not all) laptops have wireless cards preinstalled. And just as with connecting an Ethernet card to a LAN switch, you need the wireless network card to connect to an AP.
The AP installation can be fairly simple as well. Take it out of the box, connect the antenna(s) if necessary, connect the power, and then place the AP where it can reach the highest number of clients. This last part is probably the trickiest, but it really just involves a little common sense and maybe a bit of trial and error.
Configuring an AP and a NIC to work together is not as tricky as it sounds. Most wireless equipment is designed to work almost without configuration, so by default, you can pretty much turn things on and start working. The only things you need to configure are customization settings (name, network address, and so on) and security settings, and even though these are not required, it is typically best practice to configure them.
Modern Microsoft Windows computers include software to automatically configure a wireless connection, and they do so automatically when you install a wireless NIC, assuming that somehow you have a Windows machine without a wireless NIC installed on the motherboard. And if you have one without a NIC installed, your Windows machine is really old!
Once you have successfully configured your workstation(s), it is time to move on and configure the AP. There are literally hundreds of different APs out there, and of course, each uses a different method to configure its internal software. The good news is that, for the most part, they all follow the same general patterns.
Out of the box, the AP should come configured with an IP address that’s usually something similar to 192.168.1.1. But check the documentation that comes with the AP to be sure. You can just take the AP out of its box, plug it into a power outlet, and connect it to your network, but in order to manage the AP, you’ve got to configure its IP address scheme to match your network addressing scheme.
Once you have successfully connected to the AP, you then get to configure its parameters.
Although it is not a requirement, it is best practice to enable security right from the start as soon as you turn on the AP. Commercial APs typically come configured as an open network so that it is easy to log in, whereas enterprise APs come unconfigured and do not work until they are configured.
Wired Equivalent Privacy (WEP) and Wi-Fi Protected Access (WPA) allow data to be encrypted before they are sent over the wireless connection, and all configuring entails is to enable this and pick a key to be used for the connections. Simple, easy-to-configure security is certainly worth your time! WPA3, which is the third version of the protocol, is much more secure than WEP, WPA, and WPA2. You’ll learn more about wireless security in a future tutorial.
First, you will enter one or more human-readable passphrases called shared keys, which are secret passwords that will never be sent over the wire. After entering each one, you will generally click a button to initiate a one-way hash to produce a WEP key of a size related to the number of bits of WEP encryption you want.
Most configuration utilities enable you to create multiple keys in case you want to grant someone temporary access to the network but still want to keep the primary passphrase a secret. You can just delete the key you enabled to permit temporary access after you don't need it anymore without affecting access by any primary LAN participants.
Source: This content and supplemental material has been adapted from CompTIA Network+ Study Guide: Exam N10-007, 4th Edition. Source Lammle: CompTIA Network+ Study Guide: Exam N10-007, 4th Edition - Instructor Companion Site (wiley.com)