Table of Contents |
Before microbes can be viewed under a microscope, it is generally necessary to prepare them for the best view. The exact steps of preparation depend on why the microorganism is being viewed and the type of microscope being used.
A wet mount, as shown in the two images below, is a simple preparation used for light microscopy. A drop of liquid containing the specimen is placed on a slide. Specimens of interest are often liquid. For example, water (from ponds, oceans, rivers, municipal water supplies, etc.) and urine are often used to make wet mounts. If a sample is solid, such as a skin scraping or food sample, then a small amount can be placed on the slide before a drop of liquid is added. After a liquid sample is on the slide, a cover slip is placed on top before viewing.
Although water is commonly used as the liquid for wet mounts (image (a) below), stains can also be used (image (b) below). Stains are taken up more by some structures than others. Therefore, stains are helpful because they improve contrast and can be chosen to distinguish structures of particular interest. This makes it important to understand the properties of different stains and what types of structures they bind to.

A wet mount can be used to view living organisms. This allows patterns of movement to be viewed. For eukaryotes, feeding behaviors may also be studied. Although most stains kill the organism, some stains are available that can be used with living organisms prepared using a wet mount.
Although wet mounts have advantages in some cases, such as when it is important to view the movement of an organism, they can also have disadvantages. For example, there may be reasons why it is preferable to stop chemical reactions or to hold a microbe in a particular location. It may also be necessary to use a stain that kills the microbe of interest in order to see particular structures or distinguish between microbes. When stains are used, it is important not to wash the specimens off of the slide in the process.
In other cases, such as when it is not necessary to view living organisms or when a slide may be rinsed repeatedly in a way that could wash off specimens, fixation is used instead of a wet mount. This process attaches microbes to a slide, fixing them in place. Additionally, fixation kills microbes, which stops their metabolism.
EXAMPLE
The two major types of fixation are heat and chemical fixation.In many cases, specimens are stained before viewing. Because many microorganisms are relatively translucent, stains are often used to improve contrast. Stains can also be used to distinguish structures of particular interest or to aid in classifying and identifying bacteria.
Stains, or dyes, contain salts made up of a positive ion and a negative ion. Depending on the type of dye, the positive or the negative ion may be the chromophore (i.e., the colored ion) and the uncolored ion is called the counter ion. If the chromophore is the positively charged ion, the stain is classified as a basic dye. If the negative ion is the chromophore, the stain is considered an acidic dye.
IN CONTEXT
Dyes are selected for staining based on the chemical properties of the dye and the specimen being observed. These factors determine how the dye will interact with the specimen. In most cases, it is preferable to use a positive stain that is absorbed by the cells or organisms being studied. This adds color to structures and objects of interest. In some cases, however, negative stains are helpful. A negative stain is absorbed by the background but not by the cells or organisms in the specimen. Negative staining produces an outline or silhouette of the organisms against a colorful background. Nigrosine and India ink are dyes that are commonly used for negative staining.
Be careful not to confuse positive versus negative staining with the use of positive and negative ions that was referenced previously to describe the difference between acidic and basic dyes.
Bacterial cell walls typically have a negative charge, so the positive chromophores in basic dyes tend to stick well for use in positive staining. Commonly used basic dyes for this purpose include basic fuchsin, crystal violet, malachite green, methylene blue, and safranin. When used in this way, these basic dyes act as positive stains. The negatively charged chromophores in acidic dyes are repelled by cell walls and are useful as negative stains. Examples of acidic dyes include acid fuchsin, eosin, and rose bengal.
For fluorescence microscopy, fluorescent stains are used and often diluted in liquid before application. Some dyes may attach to an antibody (immunofluorescence) or to DNA molecules (fluorescence in situ hybridization, abbreviated as FISH). Infrared dyes are used to stain specimens prior to visualization using two-photon microscopes.
A specimen can be heat-fixed by using a slide warmer like the one shown in image (a) below. Another method for heat-fixing a specimen is to hold a slide with a smear over a microincinerator, as shown in image (b). Image (c) shows a tissue sample that is fixed in a solution of formalin (also known as formaldehyde). Chemical fixation kills microorganisms in the specimen, stopping the degradation of the tissues and preserving their structure so that they can be examined later under the microscope.
 and (b): modification of work by Nina Parker; source (c): modification of work by “University of Bristol”/YouTube.")
Simple staining uses a single dye to add contrast to a structure or to distinguish structures of interest. Even if there are many types of organisms in a sample, they will all be stained in the same color if they take up the dye.
EXAMPLE
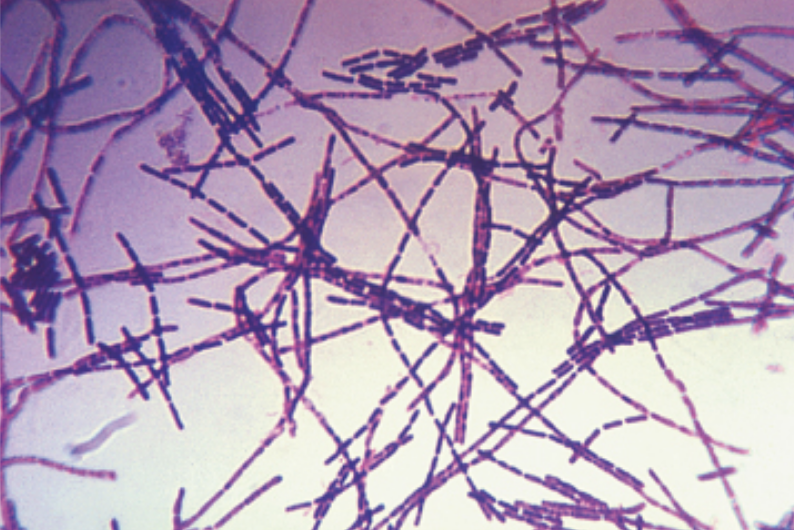
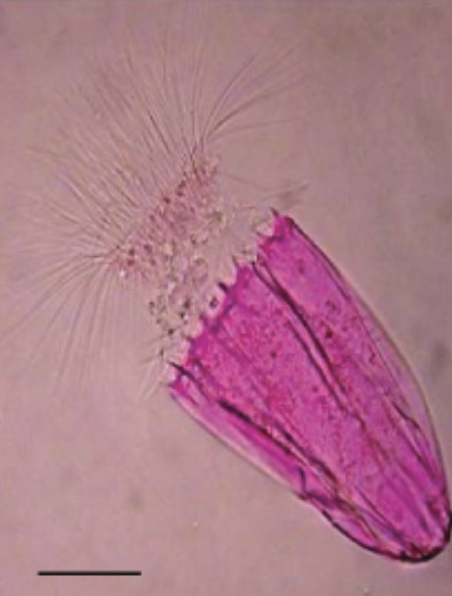
In image (a), the Bacillus anthracis cells have absorbed crystal violet, a basic positive stain. In image (b), the specimen of Spinoloricus, a microscopic marine organism, has been stained with rose bengal, a positive acidic stain. The B. megaterium in image (c) below appear to be white because they have not absorbed the negative red stain applied to the slide.: modification of work by Centers for Disease Control and Prevention; source (b): modification of work by Roberto Danovaro, Antonio Pusceddu, Cristina Gambi, Iben Heiner, and Reinhardt Mobjerg Kristensen; source (c): modification of work by Anh-Hue Tu.")
| Simple Stains | |||
|---|---|---|---|
| Stain Type | Specific Dyes | Purpose | Outcome |
| Basic stains | Methylene blue, crystal violet, malachite green, basic fuchsin, carbolfuchsin, and safranin | Stain negatively charged molecules and structures, such as nucleic acids and proteins | Positive stain |
| Acidic stains | Eosin, acid fuchsin, rose bengal, and Congo red | Stain positively charged molecules and structures such as proteins | Can be either a positive or a negative stain, depending on the cell’s chemistry |
| Simple Stains: Positive Versus Negative | |||
|---|---|---|---|
| Stain Type | Specific Dyes | Purpose | Sample Images |
| Positive stains | Crystal violet, safranin, and a variety of other acidic and basic stains | Stain structures |
|
| Negative stains | India ink, nigrosine, many acidic stains | Stain the background, not the specimen |

|
In many cases, it is helpful to distinguish between different types of cells. This is often an important first step when an appropriate medication must be chosen or to identify an organism. One way to accomplish this is using differential staining, which distinguishes between organisms based on how they interact with stains. Multiple stains are used. As a result, different organisms may stain different colors.
EXAMPLE
In clinical settings, the most important and commonly used staining techniques include Gram staining, acid-fast staining, endospore staining, flagella staining, and capsule staining. You will learn more about types of differential staining in the lesson on staining.Although the basic concepts of slide preparation are similar for electron and light microscopy, there are important differences between the techniques used. Additionally, transmission electron microscopy (TEM) and scanning electron microscopy (SEM) require different specimen preparation.
For TEM, the samples must be sliced into very thin sections. Because cells are soft, they are damaged if cut using even very sharp diamond knives. To prevent damage, cells are embedded in plastic resin and then dehydrated through a series of soaks in ethanol solutions of increasing concentration (50%, 60%, 70%, and so on). The ethanol replaces the water in the cells and the resin dissolves in ethanol and enters the cell, where it solidifies. A device called an ultramicrotome is used to cut thin sections. Next, the samples are fixed to fine copper wire or carbon-fiber grids and then stained. The stains used, such as uranyl acetate and osmium tetroxide, have electron-dense heavy metal atoms.
For SEM, the sample must usually be dehydrated even more. An ethanol series can be used, followed by critical point drying with inert liquid carbon dioxide under pressure to displace water. After drying, the specimens are sputter-coated with metal by knocking atoms off of a palladium target with energetic particles. Sputter-coating prevents specimens from being charged by the SEM’s electron beam.
In image (a) below, an ultramicrotome is used to prepare specimens for a TEM. In image (b), a technician uses an ultramicrotome to slice a specimen into thin sections.
: modification of work by “Frost Museum”/Flickr; source (b): modification of work by U.S. Fish and Wildlife Service, Northeast Region.")
Techniques used for light microscopes and electron microscopes are not appropriate for scanning tunneling microscopy (STM). Specimens viewed using STM must be on a very clean and atomically smooth surface. Mica coated with Au(111) is often used. For fixation, toluene vapor is often used.
Source: THIS TUTORIAL HAS BEEN ADAPTED FROM OPENSTAX "MICROBIOLOGY." ACCESS FOR FREE AT openstax.org/details/books/microbiology. LICENSE: CC ATTRIBUTION 4.0 INTERNATIONAL. Accessed by August 2022.
REFERENCES
Parker, N., Schneegurt, M., Thi Tu, A.-H., Lister, P., & Forster, B. (2016). Microbiology. OpenStax. Access for free at openstax.org/books/microbiology/pages/1-introduction