Table of Contents |
JavaScript can directly change how elements appear on the page using the style property. This makes it possible to update styles instantly in response to user actions, without modifying your stylesheet.
Every DOM element includes a style property, which represents its inline styles. It allows JavaScript to set or read individual CSS property values directly on an element.
EXAMPLE
You can change a single style as such as an element’s background color:In this code:const box = document.querySelector('.box');
box.style.backgroundColor = 'blue';
document.querySelector('.box') selects an element with the class box
.style.backgroundColor accesses the background-color CSS property'blue' immediately changes the element’s background color, overriding any value set in a stylesheetAdditionally, you can modify multiple style properties on the same element by accessing different properties of the style object.
EXAMPLE
Setting multiple styles on one element:In this code:const heading = document.querySelector('h1');
heading.style.color = 'navy';
heading.style.fontSize = '32px';
heading.style.textAlign = 'center';
h1 elementcolor, fontSize, and textAlign each correspond to a CSS propertyIn addition to setting styles, you can use the style property to check the current value of a CSS property. If a style is applied through a stylesheet rather than inline, the style property will not return it, so the result may be an empty string if no inline value exists.
EXAMPLE
To read the current inline style of an element, access the property without assigning a new value.const currentColor = heading.style.color;
console.log(currentColor); // Output: "navy"
style property is used to directly control inline styles on an element. It can both set new values and read existing ones, but it only reflects styles applied inline, not those from stylesheets.
index.html in your Codespace. Confirm it contains an <h1> heading and at least one <p> element; if either is missing, add them now. Open js/scripts.js.
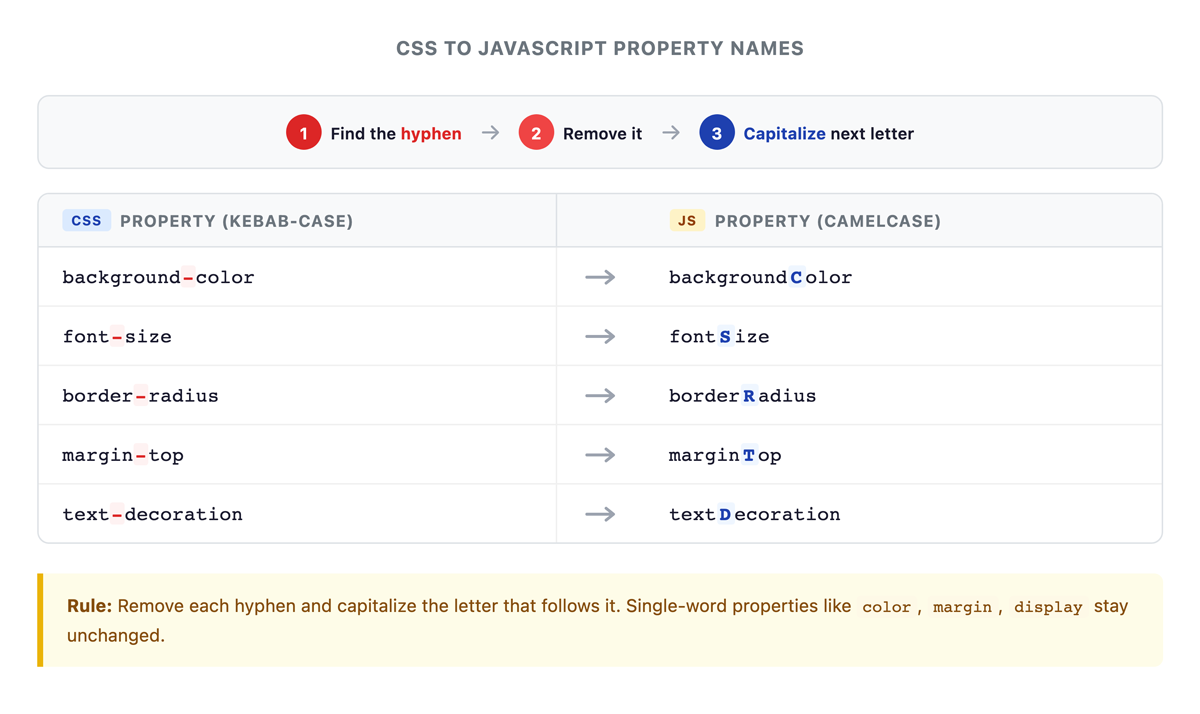
CSS property names often contain hyphens, such as background-color or font-size. JavaScript identifiers cannot contain hyphens because the hyphen character is interpreted as the subtraction operator. To bridge this gap, CSS property names are converted to camelCase when accessed through JavaScript.
The conversion follows a consistent pattern: remove the hyphen and capitalize the letter that follows it.
Using this conversion pattern, you can write CSS properties in JavaScript.
EXAMPLE
Converting CSS properties to JavaScript:In this code:const card = document.querySelector('.card');
// CSS: background-color becomes backgroundColor
card.style.backgroundColor = '#f0f0f0';
// CSS: border-radius becomes borderRadius
card.style.borderRadius = '8px';
// CSS: box-shadow becomes boxShadow
card.style.boxShadow = '0 2px 4px rgba(0, 0, 0, 0.1)';
Single-word CSS properties like color, margin, padding, and display remain unchanged because they contain no hyphens.
element.style.color = 'red';
element.style.margin = '20px';
element.style.display = 'none';
While the style property modifies individual CSS properties, the classList property allows JavaScript to work with an element’s CSS classes as a group. You can use it to add, remove, toggle, or check for classes on an element.
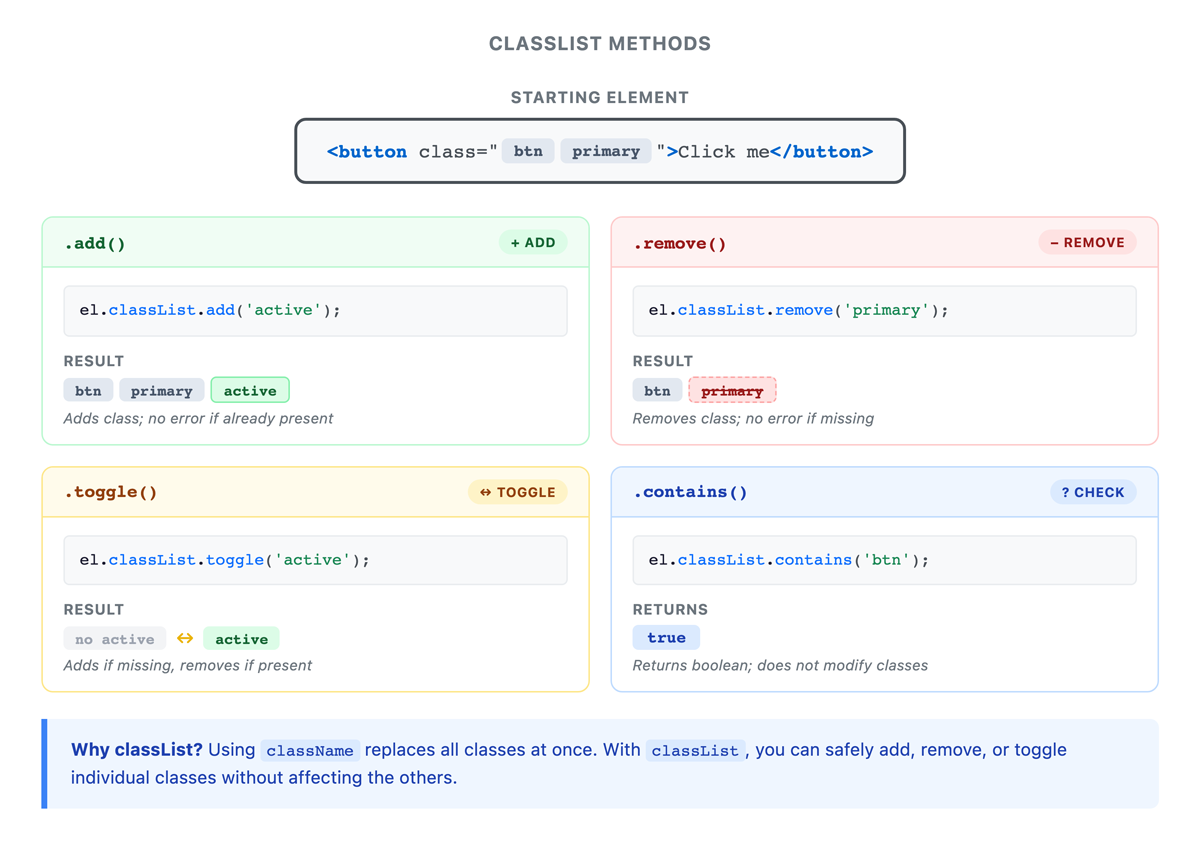
add(), remove(), toggle(), and contains().The three most commonly used classList methods are add(), remove(), and toggle(). Each method changes an element’s classes in a different way.
Use add() to apply one or more classes to an element. This is useful when you want to activate a style or state.
EXAMPLE
In this code:const button = document.querySelector('button');
button.classList.add('active');
button.classList.add('primary', 'large');
add() applies one or more classes to the elementUse remove() to take classes away from an element. This is useful when a state is no longer needed.
EXAMPLE
In this code:button.classList.remove('active');
button.classList.remove('primary', 'large'); // Remove multiple classes
remove() deletes one or more classes from the elementYou can use toggle() to switch a class on or off. This is especially useful for interactive features where something needs to change state.
EXAMPLE
Building a dark mode toggle:<button id="theme-toggle">Toggle Dark Mode</button>
Give feedback
const toggleButton = document.querySelector('#theme-toggle');
toggleButton.addEventListener('click', function() {
document.body.classList.toggle('dark-mode');});
In this code:body {
background-color: white;color: black;}
body.dark-mode {
background-color: #1a1a1a;color: white;}
toggle() switches between those states with each clickindex.html in your Codespace. If it does not already contain a <button>, add one such as:
js/scripts.js, select the button:
highlight class:
class attribute update with each click.So far, you have used classList methods to change an element’s classes. You can also check whether a class is present. The contains() method checks whether an element has a specific class. It returns true if the class is present and false if it is not. This method helps you make decisions based on an element’s current state.
The contains() method is often used with conditional statements to control behavior based on an element’s current state.
EXAMPLE
Checking class presence before acting:In this code:const menu = document.querySelector('.menu');
if (menu.classList.contains('open')) {
console.log('Menu is open');} else {
console.log('Menu is closed');}
classList.contains('open') returns a Boolean valueif statement uses that Boolean to run different code depending on the menu’s stateYou can also use contains() to control how elements are updated or styled.
EXAMPLE
Conditional styling based on class presence:In this code:const notification = document.querySelector('.notification');
function dismissNotification() {
if (notification.classList.contains('visible')) {
notification.classList.remove('visible');notification.classList.add('dismissed');}}
function first checks whether the notification has the visible classvisible is present does it remove that class and add dismissed
classList API provides four key methods: add() adds classes, remove() removes classes, toggle() switches classes on and off, and contains() checks for class presence. These methods make it easy to change an element’s appearance by leveraging CSS classes defined in your stylesheet.
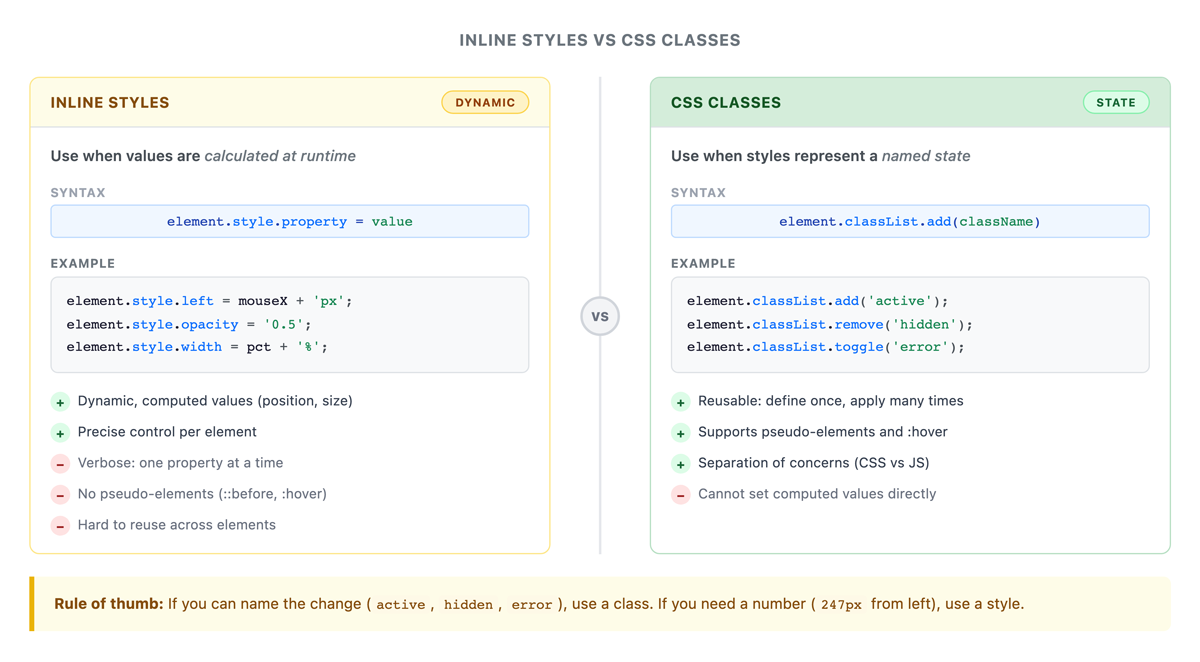
Both inline styles and CSS classes can change an element’s appearance, but each approach has distinct advantages. Choosing the right one depends on whether the value is dynamic or represents a predefined state.
Inline styles work best when you need values that are calculated at runtime—positions based on mouse coordinates, sizes computed from user input, or colors generated dynamically. Because these values cannot be predetermined in a stylesheet, setting them directly through the style property is the natural choice.
You can use inline styles to position an element based on calculated values:
EXAMPLE
Setting a dynamic position based on calculation:In this code:const tooltip = document.querySelector('.tooltip');
const mouseX = 150;
const mouseY = 200;
tooltip.style.left = mouseX + 'px';
tooltip.style.top = mouseY + 'px';
left and top values depend on runtime calculations (mouse position)'px' to the numeric valuesInline styles work well for dynamic values, but many styling changes represent fixed states. In those cases, CSS classes are a better option. Classes keep your JavaScript cleaner by centralizing style definitions in your CSS file. They also enable pseudoelements, pseudoclasses, and CSS transitions, none of which are available through inline styles.
EXAMPLE
Using classes for state changes:In this code:.button {
padding: 10px 20px;background-color: #007bff;color: white;border: none;cursor: pointer;}
.button.loading {
background-color: #6c757d;cursor: wait;}
.button.loading::after {
content: ' Loading...';}
const submitButton = document.querySelector('.button');
function startLoading() {
submitButton.classList.add('loading');}
function stopLoading() {
submitButton.classList.remove('loading');}
.loading class changes the button’s appearance and cursor to indicate a pending action::after pseudoelement appends "Loading..." text—this is only possible with CSS classes, not inline stylesThe following table summarizes when to reach for each approach:
| Criteria | Inline Styles | CSS Classes |
|---|---|---|
| Value source | Calculated at runtime | Predefined in CSS |
| Typical use | Positions, dynamic sizes, generated colors | States (active, hidden, error) |
| Pseudoelements/classes | Not available | Available |
| CSS transitions | Must be defined separately in CSS | Defined alongside the class |
| Reusability | One element at a time | Reusable across multiple elements |
| Maintenance | Values live in JavaScript | Values live in CSS |
Dynamic visual effects happen when JavaScript responds to user actions and updates styles or classes. These effects generally fall into two patterns: showing and hiding elements and providing interactive feedback.
One of the simplest visual effects is showing and hiding elements. This happens when JavaScript changes how an element is displayed in response to an action, such as a button click.
You can accomplish this by directly modifying a style property or by toggling a CSS class. Each approach has different advantages.
Using inline styles is the most direct way to show or hide an element.
EXAMPLE
Using inline style to hide an element:In this code:const modal = document.querySelector('.modal');
function hideModal() {
modal.style.display = 'none';}
function showModal() {
modal.style.display = 'block';}
display to 'none' removes the element from the page layout entirelydisplay to 'block' makes it visible againWhile inline styles work for quick changes, using CSS classes provides more flexibility and allows for smoother visual effects.
EXAMPLE
Using classes with CSS transitions:In this code:.modal {
opacity: 1;transition: opacity 0.3s ease;}
.modal.hidden {
opacity: 0;pointer-events: none;}
const modal = document.querySelector('.modal');
function hideModal() {
modal.classList.add('hidden');}
function showModal() {
modal.classList.remove('hidden');}
transition creates a smooth fade effect when the class changespointer-events: none prevents clicks on the invisible elementThese same techniques can be used to build interactive components such as menus and dropdowns.
classList.toggle() to switch the menu state.<div class="dropdown">
<button class="dropdown-button">Menu</button><ul class="dropdown-menu">
<li>Option 1</li><li>Option 2</li><li>Option 3</li></ul></div>
.dropdown-menu {
display: none;}
.dropdown-menu.open {
display: block;}
const button = document.querySelector('.dropdown-button');
const menu = document.querySelector('.dropdown-menu');
button.addEventListener('click', function() {
menu.classList.toggle('open');});
Showing and hiding elements is one type of visual effect. Another common pattern is interactive feedback, where the page responds visually to a user’s actions. These changes help users understand that something has happened, making the interface feel more responsive and intuitive.
One common form of interactive feedback is changing how a button looks while it is being pressed.
EXAMPLE
Button feedback on click:In this code:.button {
background-color: #007bff;transform: scale(1);transition: transform 0.1s ease;}
.button.clicked {
transform: scale(0.95);}
const button = document.querySelector('.button');
button.addEventListener('mousedown', function() {
button.classList.add('clicked');});
button.addEventListener('mouseup', function() {
button.classList.remove('clicked');});
mousedown event fires when the user presses the button, adding the clicked classmouseup event fires when the user releases, removing the classInteractive feedback is also useful in forms where visual changes can help users understand whether their input appears valid.
EXAMPLE
Providing validation feedback as the user types:In this code:.input-field {
border: 2px solid #ccc;}
.input-field.valid {
border-color: #28a745;}
.input-field.invalid {
border-color: #dc3545;}
const emailInput = document.querySelector('#email');
emailInput.addEventListener('input', function() {
const isValid = emailInput.value.includes('@');
if (isValid) {
emailInput.classList.remove('invalid');emailInput.classList.add('valid');} else {
emailInput.classList.remove('valid');emailInput.classList.add('invalid');}});
input event fires each time the user types a character@ symbolSo far, you’ve used class changes and event listeners to create simple visual effects. Next, you will combine these skills to build a more complete interactive interface.
interactive-cards.html in your Codespace. Add the following starter HTML:
<!DOCTYPE html><html lang="en"><head>
<meta charset="UTF-8"> <meta name="viewport" content="width=device-width, initial-scale=1.0"> <title>Interactive Cards</title> <style>body { font-family: sans-serif; padding: 20px; } .card-container { display: flex; gap: 16px; flex-wrap: wrap; } .card { border: 2px solid #ccc; border-radius: 8px; padding: 16px; width: 200px; cursor: pointer; transition: all 0.2s ease; } .card.selected { border-color: #007bff; background-color: #e7f1ff; transform: scale(1.03); } .card h3 { margin: 0 0 8px; } .card p { margin: 0; color: #555; } #status { margin-top: 16px; font-weight: bold; } </style> </head><body>
<h1>Choose Your Interests</h1> <div class="card-container" id="card-container"></div> <p id="status">No interests selected.</p> <script src="cards.js"></script> </body></html>
cards.js with the following starter code:
const container = document.querySelector('#card-container');const status = document.querySelector('#status');
index.html, and then preview your site and open the page.
document.createElement() to create at least three card elements. card to each element. innerHTML to give each card a title and description.appendChild() to add each card to the container.selected class.selected class.#status text based on the number selected.Source: THIS TUTORIAL WAS AUTHORED BY SOPHIA LEARNING. PLEASE SEE OUR TERMS OF USE.
REFERENCES
Mozilla Developer Network. (n.d.). How the web works. developer.mozilla.org/en-US/docs/Learn/Getting_started_with_the_web/How_the_Web_works