Use Sophia to knock out your gen-ed requirements quickly and affordably. Learn more
×

In Vitro Assays

Author: Sophia
what's covered
In this lesson, you will learn about a variety of laboratory tests (in vitro assays) that are used to detect antigens and antibodies. Some of these tests are very commonly encountered in laboratory and clinical settings, so it is important to recognize them and understand how they work. Specifically, this lesson will cover the following:

Table of Contents

1. Introduction

This lesson covers a range of in vitro (laboratory) tests that involve antigen–antibody reactions in varying ways. These tests can be very valuable in identifying the presence or quantity of an antigen or antibody. For example, it may be useful to know whether antiserum produced using a new approach contains a sufficiently high concentration of antibody for clinical use. Identifying antibodies in blood samples can also be used to determine whether someone has been exposed to a disease or was vaccinated against it. Detecting antigens can help in diagnosing diseases but can be used for many other purposes as well, which you will learn about in this lesson and in future lessons.


2. Precipitin Reactions

Precipitin reactions are in vitro assays (tests to detect the presence or quantity of something) that produce a visible antigen–antibody complex (called a precipitin). These reactions are generally accomplished by adding soluble antigens to a test tube containing a solution of antibodies.

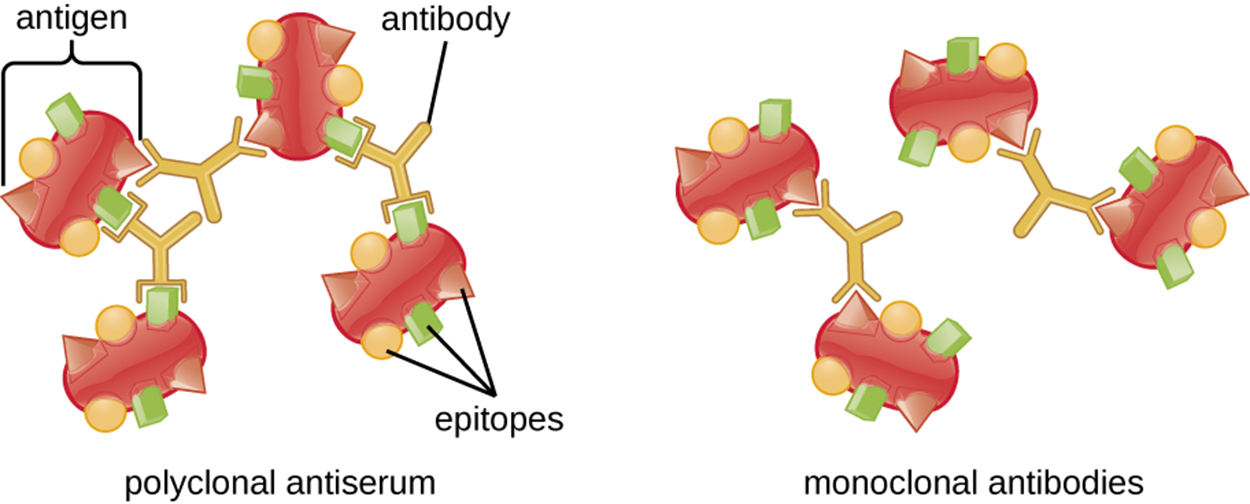
Each antibody has two arms that can bind to epitopes. When an antibody binds to epitopes on two separate antigens, then the separate antigens are bound together as they are each connected to part of the same antibody. As more and more antibodies bind, a lattice can form and this results in a precipitin.

The image below illustrates why polyclonal antibodies, rather than monoclonal antibodies, are generally used for these reactions. As the image shows, polyclonal antiserum contains antibodies that often bind to different epitopes and create stronger binding between antibodies than monoclonal antibodies that are selective for a particular epitope.

2 sets of 4 antigens. Each antigen has multiple unique epitopes on the surface. For one set of antigens, polyclonal antibodies are binding to different sets of epitopes on each antigen, linking the antigens together like a lattice. For the second set of antigens, monoclonal antibodies bind to just one of the specific unique epitopes. Because of the specificity, only 2 antigens are linked to each other, rather than forming a more complex lattice with all 4 antigens.

The amount of precipitation depends on a variety of factors. For example, antibodies with a high affinity for the antigen precipitate more than antibodies with weaker affinities.

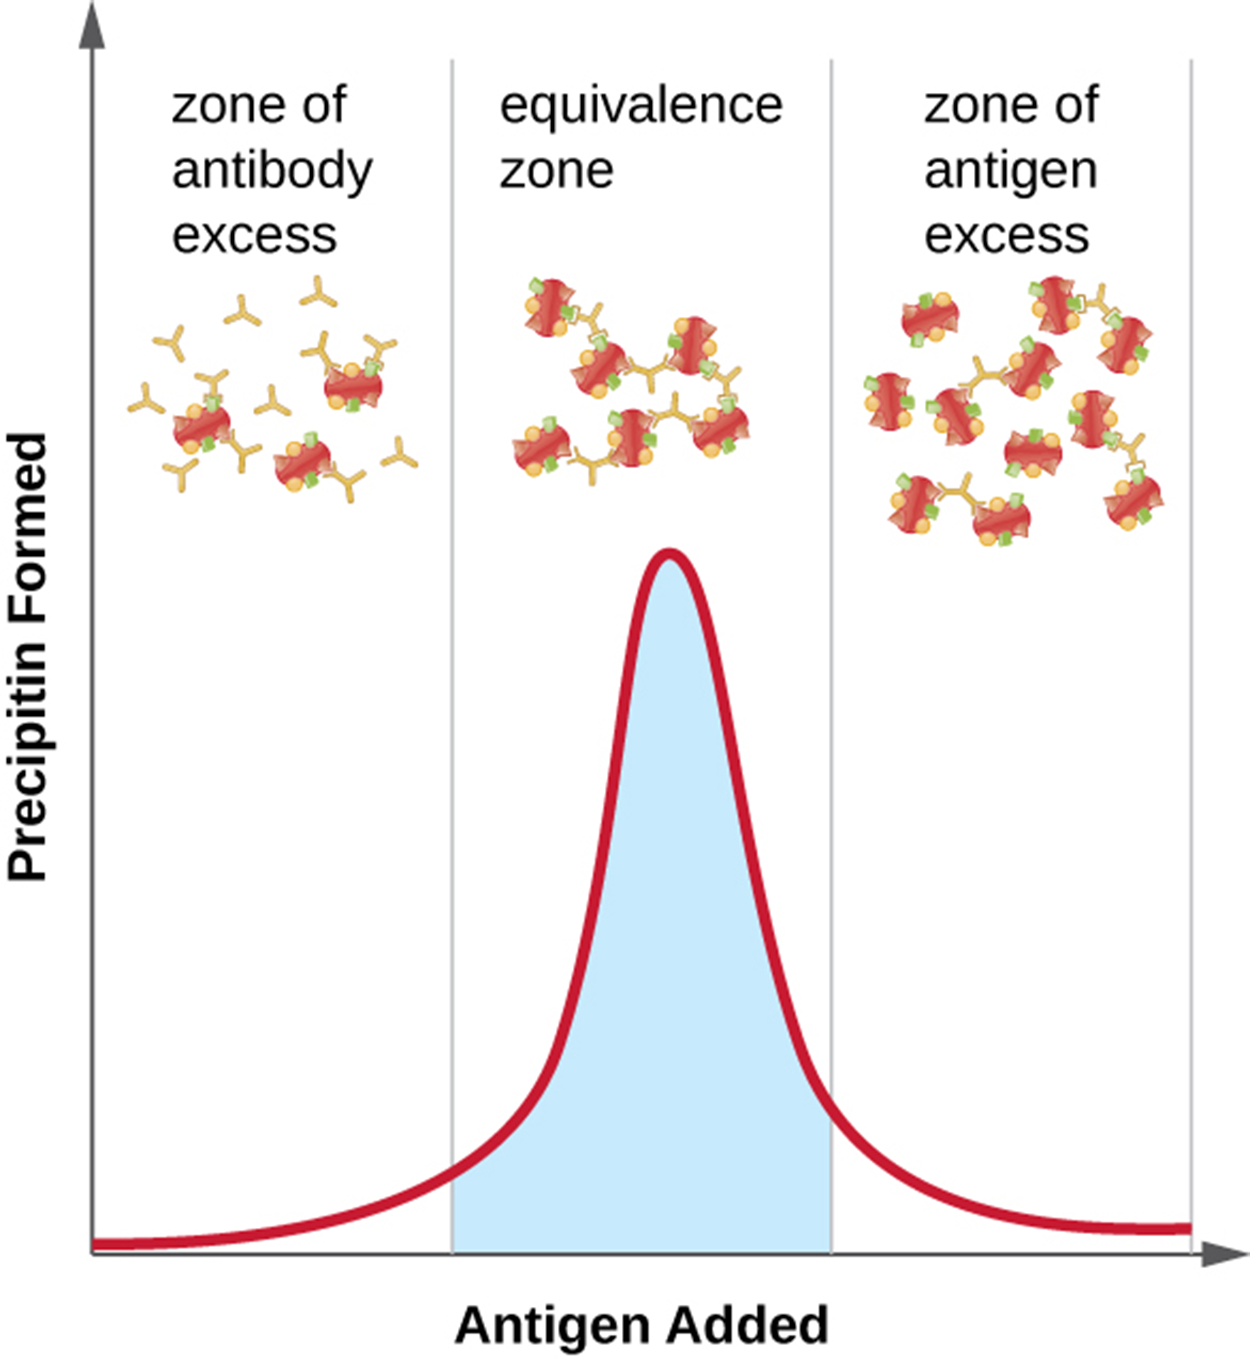
Additionally, the ratio of antibody to antigen is important and this is illustrated in the image below. The optimal ratio can vary considerably from one reaction to another and is affected by the number of epitopes on the antigen and the class of antibody.

To determine the optimal ratio, antigen is gradually added, and the amount of precipitin formed is measured quantitatively. Initially, there is an excess of antibody with relatively little antigen to bind (the zone of antibody excess). As more antigen is added, the reaction enters the equivalence zone (zone of equivalence) where optimal antigen–antibody interaction and maximal precipitation occur. If more antigen is added, the amount of antigen becomes excessive (the zone of antigen excess) and precipitation decreases.

A graph; the X-axis is labeled antigen added and Y-axis is labeled precipitin formed. In the zone of antibody excess, there is more antibody than antigen. In this case, there is no precipitate. In the equivalence zone, there are approximately equal amounts of antigen and antibody. In this case, a precipitate does form. In the zone of antigen excess, there is more antigen than antibody and no precipitate forms.

terms to know
Precipitin
A visible antigen–antibody complex.
Equivalence Zone
The range of antigen and antibody concentration at which optimal antigen–antibody interaction and maximal precipitation occur.

2a. Precipitin Ring Test

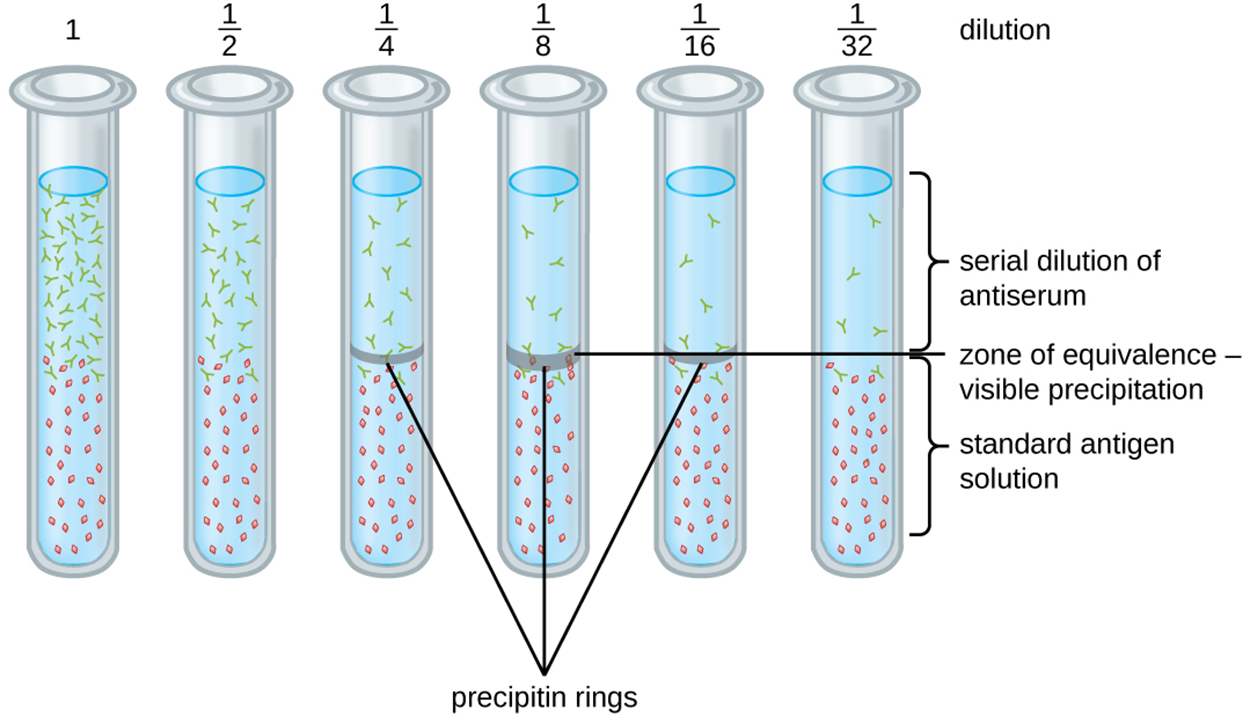
The precipitin ring test is one approach used to quantify antigen concentration or the amount of antibody present in antiserum. The steps and image below explain how this test is performed.

step by step
Step 1. A set of test tubes is prepared by adding an antigen solution to the bottom of each tube. The volume and concentration of antigen is constant across the tubes.
Step 2. Glycerol is added to each test tube. This prevents the antigen solution from mixing with antiserum that is added next, allowing interaction only where the two layers meet.
Step 3. Serial dilution of the antiserum is performed.
Step 4. A visible ring of precipitin appears at the interface between the antigen solution and the antiserum in any tubes that have an antigen–antibody ratio in the equivalence zone.
Step 5. The most dilute solution with a visible ring is used to determine the titer of the antibodies. The titer is the reciprocal of this dilution expressed as a whole number. For example, the figure below shows that precipitin rings are present at dilutions of ¼, ⅛, and 1/16. Because the highest dilution with a ring is 1/16, the titer is the reciprocal of 1/16, which equals 16.


Note that the titer gives a measure of biological activity (e.g., how strongly a patient’s antibodies respond to an antigen) but does not give an absolute amount of antibody such as mass.

Drawbacks to the precipitin ring test include the following:

  • The need for a large amount of solution
  • The need to carefully avoid mixing the solutions and disrupting the ring
terms to know
Precipitin Ring Test
A test used to quantify antigen concentration or the amount of antibody present in antiserum.
Titer (of antibodies)
The titer is a measure of the level of antibodies present in a sample and can be calculated as the reciprocal of the highest dilution in a precipitin ring test that produces a visible ring. It is expressed as a whole number.

2b. Ouchterlony Assay

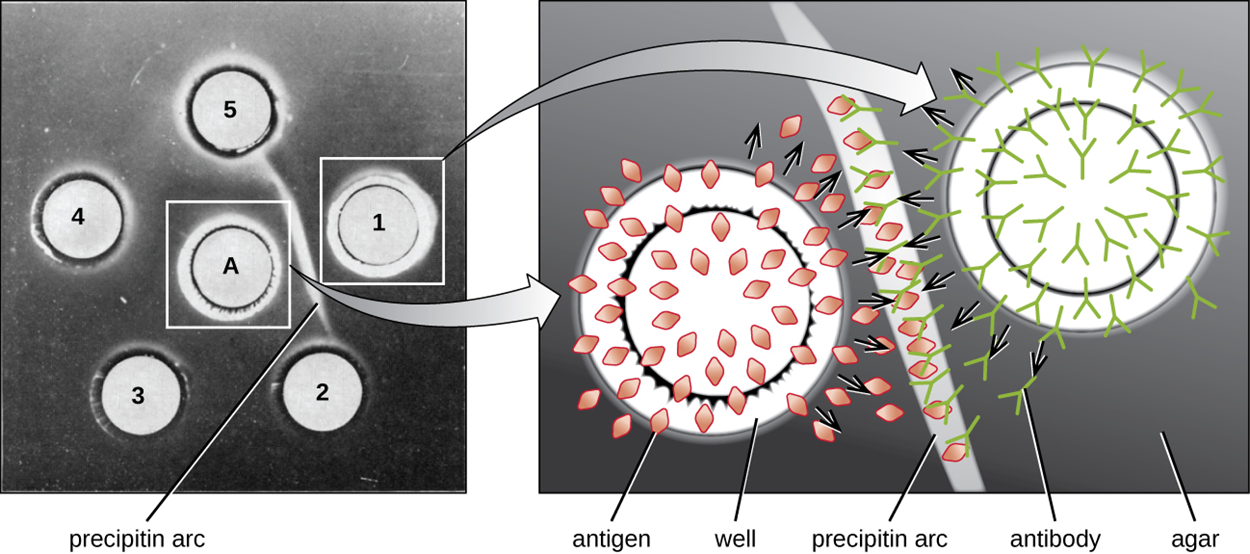
The Ouchterlony Assay (or double immunodiffusion assay) is similar to the precipitin ring test but performed using an agar gel matrix. This reduces the risk of mixing the antibody and antiserum solutions and reduces the amount of solution needed. Although more sensitive and quantitative methods are now available, this approach is a rapid, qualitative test that is especially useful in testing for cross-reactivity. The steps and image below explain the procedure.

step by step
Step 1. Holes are punched in clear agar gel, forming wells.
Step 2. Antigen and antisera are added to neighboring wells.
Step 3. Proteins diffuse through the gel, causing precipitin arcs to form between the wells at the zone of equivalence. Because the precipitin lattice is too large to diffuse through the gel, the arcs do not move and are easy to see.

To test for cross-reactivity, closely related antigens can be used with the same antiserum to determine which combinations form precipitin arcs.

The image below shows antigen in well A on the left surrounded by wells of antiserum labeled 1 through 5. A precipitin arc is visible between wells A and 1, indicating that these react. On the right, a close-up shows how the antigen and antibody move from the wells into the agar gel and bind along the precipitin arc.

term to know
Ouchterlony Assay (Double Immunodiffusion Assay)
A test that is similar to the precipitin ring test but performed using an agar gel matrix.

2c. Radial Immunodiffusion Assay

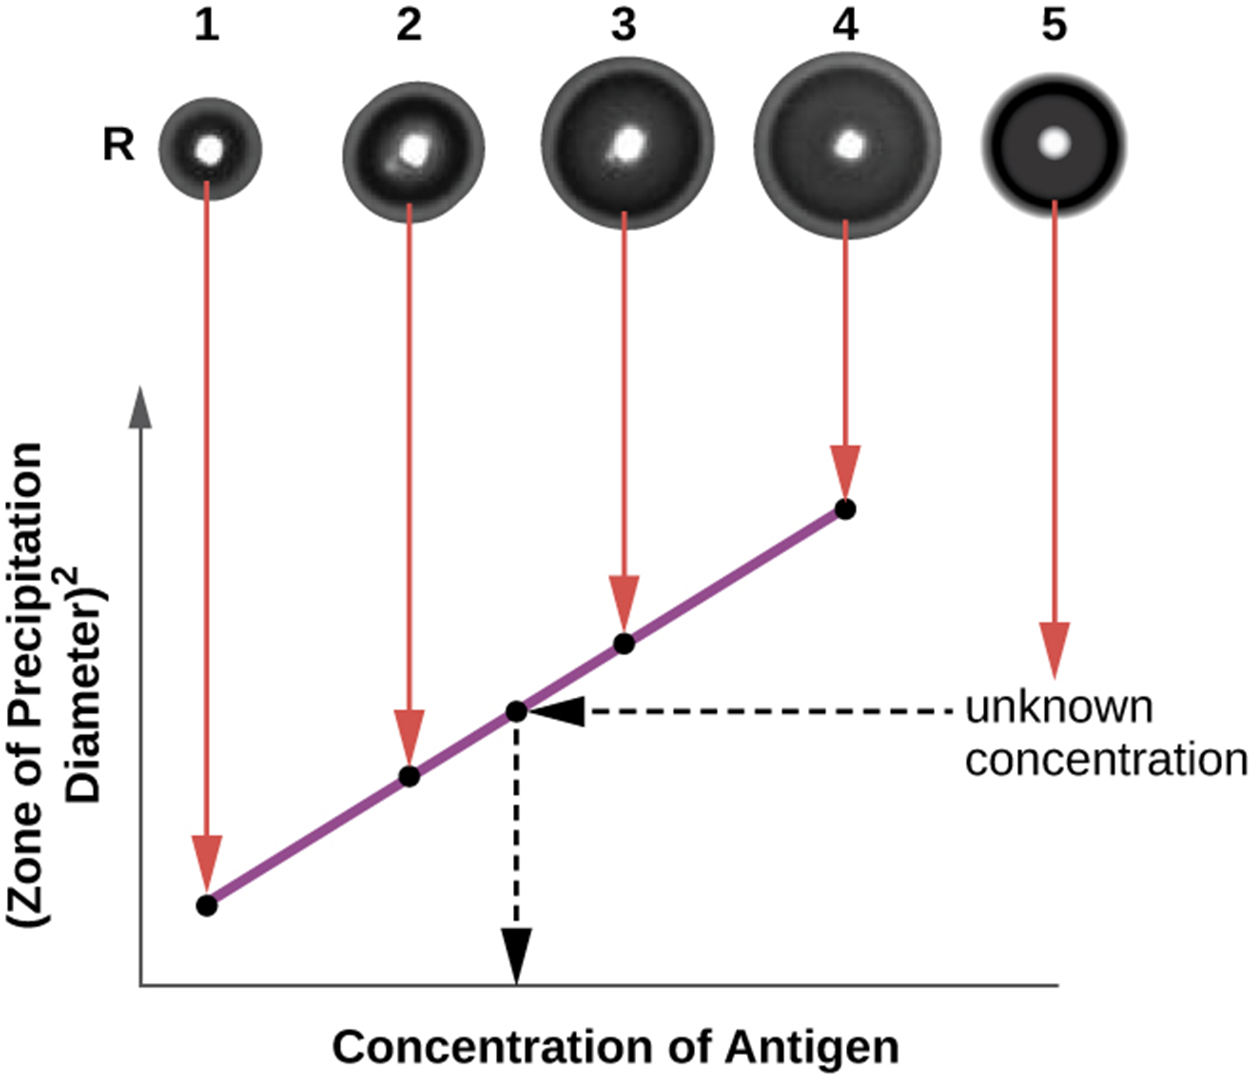
The radial immunodiffusion (RID) assay is similar to the Ouchterlony assay but is used to precisely quantify antigen concentration. The test can also be used to determine concentrations of serum proteins. The steps are summarized below and in the image.

step by step
Step 1. Antiserum is added to tempered agar (liquid agar at slightly above 45 °C).
Step 2. The mixture is poured onto a small petri dish or glass slide and allowed to cool.
Step 3. Wells are cut in the cooled agar.
Step 4. Antigen is added to the wells, and it begins to diffuse through the solid agar.
Step 5. When the antigen and antibody interact, they form a zone of precipitation. The square of the diameter of the zone of precipitation is directly proportional to the concentration of antigen.
Step 6. The value obtained in step 5 is compared with values obtained from samples of known antigen concentration. These standard samples are used to produce a standard curve for determining the concentration of the unknown solution.

The image shows four wells (numbered 1 through 4) containing antigen samples of known concentration. They are used to produce a standard curve relating the concentration of antigen to the zone of precipitation diameter squared. Well 5 contains an antigen sample of unknown concentration that can be compared to the standard curve to determine its antigen concentration.

At the top is a photograph of 4 clear dots in a row. Dot 1 has a small ring around it, dot 2 has a larger ring, dot 3 has a larger ring, and dot 4 has an even larger ring. These have arrows leading to a graph that shows that the size of the ring (zone of precipitation diameter)  relates to the concentration of antigen. The lower antigen concentration results in a smaller ring.  Another dot (#5) off to the side contains an unknown antigen concentration. The size of the ring is measured and used to find the concentration of antigen. This is done by finding the ring size on the line from the graph and connecting that to the X-axis to find the concentration of antigen.

term to know
Radial Immunodiffusion (RID) Assay
A test that is similar to the Ouchterlony assay but is used to precisely quantify antigen concentration. The test can also be used to determine concentrations of serum proteins.

3. Flocculation Assay

A flocculation assay is similar to a precipitin reaction except that it involves insoluble antigens such as lipids that produce flocculants instead of precipitins. A flocculant is a lattice of antigen and antibody visible as flocculation (foaming) in the test tube fluid.

terms to know
Flocculation Assay
An assay similar to a precipitin reaction except that it involves insoluble antigens such as lipids that produce flocculants instead of precipitins.
Flocculant
A lattice of antigen and antibody visible as flocculation (foaming) in the test tube fluid.

4. Neutralization Assay

Neutralizing antibodies coat virions and prevent them from binding and infecting cells. In some cases, large antibody–virus complexes can form that can be removed by phagocytosis. Neutralization can be used in neutralization assays, which can be used to diagnose viral infections.

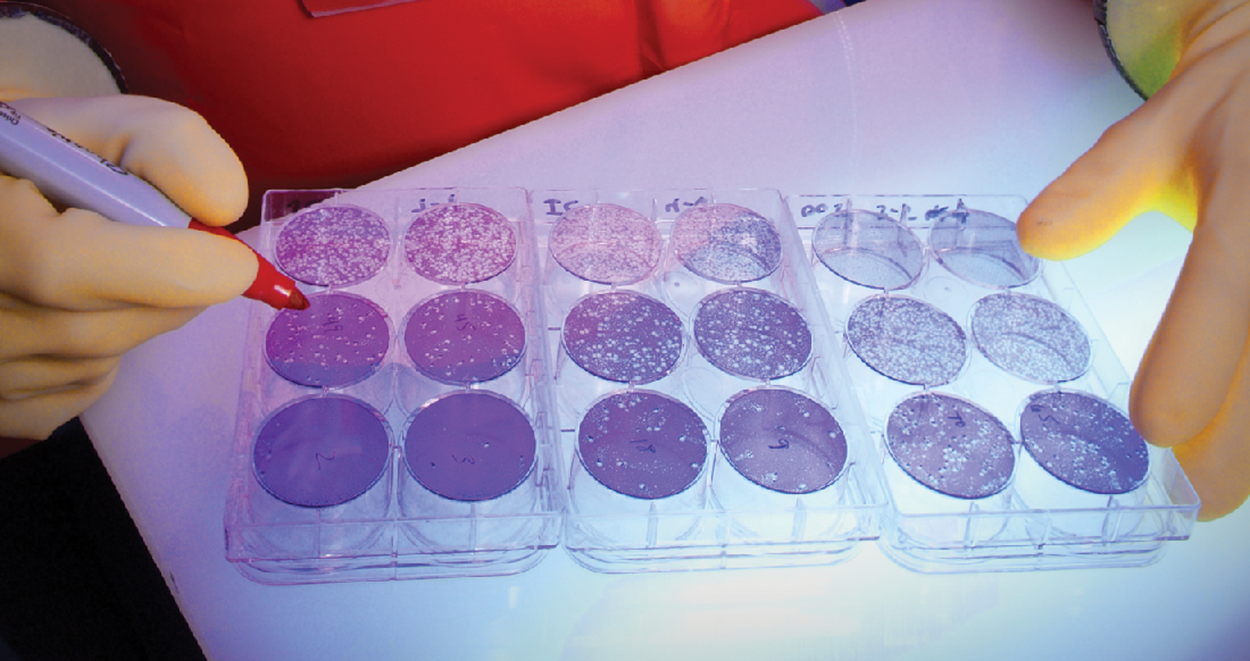
When viruses do infect cells, they often cause damage and sometimes cause lysis (bursting) or death. Changes in cells caused by viral infection (cytopathic effects) can be visualized by growing host cells in a petri dish, covering the cells with a thin layer of agar, and then adding viruses. As the viruses spread and kill cells, clear areas form.

The steps of a neutralization assay are summarized below.

step by step
Step 1. A serial dilution is carried out on a serum sample from a patient.
Step 2. Each dilution is mixed with a standardized amount of the suspect virus. Any virus-specific antibodies in the serum will neutralize some of the virus.
Step 3. The suspensions are added to host cells to allow any non-neutralized virus to infect the cells and form plaques (clear areas of dead cells) after several days.
Step 4. The titer is determined by calculating the reciprocal of the highest dilution showing a 50% reduction in plaques. Titer is always expressed as a whole number.
Step 5. If antibodies are present, then the patient has been exposed to the virus. However, the infection may have occurred in the past and may not be active at the time of testing. If two samples are tested two weeks apart and there is a fourfold increase in the second sample, then this is evidence of a new infection.

The image below shows an example of a neutralization assay. The clear areas in the wells represent plaques where viruses have killed cells. Therefore, these are areas with higher numbers of active viruses than wells without clear patches. The wells contain patient serum and therefore the assay shows whether the patient has high concentrations of virus-neutralizing antibodies (and therefore a well with few or no clear areas) or low to nonexistent concentrations of virus-neutralizing antibodies (and therefore a well with large or entirely clear areas).

A photograph of wells showing a smooth purple background with white spots.


5. Immunoelectrophoresis

Immunoelectrophoresis (IEP) can be used to examine abnormal protein electrophoresis patterns. As discussed in earlier lessons, electrophoresis involves placing samples on a gel and applying an electrical current. Proteins travel through the gel at varying rates depending on their size and charge.

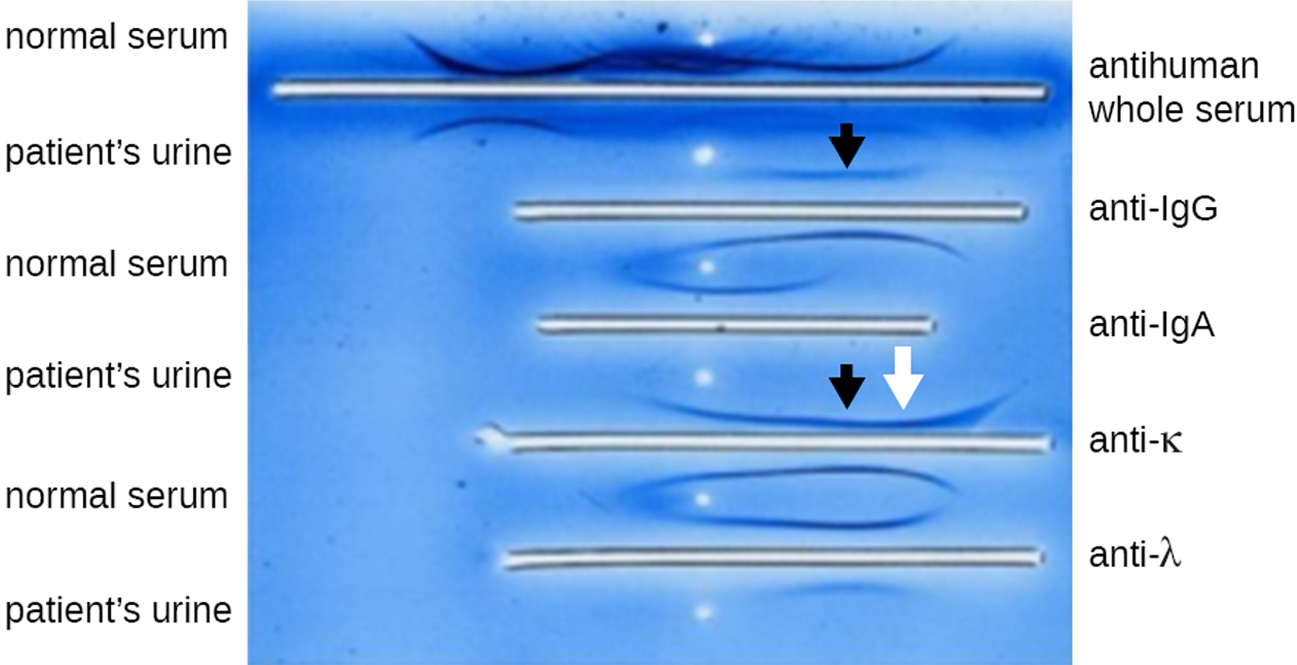
The first step in IEP is to use a polyacrylamide gel electrophoresis (PAGE) assay to separate proteins in a sample. Next, antisera against selected serum proteins can be added to troughs running parallel to the electrophoresis track. When antibodies and protein antigens interact, precipitin arcs form. This allows proteins of interest to be identified.

The photo below shows an IEP of urine. After electrophoresis, antisera were added to the troughs and precipitin arcs formed. The arrows indicate skewed arcs (those that are different from normal serum), which are helpful in diagnosing multiple myeloma. This is a cancer of antibody-secreting cells that causes the cells to produce abnormal antibodies called monoclonal proteins (M proteins) instead of healthy antibodies. These M proteins cause the distinctive skewed arcs shown in the photo.


A photograph showing various white lines on a blue background. The sources of the samples producing the lines are listed on the left from top to bottom as three sets of normal serum and patient urine. Each of these labels is associated with a horizontal line that has varying precipitin arcs above and below. The lines are labeled with antisera from top to bottom as follows: anti-human whole serum, anti-IgG, anti-IgA, anti-kappa, and anti-lambda. There are arrows indicating skewed arcs above the second and fourth lines. Black arrows point to the patient’s sample next to anti-IgG and anti-kappa. A white arrow points to the band from the patient near anti-kappa.

term to know
Immunoelectrophoresis (IEP)
A procedure that can be used to examine abnormal protein electrophoresis patterns by adding antisera to troughs running parallel to the electrophoresis track to look for abnormal precipitin arcs.

6. Immunoblot Assay

Protein gel electrophoresis can be followed by the addition of antibodies to identify specific proteins. This technique, described in the steps below, is called the western blot.

step by step
Step 1. PAGE is used to separate proteins on an electrophoresis gel.
Step 2. Protein antigens in the gel are transferred to a nitrocellulose membrane, immobilizing them.
Step 3. The nitrocellulose membrane is exposed to a primary antibody produced to bind to the protein of interest.
Step 4. A second antibody equipped with a molecular beacon (i.e., something that makes it visible) is added to bind to the first antibody (primary antibodies can also be tagged with a molecular beacon in some cases). Molecular beacons can be enzymes that will react with a chromogenic substrate to produce a color if the antibody is present. They can also be fluorophores (molecules that fluoresce when excited by light). The beacon indicates the location of the specific protein in the membrane.

The image below shows the steps of a western blot in part (a) and an example of a western blot test for antibodies to HIV in part (b). The bands on the western blot indicate the presence of the protein of interest, which takes up stain.

(a) A diagram showing the process of a western blot. Step 1 – a gel is on top of a nitrocellulose membrane and filter paper is on either side. This is all sandwiched between positive and negative plates. If the proteins are hydrophobic, use PVDF membrane instead of nitrocellulose. This causes the proteins to bind to the membrane. At this point there are many protein bands. Then, antibodies specific to the protein of interest are added. They bind to one of the protein bands on the membrane. Next, labeled antibodies bind to the first set of antibodies. This results in a single visible band. (b) A photo of the results shows dark bands on a white membrane.

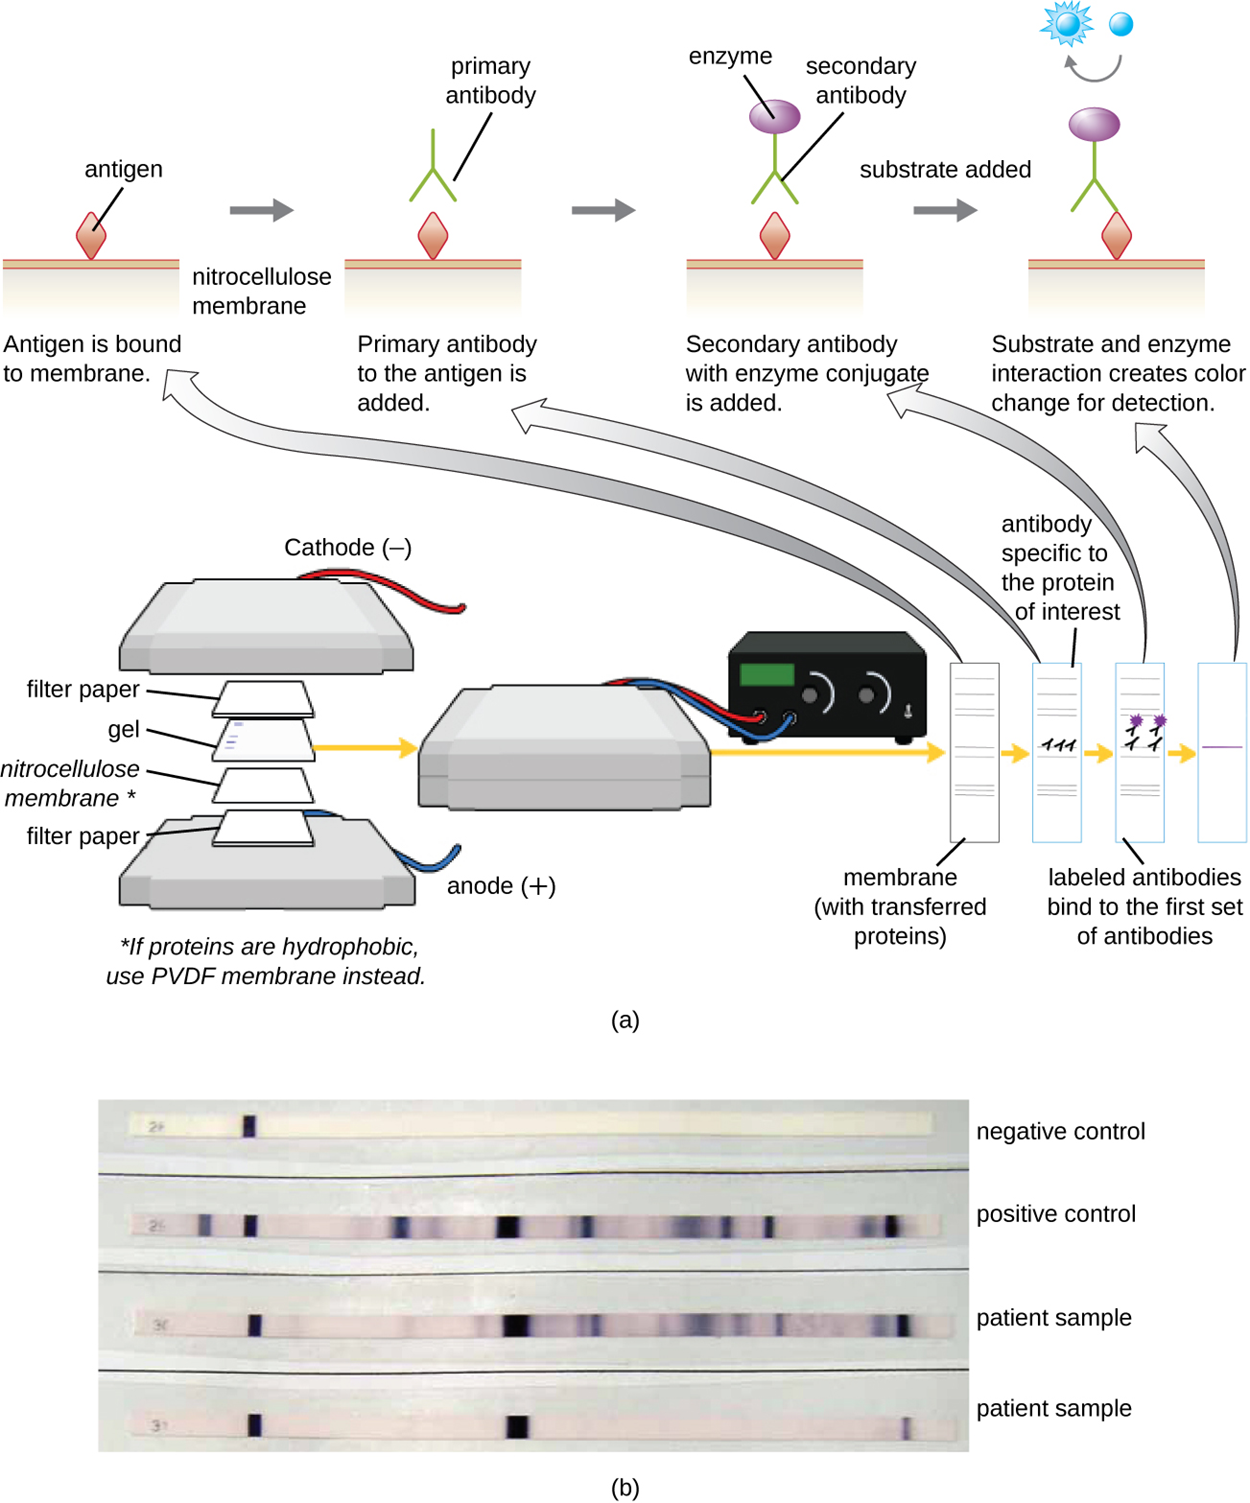
Polyclonal antibodies are generally used for western blot assays because they are able to bind to multiple epitopes of the primary antigen and are therefore more sensitive than monoclonal antibodies. However, monoclonal antibodies can also be used when there is a need to target specific epitopes.

term to know
Western Blot
Protein gel electrophoresis followed by the addition of antibodies to identify specific proteins.

7. Complement-Mediated Immunoassay

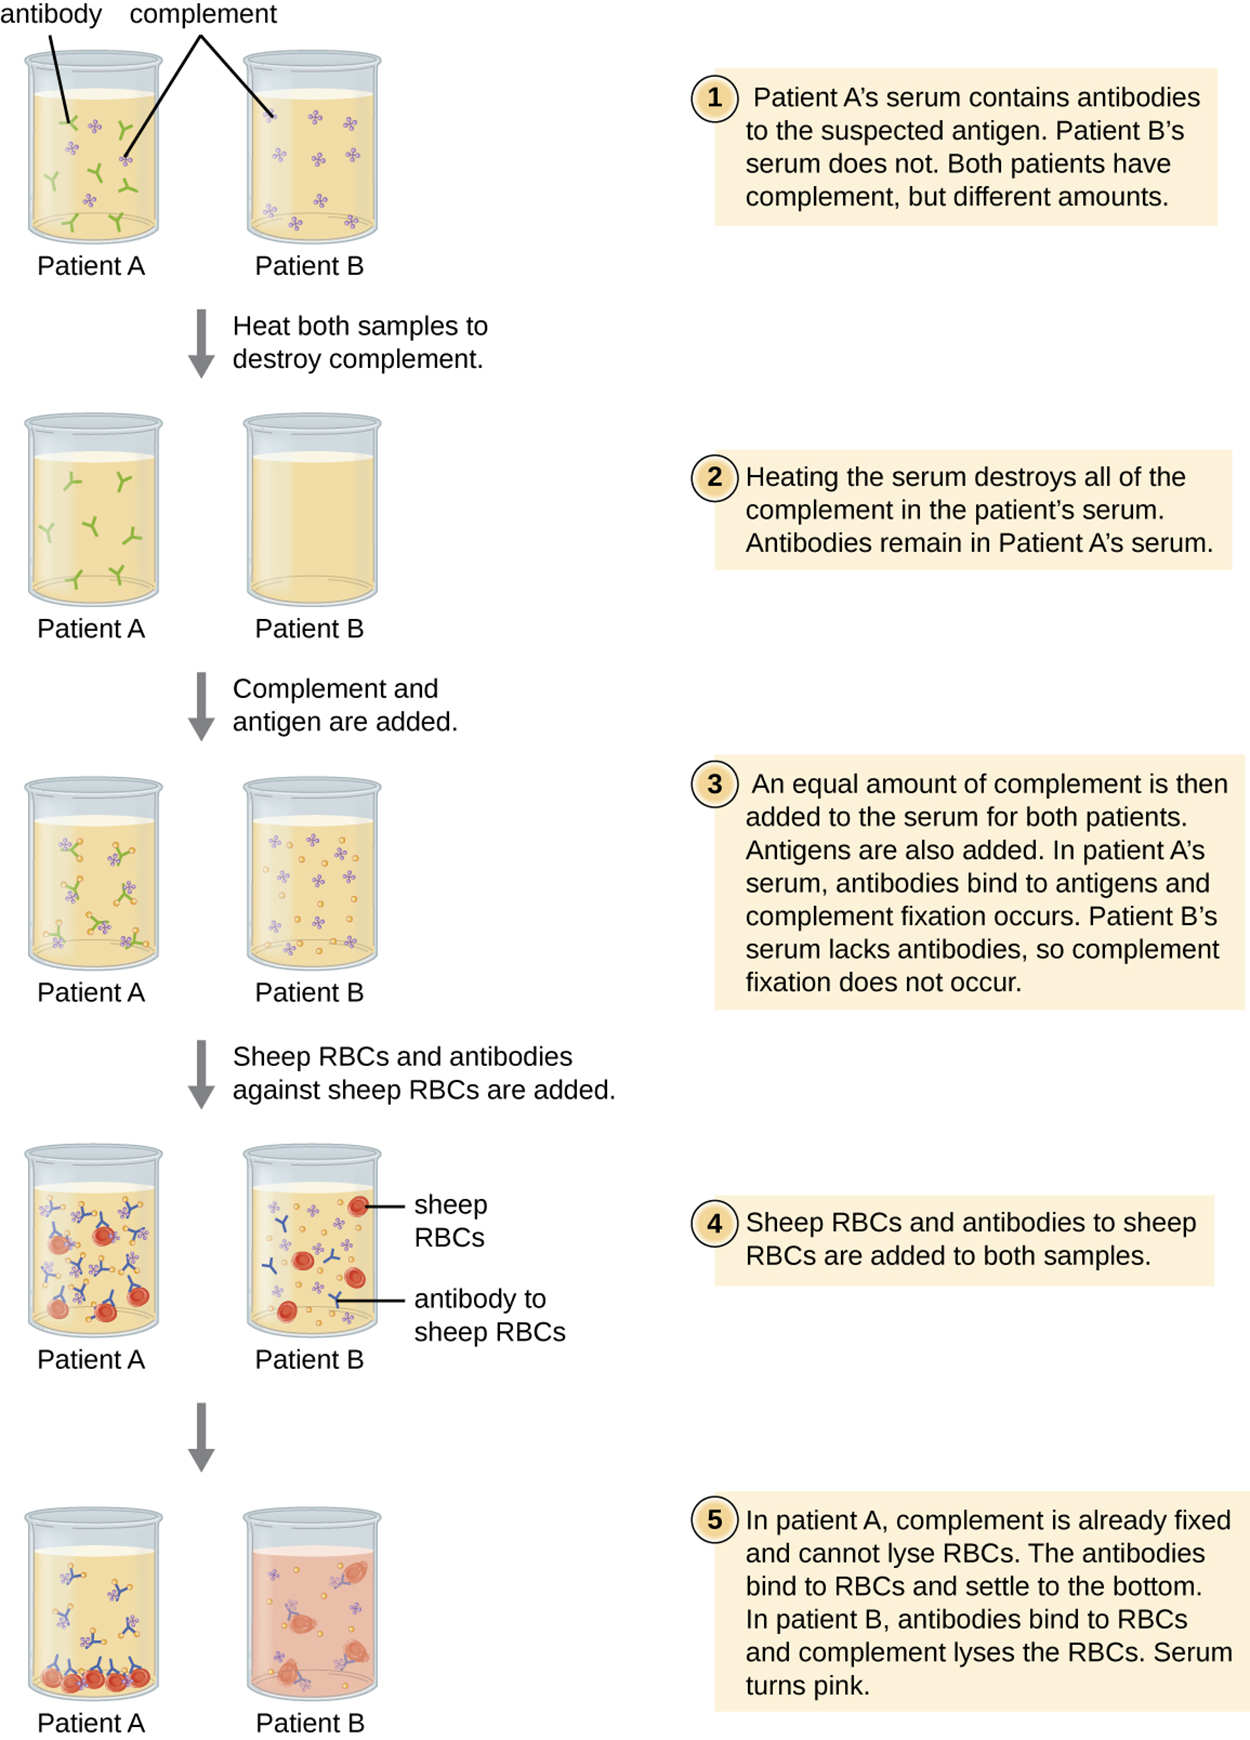
A complement fixation test allows the detection of antibodies against specific pathogens, including those that are difficult to culture in the lab. This test is possible because an important function of antibodies is to activate complement and initiate the complement cascade. Complement proteins play a variety of roles, including lytic activity that can be used to detect the presence of antibodies against specific antigens in serum.

In the complement fixation test, red blood cells are often used as indicator cells because they release the red pigment hemoglobin upon lysis, and even a small number of lysed cells release enough hemoglobin to produce a pink color.

The test is explained in the steps and image below. The steps summarize the major events, whereas the figure provides more detail about how the test is performed in a specific example.

step by step
Step 1. Antigen from a pathogen is added to the patient serum. If antibodies to the antigen are present, the antibody will bind the antigen and fix all of the available complement.
Step 2. When red blood cells and antibodies against red blood cells are added, there will be no complement left to lyse the red blood cells, and the solution will remain clear (a positive result). If complement is still present, the red blood cells will lyse, and the solution will turn pink (a negative result).

Diagram of the complement fixation test. 1. Patient A’s serum contains antibodies to the suspected antigen. Patient B’s serum does not. Both patients have complement, but different amounts. 2. Heating the serum destroys all of the complement in the patient’s serum. Antibodies remain in patient A’s serum. 3. An equal amount of complement is then added to the serum for both patients. Antigens are also added. In patient A’s serum, antibodies bind to antigens and complement fixation occurs. Patient B’s serum lacks antibodies, so complement fixation does not occur. 4. Sheep RBCs and antibodies to sheep RBCs are added to both samples. 5. In patient A, the complement is already fixed and cannot lyse RBCs. The antibodies bind to RBCs and settle to the bottom. In patient B, antibodies bind to RBCs and complement lyses the RBCs. The serum turns pink.

The table below compares the mechanisms of assays discussed in this lesson and provides examples of each.

Mechanisms of Select Antibody–Antigen Assays
Type of Assay Mechanism Examples
Precipitation Antibody binds to soluble antigen, forming a visible precipitin Precipitin ring test to visualize lattice formation in solution
Immunoelectrophoresis to examine distribution of antigens following electrophoresis
Ouchterlony assay to compare diverse antigens
Radial immunodiffusion assay to quantify antigens
Flocculation Antibody binds to insoluble molecules in suspension, forming visible aggregates VDRL (Venereal Disease Research Laboratory) test for syphilis
Neutralization Antibody binds to virus, blocking viral entry into target cells and preventing formation of plaques Plaque reduction assay for detecting the presence of neutralizing antibodies in patient sera
Complement activation Antibody binds to antigen, inducing complement activation and leaving no complement to lyse red blood cells Complement fixation test for patient antibodies against hard-to-culture bacteria such as Chlamydia

term to know
Complement Fixation Test
A test that uses the effect of antibodies on complement to allow the detection of antibodies against specific pathogens, including those that are difficult to culture in the lab.

make the connection
If you're taking the Microbiology Lab course simultaneously with this lecture, it's a good time to try the “Western Blot Transfer: Prepare for protein detection” Activity in Unit 6 of the Lab course. Good luck!

summary
In this lesson, you learned about a variety of in vitro tests used to detect antibodies and antigens. After an introduction, you learned about tests that use precipitin reactions in which antibodies and antigens form lattices that precipitate. These tests include the precipitin ring test, the Ouchterlony assay, and the radial immunodiffusion assay. Next, you learned about the flocculation assay, which can be used for insoluble antigens such as lipids that do not precipitate but instead produce a foamy appearance (flocculant). You also learned about the neutralization assay, which detects whether neutralizing antibodies are present to inhibit virions from binding to and infecting cells. Next, you learned about immunoelectrophoresis that uses antisera to produce distinctive precipitin arcs that identify the presence of proteins of interest. This test is especially useful in diagnosing multiple myeloma. After learning about an immunoblot assay, the western blot, and how antibodies can be used to detect proteins of interest in an electrophoresis gel, you learned how the role of antibodies in activating complement can be used to detect pathogens that are difficult to culture using complement-mediated immunoassays. These are examples of some of the many ways that antibody–antigen interactions can be useful in clinical and research settings. In future lessons, you will learn about more examples of ways that antibody–antigen interactions are used.


Source: THIS CONTENT HAS BEEN ADAPTED FROM OPENSTAX’s “MICROBIOLOGY”. ACCESS FOR FREE AT openstax.org/details/books/microbiology.

Terms to Know
Complement Fixation Test

A test that uses the effect of antibodies on complement to allow the detection of antibodies against specific pathogens, including those that are difficult to culture in the lab.

Equivalence Zone

The range of antigen and antibody concentration at which optimal antigen–antibody interaction and maximal precipitation occur.

Flocculant

A lattice of antigen and antibody visible as flocculation (foaming) in the test tube fluid.

Flocculation Assay

An assay similar to a precipitin reaction except that it involves insoluble antigens such as lipids that produce flocculants instead of precipitins.

Immunoelectrophoresis (IEP)

A procedure that can be used to examine abnormal protein electrophoresis patterns by adding antisera to troughs running parallel to the electrophoresis track to look for abnormal precipitin arcs.

Ouchterlony Assay (Double Immunodiffusion Assay)

A test that is similar to the precipitin ring test but performed using an agar gel matrix.

Precipitin

A visible antigen–antibody complex.

Precipitin Ring Test

A test used to quantify antigen concentration or the amount of antibody present in antiserum.

Radial Immunodiffusion (RID) Assay

A test that is similar to the Ouchterlony assay but is used to precisely quantify antigen concentration. The test can also be used to determine concentrations of serum proteins.

Titer (of antibodies)

The titer is a measure of the level of antibodies present in a sample and can be calculated as the reciprocal of the highest dilution in a precipitin ring test that produces a visible ring. It is expressed as a whole number.

Western Blot

Protein gel electrophoresis followed by the addition of antibodies to identify specific proteins.