Table of Contents |
Modern browsers can automatically check form input when a user submits a form. By adding validation attributes directly in your HTML, you can prevent empty or incorrectly formatted submissions without writing JavaScript.
Client-side validation happens in the web browser before the form is submitted. When a user clicks the submit button, the browser checks each field against the rules you added, such as required or pattern. If a field does not meet those rules, the form does not submit, and the browser displays a validation message.
This immediate feedback helps users correct mistakes quickly and reduces frustration by catching problems early.
When a user submits a form, the browser performs validation in a specific sequence:
EXAMPLE
Consider the following form:In this code:<form action="/signup" method="post">
<label for="email">Email Address:</label><input type="email" id="email" name="email" required><button type="submit">Sign Up</button></form>
type="email" attribute tells the browser to check for a valid email format. required attribute prevents submission if the field is empty. 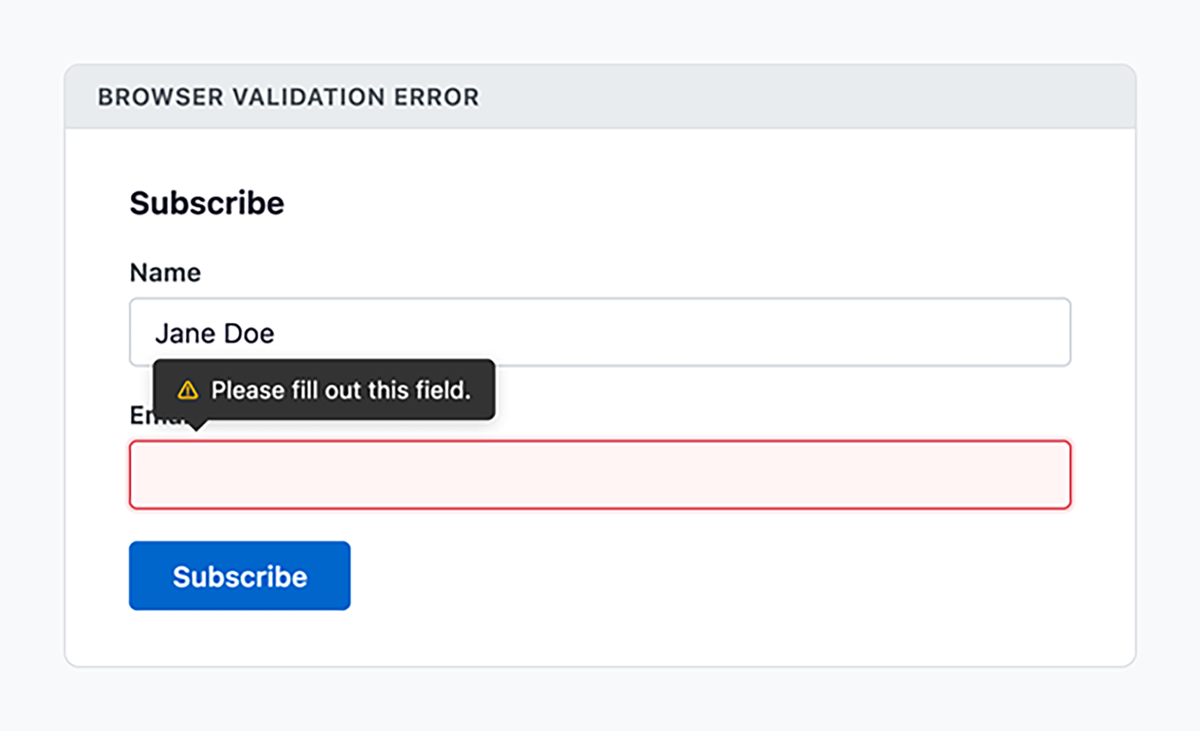
HTML5 provides built-in validation attributes that define what counts as acceptable input. By applying these attributes to form elements, you control what values users can submit.
email, url, and number define expected formats. These types also trigger automatic validation, allowing the browser to check that the entered value matches the required format.
The required attribute ensures a field cannot be left empty. If a required field has no value when the form is submitted, the browser treats it as invalid.
EXAMPLE
In this code:<form action="/register" method="post">
<label for="username">Username:</label><input type="text" id="username" name="username" required><br><label for="bio">Bio (optional):</label><textarea id="bio" name="bio"></textarea><br><button type="submit">Create Account</button></form>
required, so it must contain a value. required, so it is optional.The required attribute is a boolean attribute. Simply including the word activates validation. No value is needed. The required attribute works on most input types, as well as <textarea> and <select> elements.
index.html file in Codespace.
required attribute to those input elements. required so that it remains optional. 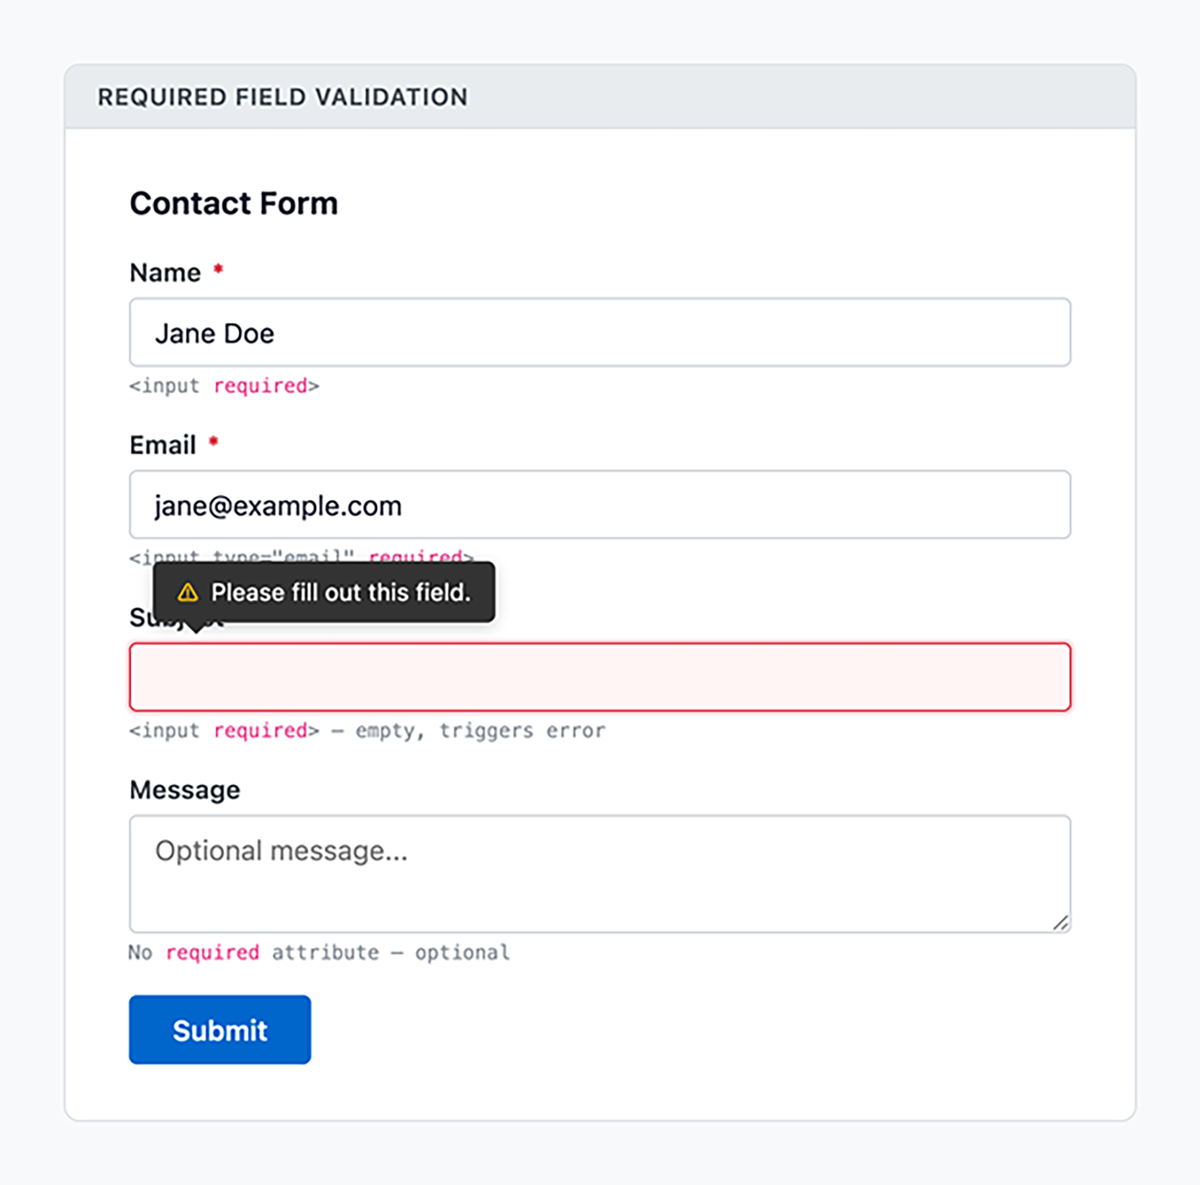
The type attribute on <input> elements can enforce basic format rules. When you use specialized input types such as email, url, or number, the browser automatically checks that the entered value matches the expected format.
| Input Type | Validates For |
|---|---|
email
|
Valid email format (contains @ and domain) |
url
|
Valid URL format (includes protocol like https://) |
number
|
Numeric values only |
tel
|
Does not enforce a specific phone format by default (varies by country) |
date
|
Valid date in supported browsers |
EXAMPLE
In this code:<form action="/profile" method="post">
<label for="email">Email:</label><input type="email" id="email" name="email" required><br><label for="website">Website:</label><input type="url" id="website" name="website"><br><button type="submit">Save Profile</button></form>
type="email" field automatically checks that the value follows a valid email structure. If a user enters values such as john or john@, the browser will display a validation error because the input does not contain both an @ symbol and a properly formatted domain. required attribute on the email field prevents the form from being submitted if the field is left empty. The browser highlights the field and displays a message until a valid email is entered. type="url" field checks that the value is a properly formatted web address. Most browsers expect a full URL that includes the protocol, such as https://example.com. If the protocol is missing, the browser may treat the input as invalid and block submission.The minlength and maxlength attributes control how many characters a user can enter in a text-based field.
The minlength attribute sets the minimum number of characters required for a value to be considered valid. If the value is shorter than the specified minimum when the form is submitted, the field is treated as invalid.
The maxlength attribute sets the maximum number of characters allowed. Unlike minlength, maxlength restricts input as the user types, preventing additional characters once the limit is reached.
EXAMPLE
In this code:<label for="username">Username (3-20 characters):</label>
<input type="text" id="username" name="username" minlength="3" maxlength="20" required>
<label for="password">Password (minimum 8 characters):</label>
<input type="password" id="password" name="password" minlength="8" required>
These attributes work with text-based inputs and <textarea> elements.
<textarea> to your form file for user comments, requiring between 10 and 500 characters.
<label> and <textarea> pair for a “Comments” field. minlength="10" and maxlength="500" on the textarea. required if the field should be mandatory. Number, date, range, and time inputs include validation attributes that control acceptable values. These attributes allow you to define limits and increments so users can only enter values within a specified range.
The min and max attributes set lower and upper bounds. They define the smallest and largest acceptable values for numeric, date, range, and time inputs.
EXAMPLE
In this code:<label for="quantity">Quantity (1-10):</label>
<input type="number" id="quantity" name="quantity" min="1" max="10" required>
<label for="checkin">Check-in Date:</label>
<input type="date" id="checkin" name="checkin" min="2024-01-01" max="2024-12-31" required>
min and max use the YYYY-MM-DD format. The step attribute controls the increment between valid values for number, date, range, and time inputs. While min and max define boundaries, step defines the spacing between acceptable values.
For numeric inputs, step determines how much the value increases or decreases when using the input controls. If a user enters a value that does not align with the defined increment, the field is treated as invalid.
EXAMPLE
In this code:<label for="amount">Donation (increments of $5):</label>
<input type="number" id="amount" name="amount" min="5" max="500" step="5" required>
For time inputs, the step value is measured in seconds. For example, step="1800" creates 30-min increments because 1800 s equals 30 min.
EXAMPLE
In this code:<label for="appointment">Appointment Time:</label>
<input type="time" id="appointment" name="appointment" min="09:00" max="17:00" step="1800" required>
The following table summarizes the numeric and date constraint attributes:
| Attribute | Purpose | Works With | Example |
|---|---|---|---|
min
|
Sets minimum value | number, date, range, time |
min="1"
|
max
|
Sets maximum value | number, date, range, time |
max="100"
|
step
|
Sets valid increments | number, date, range, time |
step="5"
|
<label> and <input> pair with type="time". min="09:00" and max="17:00". step="1800" (1800 s = 30 min). required. Built-in input types such as email and url automatically validate common formats. However, some validation rules require more precise control. When built-in types are not enough, you can use the pattern attribute to define custom format requirements using a regular expression, often called a regex.
The pattern attribute applies a regular expression to a form field. The value entered by the user must follow the structure defined by that expression in order to be considered valid.
pattern attribute, the entire input value must match the regular expression. Partial matches do not pass validation. This attribute works with text-based input types such as text, tel, email, url, password, and search.
EXAMPLE
In this code:<!-- US Phone: 123-456-7890 -->
<label for="phone">Phone:</label>
<input type="tel" id="phone" name="phone" pattern="[0-9]{3}-[0-9]{3}-[0-9]{4}">
<!-- US ZIP Code: 12345 or 12345-6789 -->
<label for="zip">ZIP Code:</label>
<input type="text" id="zip" name="zip" pattern="[0-9]{5}(-[0-9]{4})?">
<!-- Username: letters, numbers, underscores -->
<label for="username">Username:</label>
<input type="text" id="username" name="username" pattern="[A-Za-z0-9_]+">
The following table breaks down common regex patterns you may encounter:
| Pattern | Description | Matches |
|---|---|---|
[0-9]{3}
|
Exactly 3 digits | 123, 456 |
[0-9]{3}-[0-9]{3}-[0-9]{4}
|
U.S. phone number | 123-456-7890 |
[0-9]{5}(-[0-9]{4})?
|
U.S. zip code | 12345, 12345-6789 |
[A-Za-z0-9_]+
|
One or more letters, numbers, or underscores | user_1, JohnDoe |
You do not need to memorize regular expression syntax. Developers commonly look up patterns as needed. The important skill is understanding how the pattern attribute enforces a format and applying an appropriate expression to a form field.
The title attribute provides a clear, human-readable description of the expected format for a form field. When validation fails, the browser includes this text in its error message. In many browsers, the title also appears as a tooltip when users hover over the field.
EXAMPLE
In this code:<label for="phone">Phone Number:</label>
<input type="tel" id="phone" name="phone" pattern="[0-9]{3}-[0-9]{3}-[0-9]{4}" title="Enter phone as 123-456-7890" required>
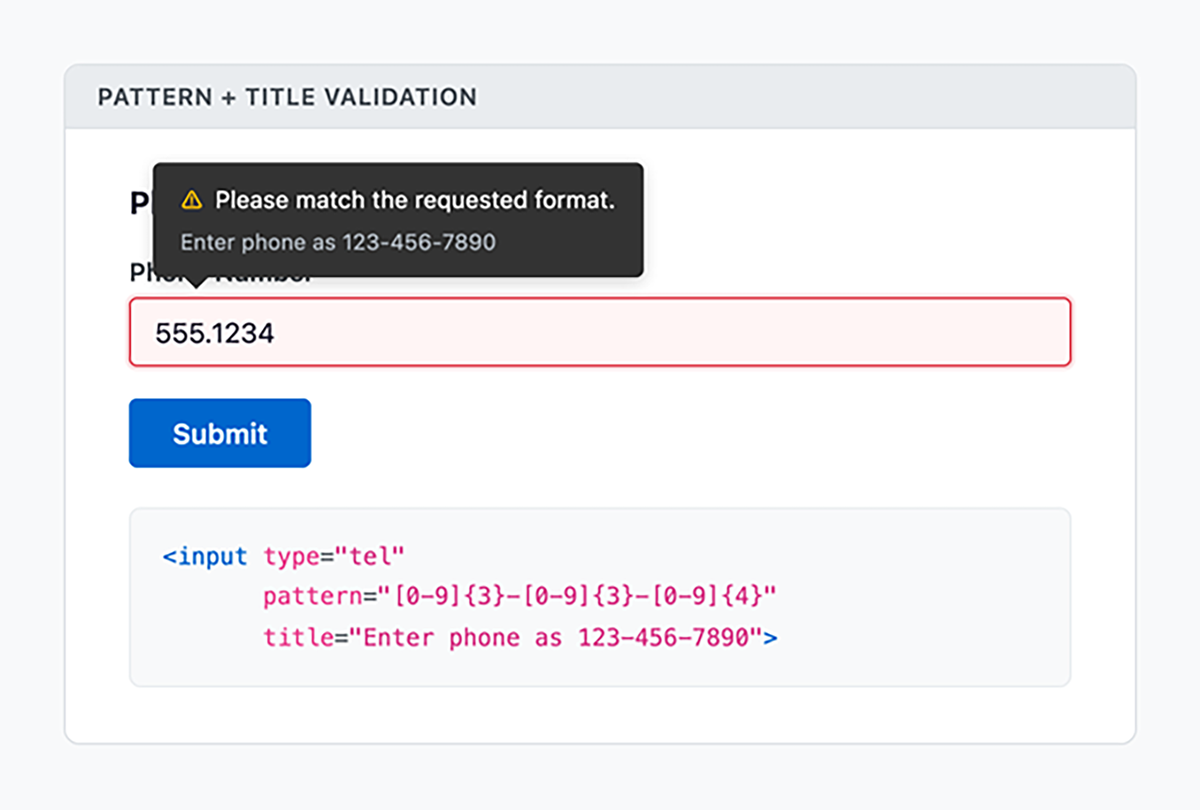
title attribute.
<label> and <input> pair for “Product Code.”pattern="[A-Z]{2}[0-9]{4}". title="Enter 2 uppercase letters followed by 4 digits (e.g., AB1234)". required. Real-world forms often require multiple validation rules on a single field and sometimes need validation disabled entirely.
You can add multiple validation attributes to a single input. All rules must pass for the field to be valid.
EXAMPLE
In this code:<label for="username">Username:</label>
<input type="text" id="username" name="username" required minlength="4" maxlength="15" pattern="[a-z][a-z0-9_]*" title="Start with a letter, use lowercase letters, numbers, underscores">
required: The field cannot be empty. minlength="4": The value must be at least 4 characters. maxlength="15": The value cannot exceed 15 characters. pattern="[a-z][a-z0-9_]*": The value must start with a lowercase letter and contain only lowercase letters, numbers, or underscores. title: This provides a human-readable explanation of the pattern requirements.The novalidate attribute disables all built-in browser validation for an entire form. When this attribute is added to the <form> element, the browser will submit the form without checking required fields, patterns, or other validation rules.
The related formnovalidate attribute can be added to a specific submit button. When that button is used, validation is bypassed only for that submission. Other submit buttons in the same form will still trigger normal validation.
EXAMPLE
In this code:<form action="/article" method="post">
<label for="content">Content:</label><textarea id="content" name="content" required></textarea><br><button type="submit">Publish</button><button type="submit" formnovalidate formaction="/draft">Save Draft</button></form>
formnovalidate, allowing users to save incomplete work. formaction="/draft" attribute sends draft data to a different server endpoint.<form> element that disables all browser validation for the entire form. HTML validation is powerful but has important limitations that every developer should understand.
| Limitations | Implications |
|---|---|
| It can be disabled by users. | Never rely on it for security. |
| Styling varies by browser. | Error message appearance is not consistent. |
| It cannot validate against server data. | It cannot check if a username already exists. |
| It does not support cross-field validation. | It cannot confirm that two password fields match. |
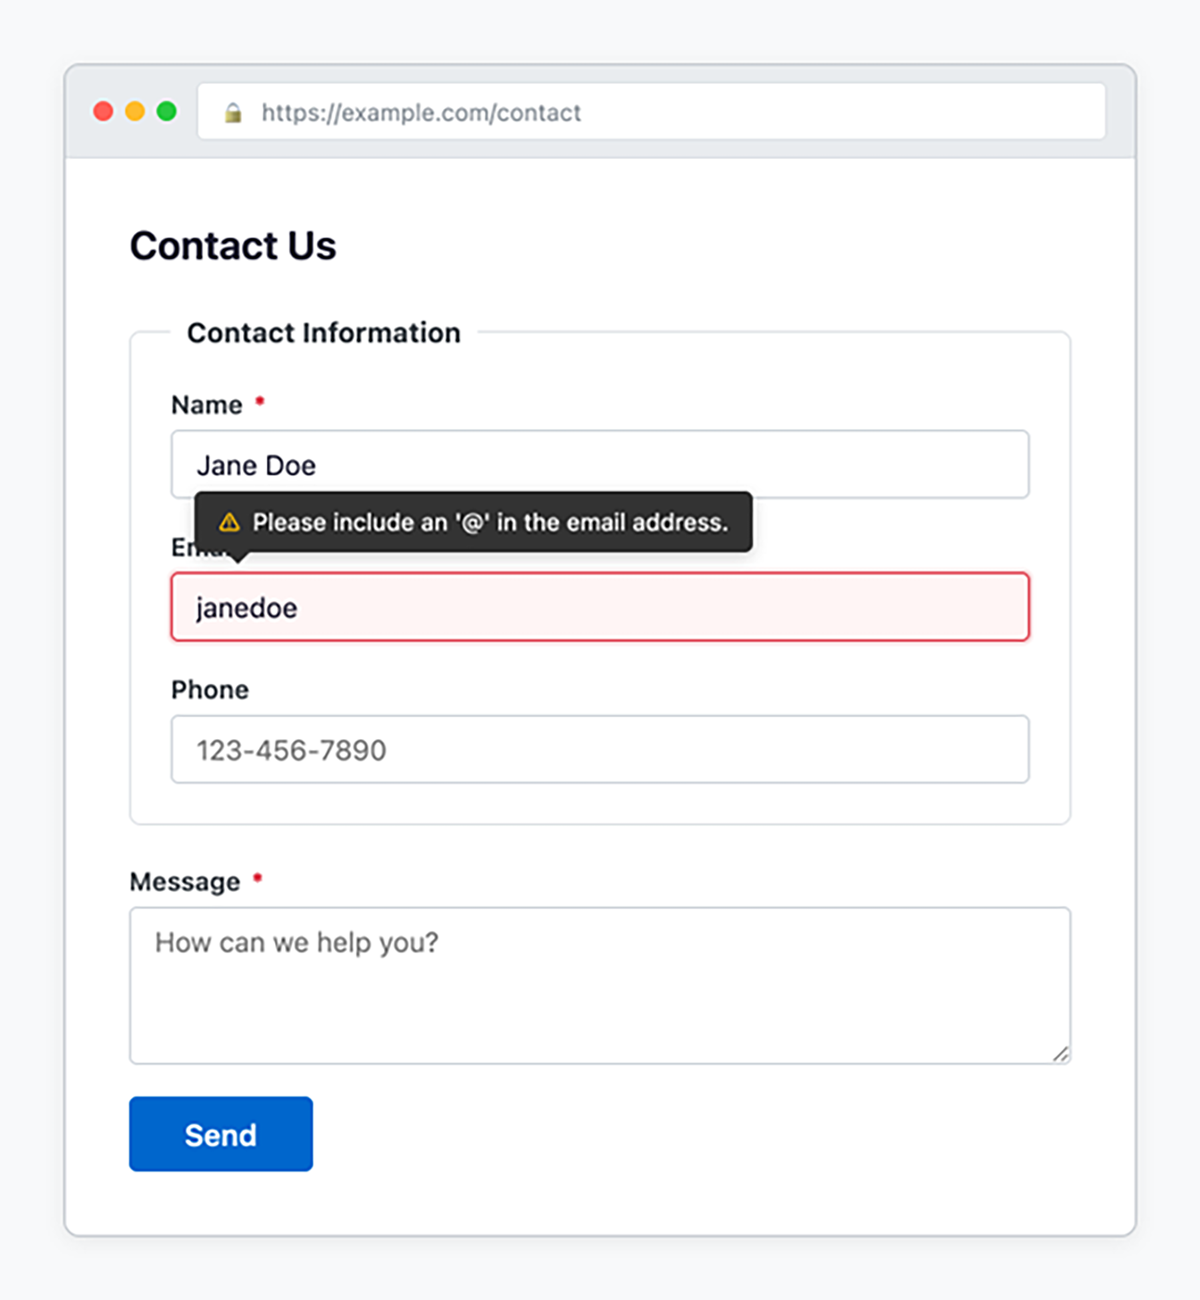
<fieldset> with a <legend> labeled “Contact Information.” type="text" required, minlength="2", maxlength="50" type="email" required type="tel" pattern="[0-9]{3}-[0-9]{3}-[0-9]{4}" title="Enter phone as 123-456-7890" <label> and <textarea> for “Message.” required, minlength="20", maxlength="1000". min, max, required Your form may look different depending on how you structured it earlier. Focus on using clear labels, grouping related fields with<form action="/contact" method="post">
<fieldset>
<legend>Contact Information</legend>
<label for="name">Name</label><input type="text" id="name" name="name" required minlength="2" maxlength="50">
<label for="email">Email</label><input type="email" id="email" name="email" required>
<label for="phone">Phone :</label><input type="tel" id="phone" name="phone" pattern="[0-9]{3}-[0-9]{3}-[0-9]{4}" title="Enter phone as 123-456-7890"></fieldset>
<label for="message">Message</label><textarea id="message" name="message" required minlength="20" maxlength="1000"></textarea>
<button type="submit">Send</button></form>
<fieldset>, and applying appropriate validation attributes to each input.
Source: THIS TUTORIAL WAS AUTHORED BY SOPHIA LEARNING. PLEASE SEE OUR TERMS OF USE.
REFERENCES
Mozilla Developer Network. (n.d.). How the web works. developer.mozilla.org/en-US/docs/Learn/Getting_started_with_the_web/How_the_Web_works