In this lesson, you will learn how to use GitHub’s web-based platform to create and manage repositories for your web development projects. Building on the version control concepts from the previous tutorial, you will put those ideas into practice through hands-on work with GitHub’s interface. Specifically, this lesson will cover the following:
1. Repositories
Repositories provide the structure for organizing project files and tracking changes as a website is developed. Creating and configuring repositories on GitHub allows you to control how your project is organized and who can access it.
1a. Creating New
Creating a repository on GitHub establishes a workspace for your project files and prepares them for tracking changes as you build your site.
-
To create a new repository, do the following:
- Make sure you are signed in to GitHub and viewing the dashboard. The repository creation option is available from the top navigation bar.
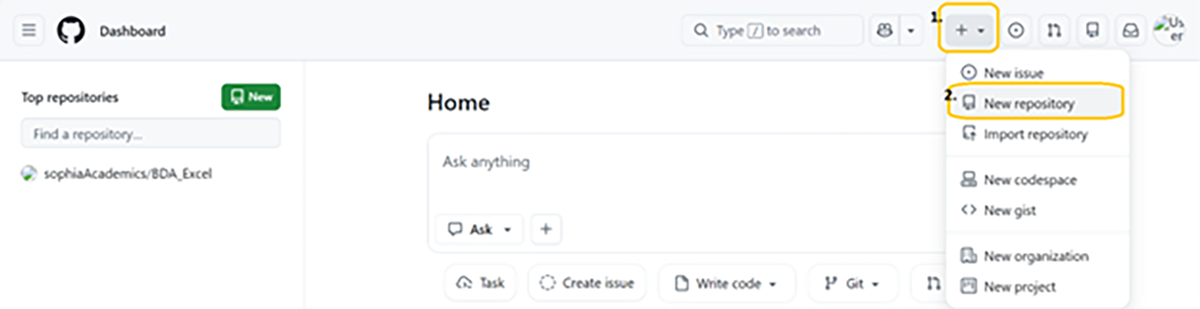
- Click the “+” icon in the top-right corner of the page.
- Select “New repository” from the dropdown menu. This opens the repository creation page. The repository creation option is always available from the plus icon in GitHub’s top navigation bar.
- Enter a repository name using lowercase letters, numbers, and hyphens.
- When choosing a repository name, use lowercase letters and separate words with hyphens. Select a name that clearly describes the project, such as “my-first-website” or “css-practice.” Avoid vague names like “Project1” or “test,” which make repositories harder to recognize later.
- Add an optional description that explains the purpose of your project. This description appears below the repository name on GitHub.
- Choose the repository visibility. This choice controls the repository’s visibility, which determines who is allowed to view the project and its files:
- Public: Anyone on the internet can view this repository.
- Private: Only you and collaborators you specify can view this repository.
- Select “Add a README file” to include an initial file that introduces your project. GitHub automatically creates this file for you, so you do not need to upload or attach anything. The README is a text-based file that you can edit later to describe your project.
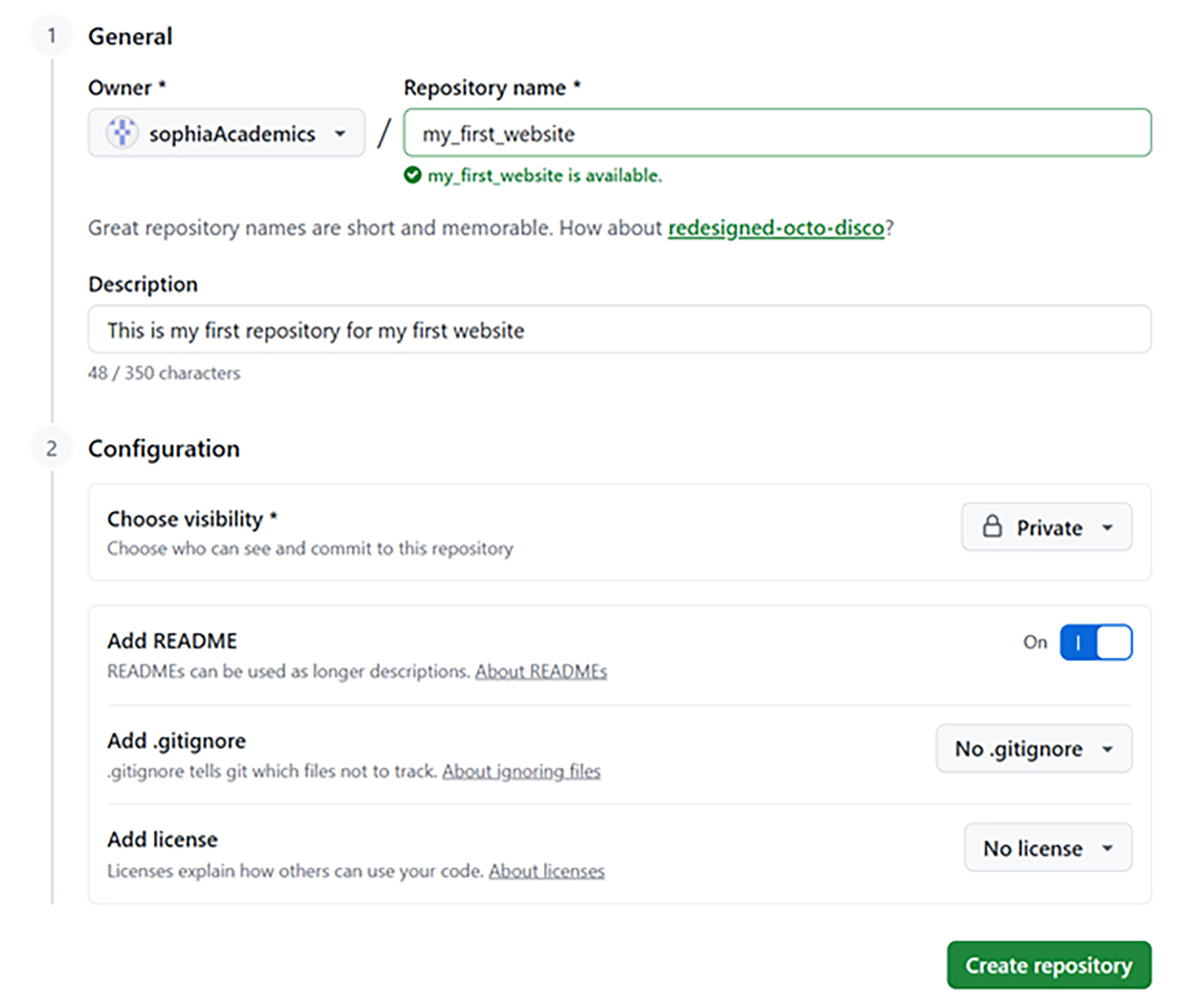
- Click “Create repository” to finish. GitHub creates the repository and saves its initial state, including the README file. When the process is complete, you will be taken to the repository’s main page, where your project files and settings are displayed.
With your repository created, you now have a place to store and manage your project files as you continue building your website.
-
Watch this video to understand how creating a GitHub repository helps you organize, save, and track your work.
-
- Repository Visibility
- A setting that determines who can view a repository, with public repositories visible to anyone and private repositories visible only to the owner and selected collaborators.
1b. Settings
Every repository includes a Settings page where you can manage access and make basic changes to how the repository is organized. You will not need to adjust most settings right away, but it is important to know where they are and what they control.
To access repository settings, click the “Settings” tab in the menu below the repository name.
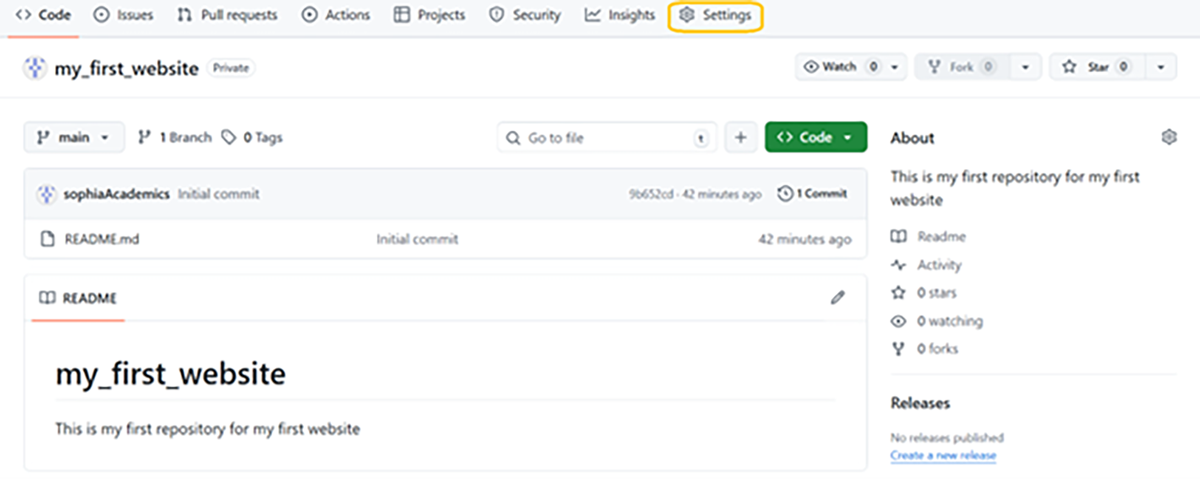
Some settings you may encounter include the following:
General Settings
- Repository name: This allows you to rename the repository. Renaming also changes the repository’s web address.
-
Default branch: This controls which version of the project GitHub shows first when someone opens the repository. For new projects, this is usually set to main.
Collaborators
- Add other GitHub users who are allowed to contribute to your repository.
Danger Zone
- Change the repository visibility between public and private.
- Archive or permanently delete the repository.
-
The danger zone contains powerful and often irreversible actions. Deleting a repository permanently removes all files and history. For this course, you should avoid changing these settings unless you are specifically instructed to do so.
-
You have created a repository named “my-portfolio” and want to add your classmate as a collaborator.
Where would you find this option?
Navigate to your repository, click the “Settings” tab, then select “Collaborators” from the left sidebar under the “Access” section. From there, you can invite your classmate by entering their GitHub username or email address.
-
- Default Branch
- The primary branch that displays when someone visits your repository and serves as the base for new branches.
2. Managing Files
GitHub’s web interface allows you to create, upload, and edit project files directly in your browser without installing any software.
2a. Adding and Editing Files
You can add files to your repository by creating new files directly on GitHub or uploading existing files from your computer.
-
To create a new file in your repository, do the following:
- Navigate to your repository’s main page by clicking the “<> Code” tab or the repository name near the top of the page.
- Click the “+” (Add file) button above the file list.
- Select “Create new file.”
- Type the filename including its extension
- Add two files, both
index.html and styles.css.
- When you enter the filename, you are naming the new file you are creating. The editor area below is where you add the file’s content.
- Enter your file content in the text editor.
- Click the “Commit changes” button.
- In the first text box, enter a short commit message that summarizes your change. This message is required and acts like a brief title, such as “Add homepage file.”
- Optional: Add more details in the description box to explain what you changed and why.
- Click “Commit changes” to save the file to your repository.
-
Watch this video to learn how to commit your work on GitHub so your changes are tracked and saved.
-
For this exercise, please download the following about.html file. Then, follow these directions to upload the file to your repository:
- Navigate to your repository’s main page by clicking the “<> Code tab” or the repository name near the top of the page. The main page shows the list of files and folders in your repository.
- Click the “+” (Add file) button above the file list.
- Select “Upload files” from the menu.
- Drag and drop files into the upload area, or click “choose your files” to browse your computer and select files.
- Click the “Commit changes” button.
- In the first text box, enter a short commit message that summarizes what you uploaded, such as “Add image files.”
- Optional: Add more details in the description box to explain what the files are for.
- Click “Commit changes” to add the files to your repository.
-
Watch this video to see how to upload and add existing project files to GitHub.
In addition to creating and uploading files, you can make quick updates directly from the repository view.
To edit an existing file, click the filename to open it, then click the pencil icon above the file content. After making your changes, commit them using the “Commit changes” option.
You can also create folders as you add files. Including a forward slash in the filename automatically creates a folder. For example, entering css/styles.css creates a css folder containing a file named styles.css.
-
When creating files for web projects, file extensions determine how browsers and servers interpret your code. Always include the correct extension:
.html for HTML documents,
.css for stylesheets, and
.js for JavaScript files. GitHub recognizes these extensions and provides syntax highlighting to make your code easier to read.
2b. Writing Effective Commit Messages
Each time you save changes on GitHub, you enter a commit message. While any message will allow you to save your work, writing clear and descriptive commit messages makes your project easier to understand and manage over time.
When committing changes on GitHub, you see two text boxes for the message.
- Commit message: This is a brief summary (50 characters or fewer) that describes the change. It is required.
- Extended description: This is an optional longer explanation on what you changed and why.
-
EXAMPLE
Good commit messages:
Add navigation bar to homepage
Fix broken image path in gallery section
Update footer copyright year to 2024
-
Write commit messages in the imperative mood, as if giving a command. Use “Add navigation bar” rather than “Added navigation bar.” This convention creates consistency throughout your project history. Think of the subject line as completing the sentence: “If applied, this commit will . . .”
Effective commit messages follow these guidelines:
- Keep the subject line under 50 characters.
- Use the imperative mood (“Add,” “Fix,” “Update,” and “Remove”).
- Capitalize the first word.
- Do not end the subject line with a period.
-
You just added a new CSS file that styles the header section of your website. Which commit message best follows the guidelines?
- A) “added styles”
- B) “Add header styles for improved navigation visibility”
- C) “I’m adding the new CSS file for the header part of the site.”
- D) “header.css”
Click to reveal answer
B) “Add header styles for improved navigation visibility” is the best choice. It uses the imperative mood (“Add”), describes what was changed (header styles), and explains why (improved navigation visibility). Option A is too vague, option C uses the first person, and option D only names the file without describing the change.
Before continuing, make sure you have saved at least one change to your repository, such as creating or editing a file. This will help you recognize what appears in the commit history.
-
- Commit Message
- A brief description written when saving changes to a repository that explains what was changed and why, consisting of a required subject line and an optional extended description.
3. Repository Management
GitHub automatically keeps a record of each change you save to your repository, such as creating or editing a file. The commit history allows you to review the changes you have already saved, see when they occurred, and understand how your project has developed over time.
3a. Commit History
The commit history provides a chronological record of all changes made to your repository. Each entry shows who made the change, when it happened, and the commit message.
-
To view your repository’s commit history:
- Navigate to your repository’s main page.
- Locate the commit count link above the file list (for example, “15 commits”).
- Click this link to open the commit history page.
- Browse the list of commits, with the most recent at the top.
- Click any commit message to view the specific changes made.
When viewing an individual commit, GitHub displays a diff view that highlights what changed. Added content appears in green, while removed content appears in red. This visual comparison makes it easier to see how a file was updated.
-
EXAMPLE
A diff view might show:
- <h1>Welcome to My Site</h1>
+ <h1>Welcome to My Portfolio</h1>
This indicates the heading text changed from “Welcome to My Site” to “Welcome to My Portfolio.”
-
Watch this video to see how to view and understand your commit history in a GitHub repository.
The commit history helps you to:
- Review changes you have made to your project
- See when updates were saved
- Read commit messages to understand what was changed
-
- Commit History
- A chronological list of saved changes in a repository, showing when updates were made and the messages that describe them.
- Diff View
- A visual comparison that highlights the differences between versions of a file, showing added content in green and removed content in red.
3b. Basic Tasks
As you continue working on a project, you may need to make small changes to how files are organized or described. GitHub’s web interface allows you to perform common repository management tasks directly in your browser.
The README file appears on the repository’s main page and provides a short description of the project. You can update this file to explain what your project is about or add notes for yourself or others. To edit the README, click the filename to open it, then click the pencil icon above the file content. After making your changes, save them using the “Commit changes” option.
If a file is no longer needed, you can remove it from the repository. To delete a file, open the file, click the three-dot menu in the toolbar, and select “Delete file.” You will be asked to confirm the deletion by committing the change.
You can also reorganize files by changing their location within the repository. To move a file, open it for editing and update the filename field to include a folder path. For example, changing styles.css to css/styles.css moves the file into a css folder. Commit the change to apply it.
Before deleting or moving files, review your changes carefully. These actions take effect immediately when you commit them.
-
GitHub’s web interface allows you to manage project files and make updates without installing additional tools. By editing, organizing, and reviewing files through the browser, you can keep your repository organized as your project grows.
-
Your repository contains an
index.html file in the root directory. You want to move it into a folder called pages.
How would you accomplish this using GitHub’s web interface?
Open the index.html file, click the pencil icon to edit it, and change the filename field from index.html to pages/index.html. This creates the pages folder and moves the file into it. Enter a commit message such as “Move index.html to pages folder,” then click “Commit changes.”
In this lesson, you learned how to work with repositories by creating new repositories and adjusting settings to control access and organization. You then practiced managing files by adding and editing files and writing effective commit messages to clearly save and describe changes. Next, you explored repository management by reviewing commit history to see how updates are tracked over time. Finally, you learned how to apply basic tasks to organize, move, and maintain files as your project grows.