Table of Contents |
Every time a user interacts with a web page, the browser generates a signal called an event. These signals notify your JavaScript code that something has happened, giving you the opportunity to respond. Without events, web pages would remain static, with no way to react to user input.
An event is a signal from the browser indicating that something has occurred on the page. Events can be triggered by user actions like clicking a button, typing in a form, or pressing a key. They can also be triggered by browser actions, such as when a page finishes loading or when the window is resized.
Think of events as notifications. When a user clicks a button, the browser sends a “click” notification to that element. Your JavaScript code can listen for these notifications and run specific functions when they occur.
The flow from action to response follows a consistent pattern:
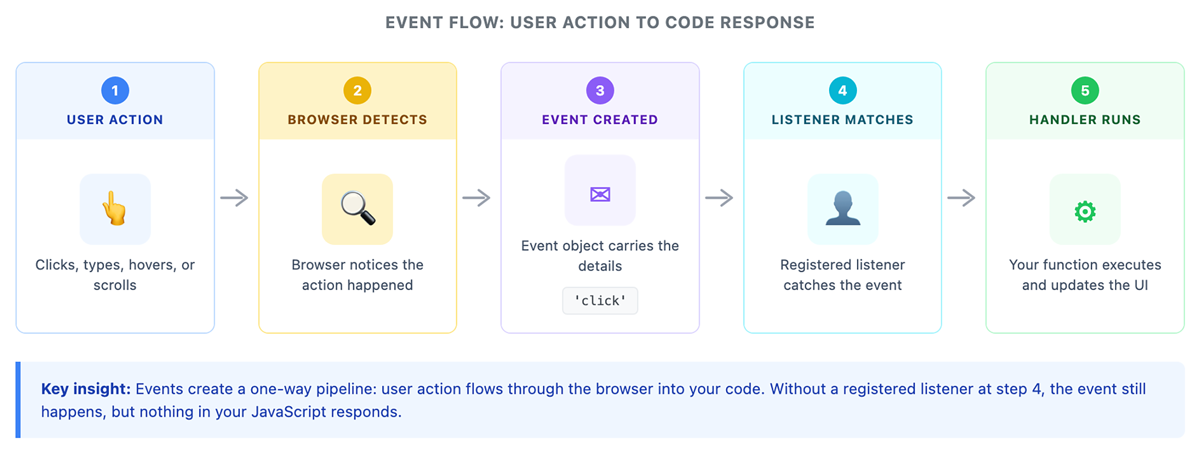
The browser can detect many different types of events. Choosing the correct event type allows you to create interactions that match user expectations.
Mouse events occur when users interact with a mouse or trackpad:
| Event Type | Triggered When |
|---|---|
click
|
User clicks an element |
dblclick
|
User double-clicks an element |
mouseenter
|
Mouse pointer enters an element |
mouseleave
|
Mouse pointer leaves an element |
mousemove
|
Mouse pointer moves over an element |
Keyboard events occur when users press keys:
| Event Type | Triggered When |
|---|---|
keydown
|
User presses a key down |
keyup
|
User releases a key |
Form events relate to user input:
| Event Type | Triggered When |
|---|---|
submit
|
Form is submitted |
change
|
Input value changes and the element loses focus |
input
|
Input value changes immediately |
focus
|
Element receives focus |
blur
|
Element loses focus |
Document and window events relate to the page itself:
| Event Type | Triggered When |
|---|---|
load
|
Page and resources finish loading |
scroll
|
User scrolls the page |
resize
|
Browser window is resized |
Different event types are suited to different interactions. The following examples show how common scenarios map to specific events:
| Scenario | Event |
|---|---|
| Showing a dropdown menu when clicked |
click
|
| Validating a form field after the user leaves it |
blur
|
| Updating a character count as the user types |
input
|
| Enlarging an image when the mouse hovers over it |
mouseenter
|
| Reacting when the user presses “Escape” |
keydown
|
Now that you understand what events are, the next step is learning how to respond to them. When a user clicks a button or types into a form, the browser detects the event but does not take action on its own. You need to tell it what to do.
This is where event listeners come in. An event listener “listens” for a specific event on a specific element and runs code when that event occurs.
JavaScript provides the addEventListener() method to set this up. It allows you to connect an event, such as a click, with a function that should run in response.
An event listener connects an event to a specific action. It tells the browser, “When this event happens on this element, run this code.”
JavaScript provides the addEventListener() method to create this connection. This method allows you to specify both the event to watch for and the function to run when it occurs.
The basic syntax is:
element.addEventListener('eventType', handlerFunction);
In this syntax:
element is the DOM element you want to watch. 'eventType' is a string naming the event (like 'click' or 'keydown'). handlerFunction is the function the browser will call when the event fires. addEventListener() syntax connects an element, an event, and a function.
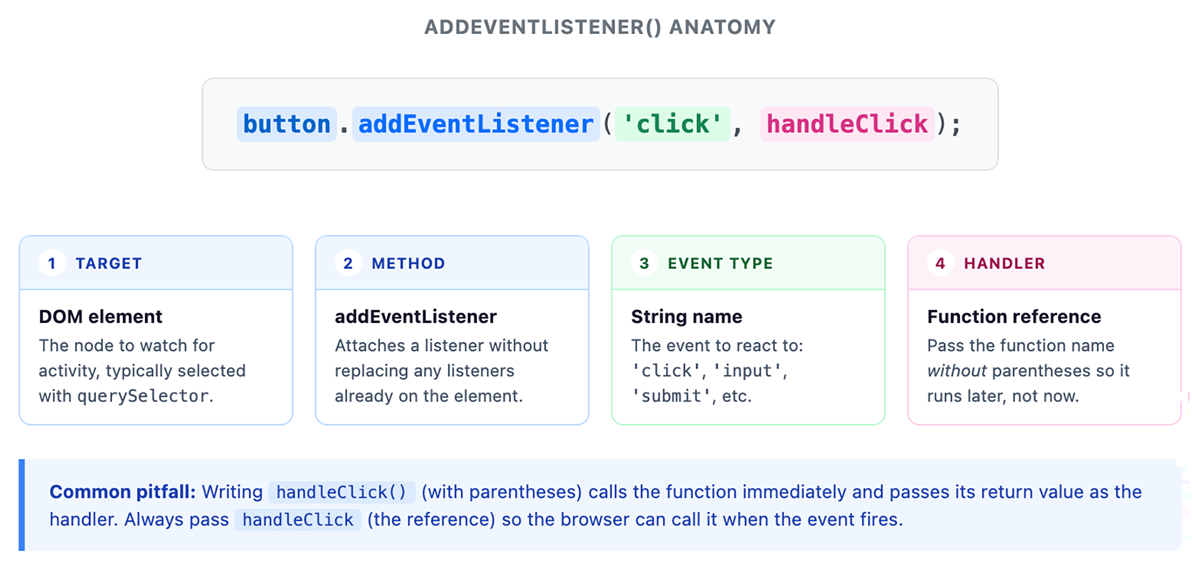
Now that you understand how each part of the addEventListener() method fits together, you can see how it works.
EXAMPLE
Responding to a button click:In this code:const button = document.querySelector('#myButton');
button.addEventListener('click', function() {
alert('Button was clicked!');});
document.querySelector('#myButton') selects the button element.addEventListener() attaches a listener to that element.'click' tells the browser which event to watch for.You can attach multiple event listeners to the same element. Each listener operates independently, so a single button can respond to clicks, hovers, and other events at the same time.
EXAMPLE
Listening for two different events on one button:In this code:const button = document.querySelector('#myButton');
button.addEventListener('click', function() {
console.log('Click detected');});
button.addEventListener('mouseenter', function() {
console.log('Mouse entered button area');});
addEventListener() method takes two main arguments: the event type as a string (like 'click' or 'keydown') and a function that executes when the event fires. The function is often called an event handler or callback function.
index.html, make sure a button with id="demo-btn" is present. If not, add it:
js/scripts.js, select the button with document.querySelector('#demo-btn') and store it in a variable.
'click' event.console.log() to display the message "Button clicked!".The function you pass to addEventListener() is called an event handler (also known as a callback function). This function defines what should happen when the event occurs. There are several ways to write event handler functions, depending on how you want to organize your code.
You can define event handlers in three common ways.
Anonymous functions are written directly inside addEventListener(). This approach is useful for a short, simple behavior that does not need to be reused.
EXAMPLE
In this code:button.addEventListener('click', function() {
console.log('Clicked!');});
addEventListener() attaches a click event listener to the button.'click' tells the browser to listen for a click event.Instead of writing the function directly inside addEventListener(), you can define the function separately and then use it as the event handler.
EXAMPLE
In this code:function handleClick() {
console.log('Clicked!');}
button.addEventListener('click', handleClick);
handleClick is defined separately and given a name. addEventListener() attaches a click event listener to the button. handleClick is passed as the event handler.handleClick function, logging “Clicked!” to the console.Arrow functions provide a shorter way to write functions. They are commonly used when you want a concise, inline event handler without creating a separate named function.
This approach is useful for simple, one-time behaviors where readability and brevity are more important than reuse.
EXAMPLE
In this code:button.addEventListener('click', () => {
console.log('Clicked!');});
() => { ... } defines the event handler directly inside addEventListener(). 'click' tells the browser to listen for a click event. const heading = document.querySelector('h1');heading.addEventListener('click', function() {
heading.style.color = 'blue';});
When an event occurs and your handler function runs, the browser also provides additional information about that event.
This information is stored in an object called the event object. It is automatically passed to your handler function, giving you access to details such as which element triggered the event or which key was pressed.
The following diagram highlights how the event object is passed into your handler and some of the most commonly used properties it provides.
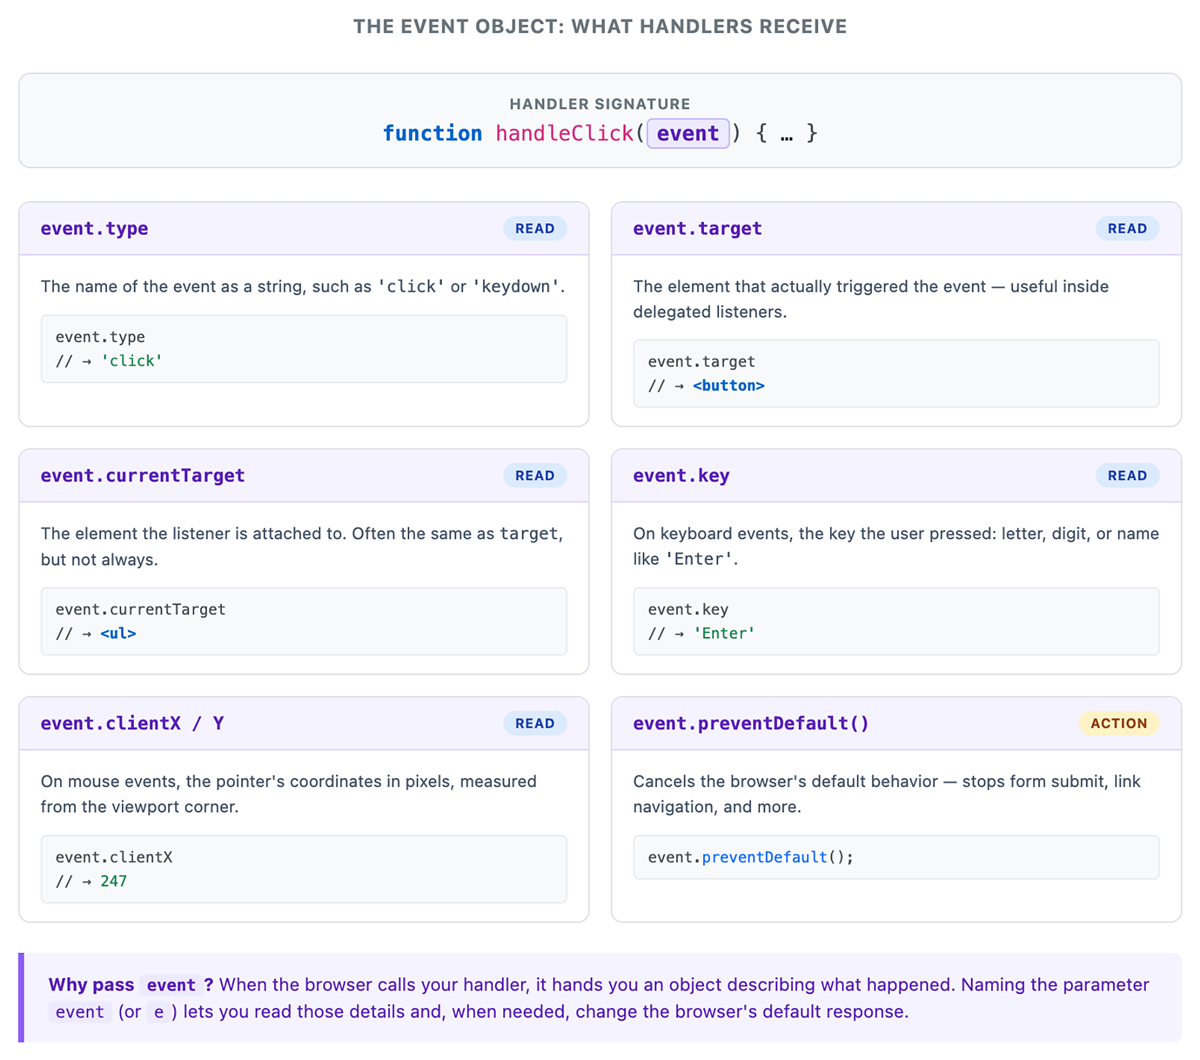
To access the event object, you add a parameter to your handler function. When the event occurs, the browser automatically passes the event object into that function as an argument. By convention, this parameter is often named event, e, or evt.
EXAMPLE
Displaying the event object in the console:In this code:const button = document.querySelector('#myButton');
button.addEventListener('click', function(event) {
console.log(event);});
console.log(event) displays the event object so you can explore its properties.The event object contains properties that describe the event, such as which element triggered it, where it occurred, or which key was pressed. These details allow your code to respond differently based on what happened.
EXAMPLE
Reading multiple event properties:In this code:const button = document.querySelector('#myButton');
button.addEventListener('click', function(event) {
console.log('Event type:', event.type);console.log('Target element:', event.target);console.log('Mouse X position:', event.clientX);});
event.type returns the name of the event (here, 'click').event.target returns the actual element the user interacted with.event.clientX returns the horizontal pixel position of the click in the viewport.By accessing specific properties, you can use event data to create more dynamic behavior.
EXAMPLE
Tracking click coordinates anywhere on the page:In this code:document.addEventListener('click', function(event) {
const x = event.clientX;const y = event.clientY;console.log(`Clicked at position: ${x}, ${y}`);});
document, so it fires for clicks anywhere on the page.event.clientX and event.clientY give the click position relative to the viewport.This approach allows your code to respond differently based on where and how the user interacts with the page.
The event object includes many properties, but you do not need to memorize all of them. Instead, focus on a few key properties that help your code respond to user actions in meaningful ways.
Some properties are available for most events. For example, event.type tells you what kind of event occurred, such as a click or key press, which allows your code to handle different types of interactions. The event.target property identifies the element that triggered the event, while event.currentTarget refers to the element where the event listener is attached. You may also see event.timeStamp, which records when the event occurred.
Among these, event.target is especially important because it tells you exactly which element the user interacted with. This allows your code to respond differently depending on what was clicked.
Other properties depend on the type of event. For mouse interactions, properties like event.clientX and event.clientY provide the position of the pointer within the viewport, which can be used for features like tracking clicks or positioning elements on the screen. The event.pageX and event.pageY properties give the position relative to the full document, and event.button indicates which mouse button was pressed.
For keyboard interactions, event.key identifies the key that was pressed, such as “Enter” or “a,” allowing your code to trigger actions based on specific keys. The event.code property refers to the physical key on the keyboard, and properties like event.shiftKey, event.ctrlKey, and event.altKey indicate whether modifier keys were held, which is useful for handling keyboard shortcuts.
event.target property identifies the element that triggered the event. This allows a single event listener to handle interactions from multiple elements by checking which element was clicked.
index.html, make sure several clickable elements are present (two or three buttons or links). js/scripts.js, add an event listener on document that listens for a click event. event.target and event.target.tagName to the console. (Hint: Use console.log() to display values in the console.) event.target identifies the exact element that triggered the event. document.addEventListener('keydown', function(event) {
if (event.key === 'Escape') {
closeModal();}});
Source: THIS TUTORIAL WAS AUTHORED BY SOPHIA LEARNING. PLEASE SEE OUR TERMS OF USE.
REFERENCES
Mozilla Developer Network. (n.d.). How the web works. developer.mozilla.org/en-US/docs/Learn/Getting_started_with_the_web/How_the_Web_works