Table of Contents |
Control structures in programming are structures of code that allow the software to make decisions to execute or not execute a section of code. The two basic structures include the decision structure and iteration structure. Decisions allow the code to execute one of possibly many blocks of code based on the evaluation of a true or false condition statement.
In programming, control refers to manipulating the flow of execution so that an application responds appropriately based on the different inputs provided. A decision structure is a set of programming code that evaluates the true/false value of a condition statement and, based on that evaluation, executes one of multiple pathways of commands. Iterative structures, also referred to as loops, are code structures that evaluate a condition statement; as long as the condition evaluates to true, the block of code will execute repeatedly, rechecking the condition statement after completing one pass through the code block.
You have been practicing writing the code in the console pane in your browser’s developer tools. Pressing the “Enter” key produced an undefined result on some of the code samples, but it did not create any errors.
The code samples throughout this lesson will grow and may create errors if you press the “Enter” key before the code is finished. To prevent this from happening, when you are ready to enter the code on the next line, simply press and hold your “Shift” key and then the “Enter” key (“Shift” + “Enter”). This will create a line break without producing the undefined error.
EXAMPLE
Decision structure
const ageToDrive = 16;
let myAge = 35;
if (myAge >= ageToDrive)
{
    console.log( "user is legal to drive" );
}
else
{
    console.log( "user is not yet legal to drive" );
}
This common and fairly universal decision structure is called an IF or IF-ELSE structure. In the example above, you see the “if” keyword and a comparison statement in the parentheses.
The condition statement is any expression that will result in a true or false response (also, 0 equals false and anything other than 0 is true). When the condition evaluates to true, the connected block of code will execute, and the else block is skipped. If the condition evaluates to false, the block of code is not executed; if there is an “else” present, then the else block will get executed.
Every separate if statement will be evaluated and possibly executed individually. Else sections are optional, but they give you the option of having only one of two possible blocks of code to execute.
Decision structures can also have more than one possible outcome by daisy-chaining if-else structures together. Essentially, the block of the else section is simply a whole new if-else structure.
EXAMPLE
Daisy-chained if-else structure
const ageForPermit = 15;
const ageForLicense = 16;
let myAge = 35;
if (myAge >= ageForLicense)
{
    console.log( "User is eligible for a full license" );
}
else if (myAge >= ageForPermit)
{
    console.log( "User is eligible for a permit" );
}
else
{
    console.log( "User is not legal to drive" );
}
Based on the logic of else-if and else statements in the code sample above, what do you think the output will be? Will it be “User is eligible for a full license,” “User is eligible for a permit,” or “User is not legal to drive”?
Directions: In your console pane, type the code below and press “Enter.”
1. Open the Developer Tools in Google Chrome (F12), and click on the Console tab.
2. In your console pane, type the code below, using the “Shift” + “Enter” key combination at the end of each line:
const ageForPermit = 15;
const ageForLicense = 16;
let myAge =35;
if (myAge >= ageForLicense)
{
    console.log("User is eligible for a full license");
}
else if (myAge >= ageForPermit)
{
    console.log("User is eligible for a permit");
}
else
{
    console.log("User is not legal to drive");
}
3. Next, press “Enter.” You should see an output of User is eligible for a full license.
EXAMPLE
The output should be as shown below. Keep in mind there may be some variances in other visible content because of the webpage you are on when accessing the console pane.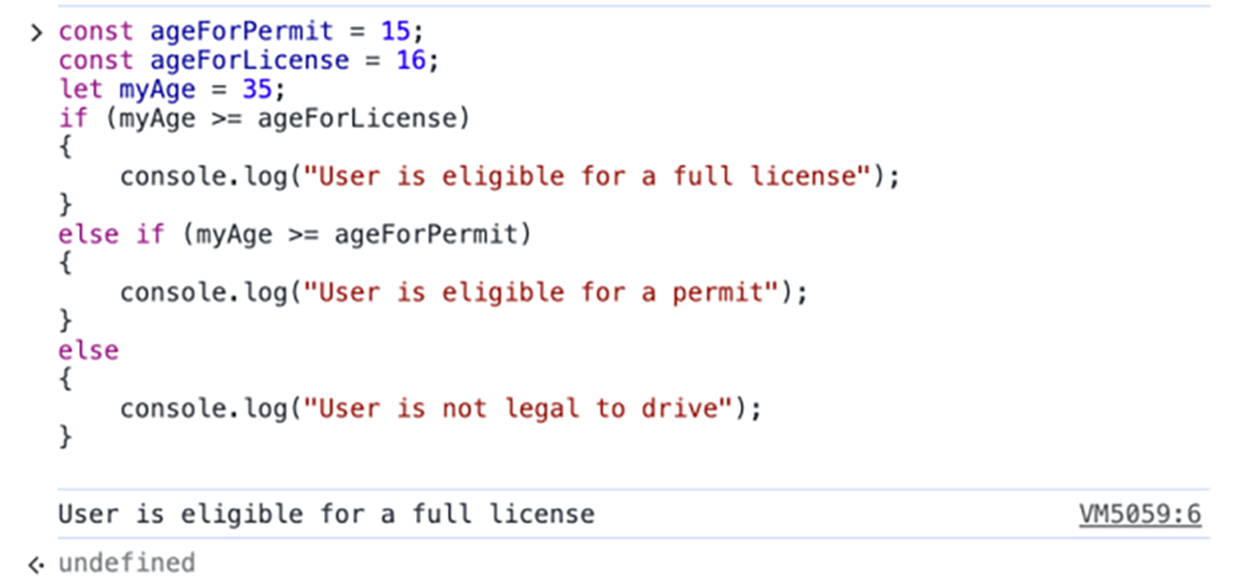
The first line of the code sets the variable ageForPermit and sets the value of 15. The second line of code sets the variable ageForLicense and sets the value of 16. The third line sets the variable myAge and sets the value of 35. The else-if statement checks if the value of myAge is greater than or equal to ageForLicense. If true, the statement “User is eligible for a full license” is displayed. If false, it checks the statement if myAge is greater than or equal to ageForPermit. If true, the statement “User is eligible for a permit” is displayed. If false, it defaults to display the last statement of “User is not legal to drive.”
Was the output what you expected? Remember we said that the value for myAge is 35. The first statement identified that 35 was greater than 16 (ageForLicense) and stopped parsing through the remaining statements because it found a result that was true and displayed the “User is eligible for a full license” in the console.
What happens if we change myAge to 15? See below.
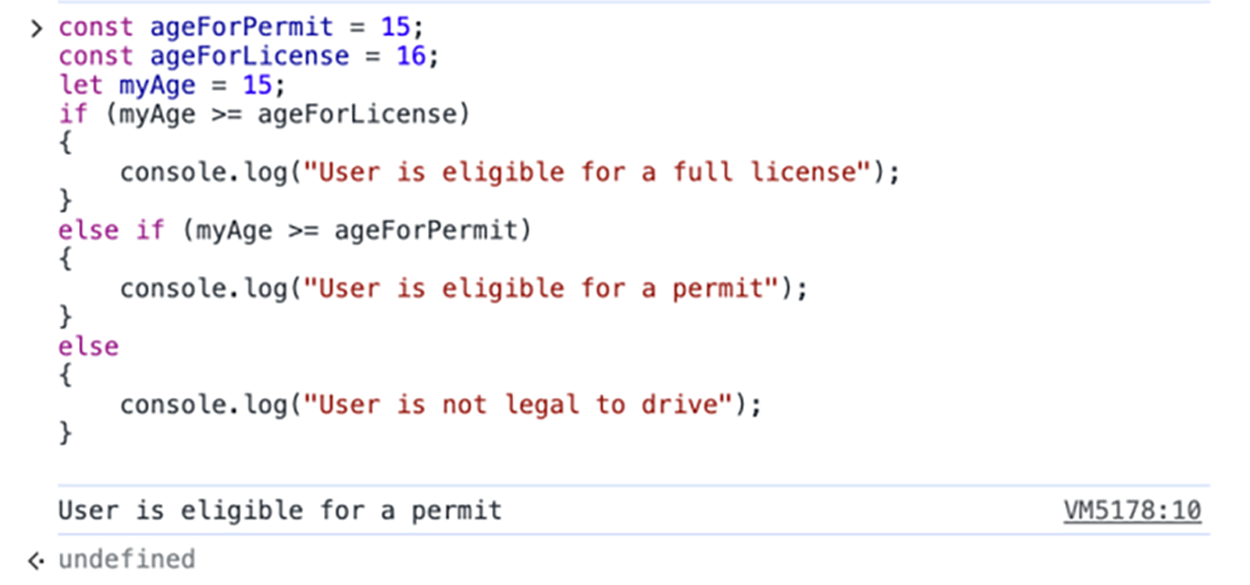
The console displays the message “User is eligible for a permit.” The first statement asking if the age was older than or equal to 16 (ageForLicense) was false, so it proceeded to the next statement asking if the age was older than or equal to 15 (ageForPermit). This produced a true result, so it displayed the corresponding message from the console.log statement.
EXAMPLE
What happens if we change myAge to 11?
The console displays the message “User is not legal to drive.” The first statement asking if the age was older than or equal to 18 (ageForLicense) was false, so it proceeded to the next statement asking if the age was older than or equal to 15 (ageForPermit), which was also false. The last else statement provided an output to display when the above if and else-if statements were False.
The decision structure above allows for testing a single value and responding accordingly. Conditions can be combined using two different methods, so we can test the condition of more than one factor. Nesting an if structure within the block of another if structure is one approach to testing multiple conditions. However, a more effective method (and one that requires less typing and more succinct code) is to use logical operators. Logical operators include AND (represented by a double ampersand: && ), OR (represented by two pipe characters: || ), and NOT (!). “NOT” is not used to combine multiple comparison expressions, but instead it is used to invert the output of a statement. If the statement returns false in the presence of a NOT operator, the output will become true.
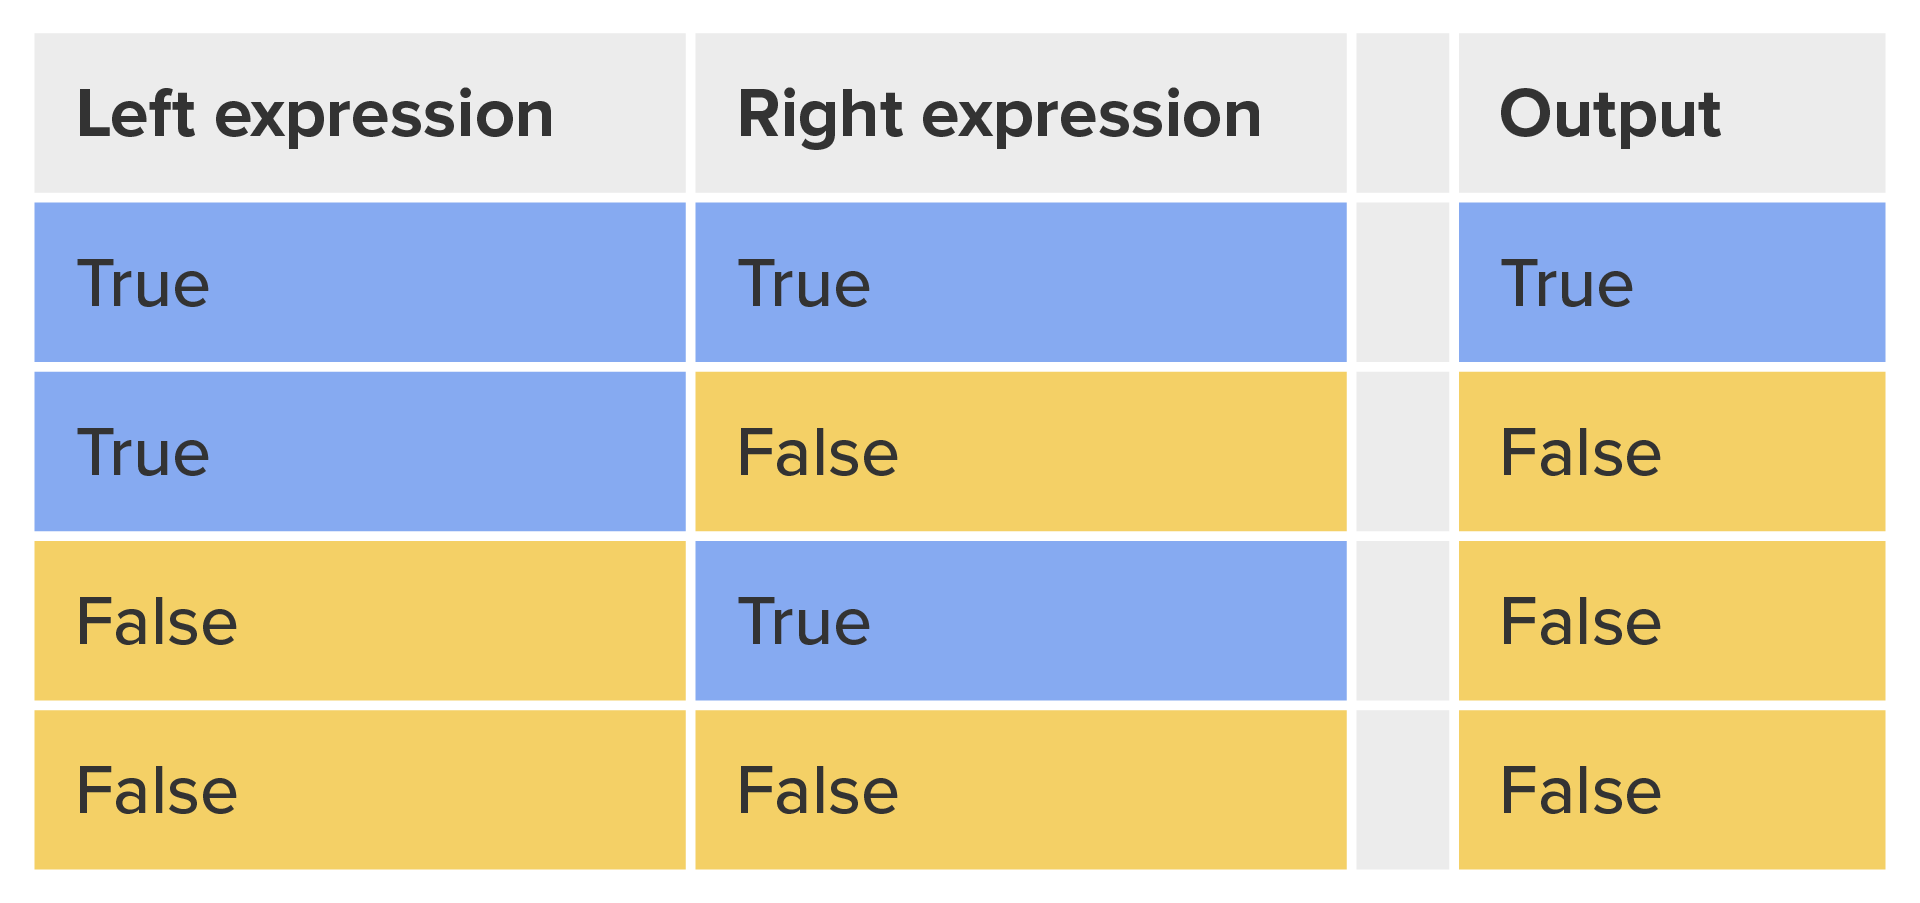
AND is used to test two separate conditions; only when both are true does the entire expression return true. If either the left or right expressions return false, the whole statement will return false. Below is the truth table for the AND operator:
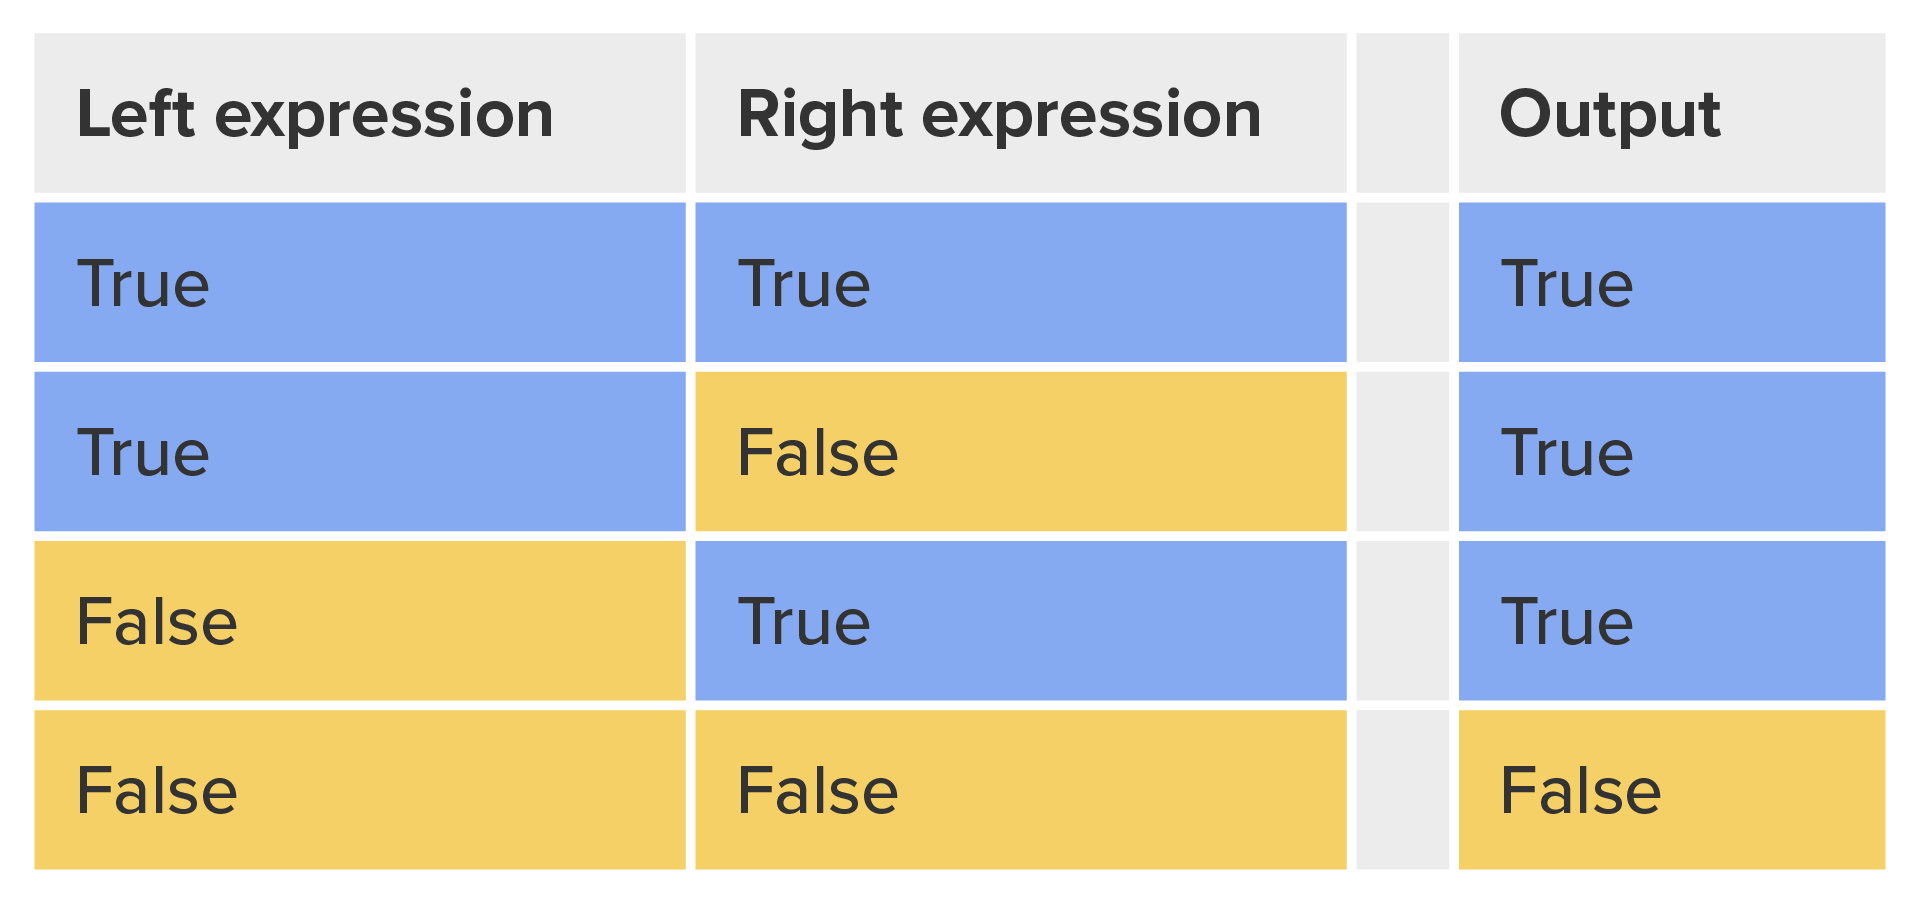
OR is used between two condition expressions when either of the conditions can be true for the whole expression to return true. In this case, either or both of the conditions can be true to get a true output. Only when both the left and the right are false will the expression return false. Below is the truth table for the OR operator:
EXAMPLE
The AND operator
if (  x >= 5  &&  x <= 10 )
{
     console.log( "x falls in the range of 5 and 10" );
}
else
{
    console.log( "x is outside the range of 5 and 10" );
}
Directions: In your console pane, type the below code and press “Enter.”
1. Open the Developer Tools in Google Chrome (F12), and click on the Console tab.
2. In your console pane, type the code below, using the “Shift” +“Enter” key combination at the end of each line:
let x = 7;
if (x >= 5 && x <= 10)
{
	console.log("x falls in the range of 5 and 10");
}
else
{
	console.log("x is outside the range of 5 and 10");
}
3. Next, press “Enter.” You should see an output of x falls in the range of 5 and 10.
EXAMPLE
The output should be as shown below. Keep in mind there may be some variances in other visible content because of the webpage you are on when accessing the console pane.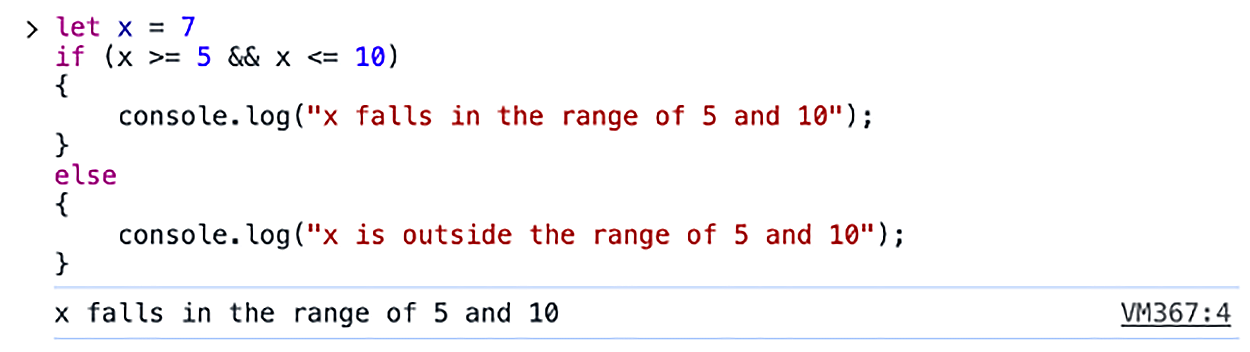
The first line of the code creates the variable x and sets the value of 7. The if-else statement begins by checking if x is greater than or equal to 5 AND if x is also less than or equal to 10. If this evaluates to true, then the link “x falls in the range of 5 and 10” will be displayed on the screen. If the statement evaluates to false, then “x is outside the range of 5 and 10” will be displayed.
EXAMPLE
The OR operator
if ( engineMileage >= serviceThreshold  ||  currentDate > serviceDate )
{
    console.log( "Time to schedule service!" );
}
else
{
    console.log( "No need to schedule service at this time" );
}
Directions: In your console pane, type the code below and press “Enter.”
1. Open the Developer Tools in Google Chrome (F12), and click on the Console tab.
2. In your console pane, type the code below, using the “Shift” + “Enter” key combination at the end of each line:
engineMileage = 11000;
serviceThreshold = 20000;
currentDate = 20231204;
serviceDate = 20231103;
if (engineMileage >= serviceThreshold || currentDate > serviceDate)
{
	console.log("Time to schedule service!");
}
else
{
	console.log("No need to schedule a service at this time.");
}
3. Next, press “Enter.” You should see an output of Time to schedule service!
EXAMPLE
The output should be as shown below. Keep in mind there may be some variances in other visible content because of the webpage you are on when accessing the console pane.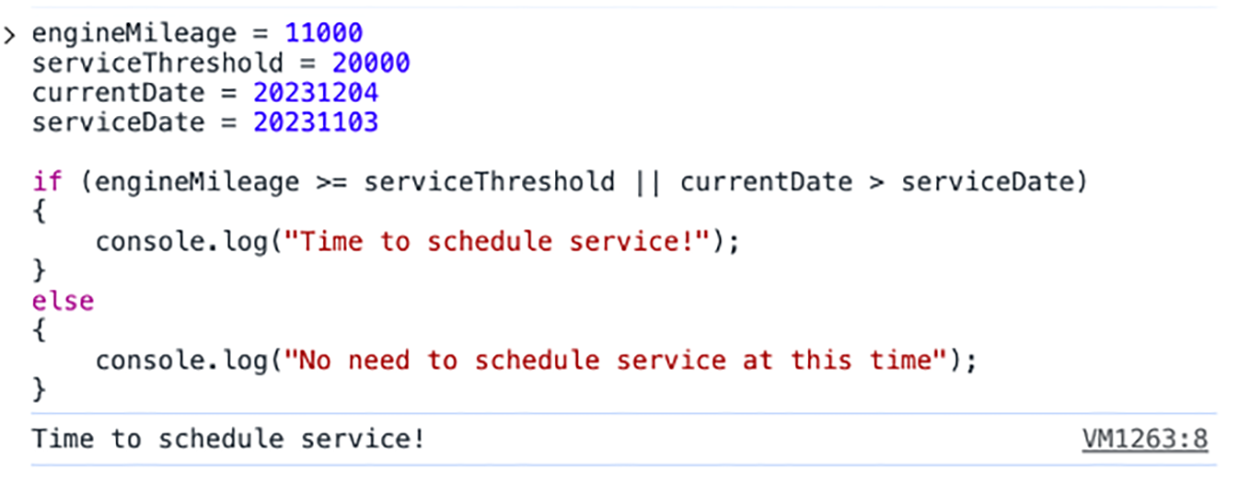
As you can see in this sample, the engineMileage is less than the serviceThreshold (evaluates to false), but the currentDate is greater than the serviceDates (evaluates to true). When using the OR (||) operator, you only need one to evaluate to pass the condition.
Try changing the currentDate to 20231003. Did you get the expected result?
Control
Manipulation of the flow of execution so that an application responds appropriately based on the different inputs provided.
Decision Structure
A set of programming code that evaluates the true/false value of a condition statement and, based on that evaluation, executes one of multiple pathways of commands.
Iterative Structure
Also referred to as a loop; code structure that evaluates a condition statement, and as long as the condition evaluates to true, the block of code will execute repeatedly, rechecking the condition statement after completing one pass through the code block.
IF/IF-ELSE
A common programming structure that controls the flow of execution depending on the evaluation of a true/false condition statement.
Logical Operators
Operators used to combine the results of multiple condition expressions into a single output, based on the truth table of the logical operator.
Truth Table
A table used to illustrate the outcome of multiple binary inputs for different logical operators.
In the previous tutorials, you have seen the use of the console.log() function, which prints the value of whatever is in the parentheses. This is one of the common forms of output for developers when it comes to JavaScript programming. Users do not typically keep their browser’s console open, so printing data and information to the console is not particularly helpful for users. Instead, console logs are used by developers for a number of purposes, one of which is to print programming information, variables, status, and errors related to the program code. This helps with the development process. It is also used by developers for debugging and troubleshooting. For example, if you have an issue with a single piece of data that is processed multiple times, yet it does not come out on the other end, you would troubleshoot this by logging the value of the data to the console at every step in the process and then examine the console log to find out where the operations go wrong.
In order for output from JavaScript to be useful to the user, it needs to be put into the webpage itself or announced using a popup solution. The popup solutions include using the alert(), confirm(), or prompt() functions, which will open a small popup dialog window with a title, message, and one or more clickable buttons.
Popups can be a great way to collect information for your user and to get their attention. Remember that a web developer should build with the user and user experience first in mind. Having too many popups or having popups that prevent you from engaging with the website can have a negative impact on the UX. This can also have a negative impact on SEO ranking.
| Popup Solution | Description | Output |
|---|---|---|
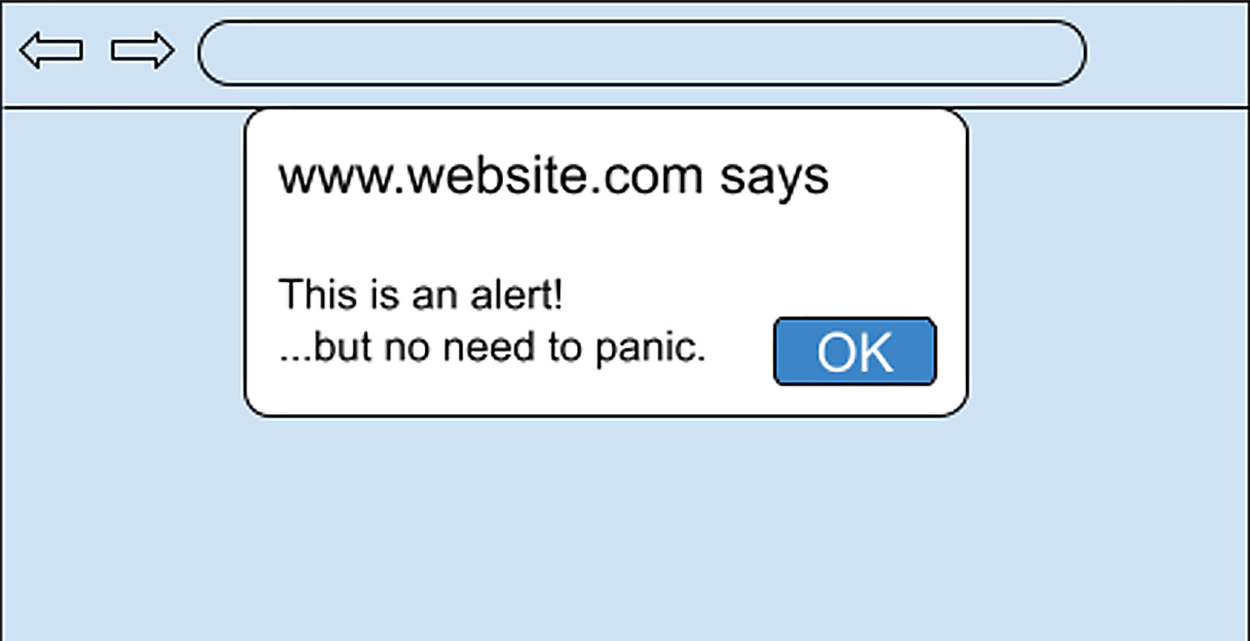
| window.alert("This is an alert!\n... but no need to panic") | Opens a popup with a message and an “OK” button. |
|
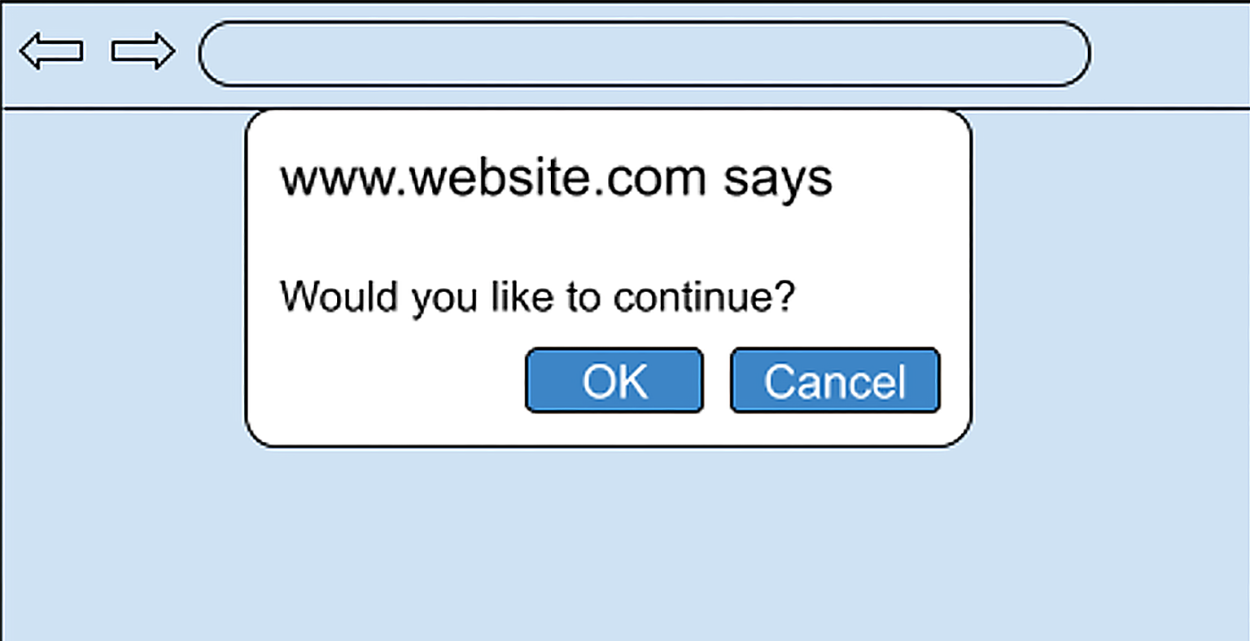
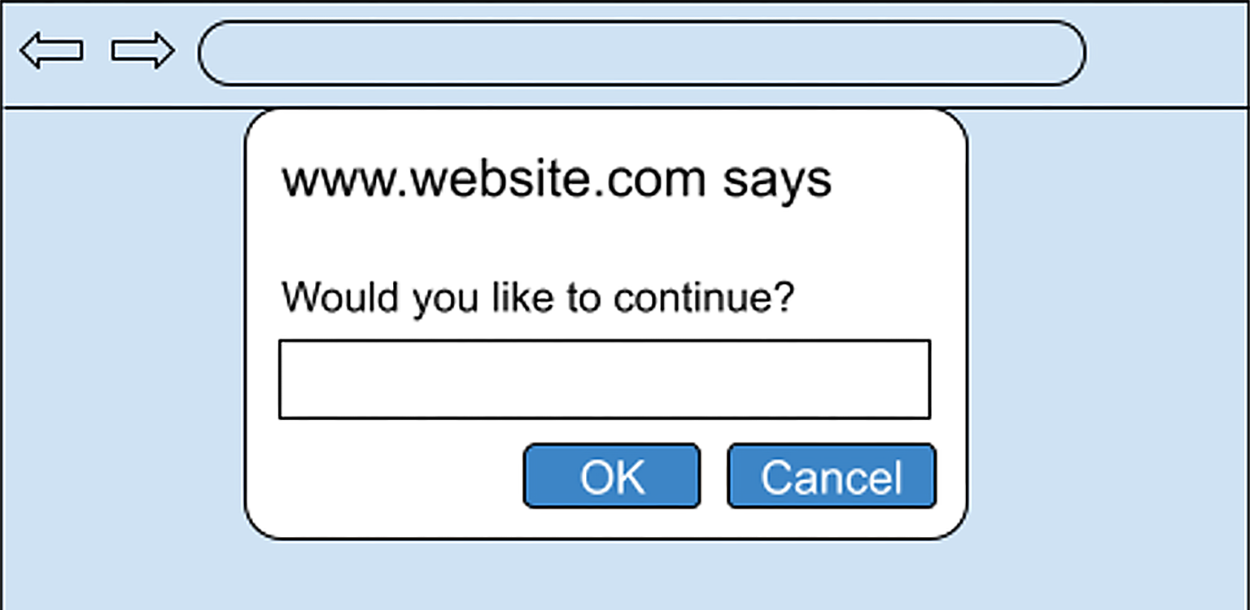
| window.confirm( "Would you like to continue?") |
Opens a popup with a message with ”OK” and “Cancel” buttons. Returns “true” if the user clicks OK” and returns “false” when the user clicks “Cancel.” |
|
| window.prompt("please enter your name") |
Opens a popup window with a message and a text field for the user to enter a value. Returns the value if the user clicks “OK” and returns “null” when the user clicks “Cancel.” |
|
As you can see from the examples above, not only can popups be used to display information to the user, but they also enable developers to gather a yes, no, or even textual input from the user.
What if we needed to display a larger amount of data for the user? What if we need to generate a whole table of information for a user to see? This is where JavaScript can output directly to the webpage by manipulating the DOM contents and adding new content.
To add new content to a page, we can use the document.write() function to write HTML directly into the DOM. The following example demonstrates a JavaScript function that accepts data as an argument, formats it as a Level 2 heading, and then writes it into the document at its current location in the document.
EXAMPLE
JS code
<script>
function addHeading( data )
{
     document.write(`<h2>${data}</h2>`);
}
</script>
EXAMPLE
HTML code before being rendered
<body>
<div>
     <script>addHeading( "This is a level 2 heading" );</script>
</div>
</body>
EXAMPLE
HTML code after being rendered
<body>
<div>
     <h2>This is a level 2 heading</h2>
</div>
</body>
The call to the addHeading function will take the argument value, interpolate it into the string between the <h2> and </h2> tags, and then leave the final string in its place. The original file on the server does not change; only the copy within the user’s browser’s memory gets changed by the browser executing the JS code.
The term “interpolate” is a fancy way to say “evaluate and insert.” When we write a string of text in any programming language, everything between the quote marks is nothing more than plain text. Any variable names, function calls, and so on are treated simply as text and do not get evaluated or executed. In JavaScript, we can interpolate the values of variables and objects using special syntax. First, we replace quotes with backticks (the backtick is the key to the immediate left of the 1 number key (upper left). Then, within the string of text, the value of any variable, function call, or object can be evaluated and its value inserted into the string by surrounding it with curly brackets, prefixed with a dollar sign: ${ }.
We can use JavaScript to write more complex content, such as a table of data, into a webpage using a list and a loop. In the following example, we write a function createTable( data ), which accepts an array of values. It then writes to the webpage the start of the table and the table headers. Then, the forEach() function of the data argument (which is an array) is used to create the next table row and cells, taking each element from the list, one at a time, and interpolating it to the correct location. Once the loop terminates, the function closes the table by writing the </table> closing tag.
EXAMPLE
JS code
const fruit = [ "Banana", "Apple", "Orange", "Jackfruit" ];

function createTable(data)
{
  document.write("<table><tr><th>Count</th><th>Data</th></tr>");
  let count = 1;
  data.forEach( (x)=>
    {
    document.write(`<tr><td>${count}</td><td>${x}</td></tr>`)
    }
  );
  document.write("</table>");
}
EXAMPLE
HTML code before being rendered
<body>
<div>
     <script>createTable( fruit );</script>
<div>
</body>
EXAMPLE
HTML code after being rendered
<body>
<div>
     <table>
          <tr>
               <th>Count</th>
               <th>Data</th>
          </tr>
          <tr>
               <th>1</th>
               <th>Banana</th>
          </tr>
          <tr>
               <th>2</th>
               <th>Apple</th>
          </tr>
          <tr>
               <th>3</th>
               <th>Orange</th>
          </tr>
          <tr>
               <th>4</th>
               <th>Jackfruit</th>
          </tr>
<div>
</body>
EXAMPLE
How the data will be displayed on the page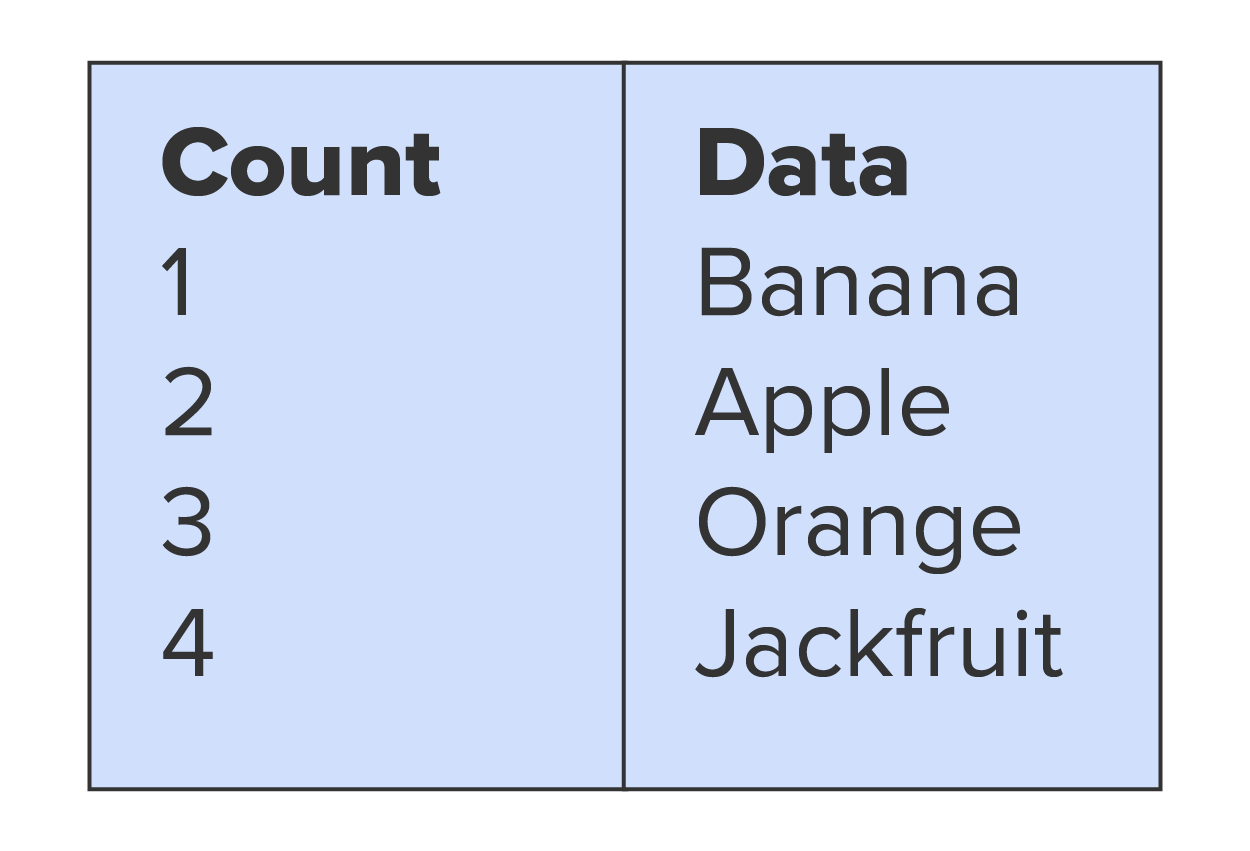
Again, the script tags and the call to createTable() is removed once executed, and, in its place, the write commands have built an HTML table with the array data interpolated throughout.
Interpolate
A programming process wherein special syntax is used to weave object data throughout a string of literal text.
Manipulating content within a DOM using JavaScript is a powerful feature that gives programmers a lot of flexibility in manipulating existing content within a webpage. However, what if we wanted to create new content, on demand, using JavaScript? This can be accomplished using two methods:
EXAMPLE
Creating new content using .innerHTML
<body>
    <header id="header"></header>
</body>
<script>
    document.getElementById("header").innerHTML = "<h1>Welcome to our website!</h1><nav><ul>...</ul></nav>";
</script>
EXAMPLE
HTML code after execution
<body>
    <header id="header">
        <h1>
            Welcome to our website!
        </h1>
        <nav>
            <ul>...</ul>
        </nav>
    </header>
</body>
This method of adding new content to a webpage is easier for the developer, but it requires more browser processing overhead as the browser is responsible for parsing the .innerHTML code into elements, creating the DOM segment, and then attaching it to the primary DOM.
A more efficient method of creating new content is to use the second method and create and attach the new elements using createElement() and appendChild(). This method reduces the processing burden on the browser. For example, let us create a paragraph element and append it to the document itself.
EXAMPLE
Creating an element with createElement and attach it to the body<script>
const para = document.createElement("p");
para.innerText = "This is the new paragraph element.";
document.body.appendChild(para);
</script>
In the example above, we called the document.createElement() and passed in a string identifying the type of HTML element we wanted to create. This newly created element is assigned to the “para” variable. Next, we give the new element some content by assigning text to the .innerText element. (note that assigning content to the .innerText attribute does not incur the same processing overhead as .innerHTML since .innerText does not have to be parsed into objects.)
The last step in the example was to attach the newly created element to the DOM; in this case, we referenced the document.body object, which represents the body element of the page, and called the appendChild() function. The appendChild() function will append the element to the end of the current body content.
If we wanted to add the new element to a specific location on the page, we would do the same operation, but instead of attaching it to the document.body, we would get a handle to the specific element, which will hold the new element and attach it there.
EXAMPLE
Creating an element with createElement and attach an element<body>
<header id="topHeader"></header>
</body>
<script>
const para = document.createElement("h1");
para.innerText = "Welcome to the site!";
document.getElementById("topHeader").appendChild(para);
</script>
EXAMPLE
HTML code after execution<body>
<header id="topHeader">
<h1>Welcome to the site!</h1>
</header>
</body>
We can also dynamically remove elements from a DOM using the removeChild() function. The process is a bit different since we target an element to remove one of its child elements (not the targeted element itself), such as list items in an ordered or unordered list.
EXAMPLE
Removing an element’s child using removeChild()
<body>
    <ul id="FruitList">
        <li>Apple</li>
        <li>Banana</li>
        <li>Grapes</li>
    </ul>
    <button onClick="myFunction()">Remove First Item</button>
</body>
EXAMPLE
JavaScript code<script>
function myFunction() {
const list = document.getElementById("FruitList");
if (list.hasChildNodes()) {
list.removeChild(list.children[0]);
}
}
</script>
EXAMPLE
HTML code after execution
<ul id="FruitList">
  <li>Banana</li>
  <li>Grapes</li>
</ul>
Let us break down the example above. We start with an unordered list container with three list items, followed by a button with an onClick listener pointing to the myFunction. The function gets a handle to the unordered list using getElementById("FuitList") and stores it in the “list” variable. Then, we enter an if statement, which checks to see if there are in fact children within the element (we do not want to try to remove an element if there are no elements in order to avoid an error).
If children are present in the list, we then call the list.removeChild() function and pass in a reference to the specific child. The reference to the child is made through the “list” object itself using its built-in “children” collection property. When you reference an element’s “.children” property, it returns an array of elements that are the element’s direct children. Since list.children returns an array, we can use the index indicator to specify which specific list item we want to remove. In this case, we wanted to remove the first child in the list, so we used the index of zero as “list.children[0]” and used that as the argument in the call to the list.removeChild() function.
Where can you see this functionality of dynamically creating and removing content and elements from the DOM being used? What about a wedding RSVP form that may ask “How many guests will you be bringing?” When the user enters a number into the field, you use that number to generate the correct number of guest information sections in the form.
Programming Handle
An object or variable that represents another object in memory.
Thus far, you have seen the document.getElementById() function used to get a programming handle to a single HTML element within the DOM. However, oftentimes, we need to select multiple similar items or items with a similar characteristic in order to process or manipulate them using JavaScript. In such cases, we can use the following alternative functions:
In the case of getElementsByTagName(), this function returns an array of elements that are of the same Tag name that was provided to the function argument. For example, we can get an array of every paragraph element using document.getElementsByTagName("p"). We can then access individual elements using an index indicator, or we can use a loop or the .forEach function to make a change to all elements in the array.
EXAMPLE
Retrieving the li elements for processing
<ul id="FruitList">
    <li>Apple</li>
    <li>Banana</li>
    <li>Grapes</li>
</ul>
<button onClick="capsData()">Capitalize Items</button>
<script>
  function capsData()
  {
  let items = document.getElementsByTagName("li");
      for(let i = 0; i < items.length; i++)
      ( items[i].innerText = items[i].innerText.toUpperCase());
  }
</script>
EXAMPLE
HTML code after execution
<ul id="FruitList">
    <li>APPLE</li>
    <li>BANANA</li>
    <li>GRAPES</li>
</ul>
In this example, we used the getElementsByTagName("li") to get an array of list item elements. Next, we used a basic for loop to step through the array and overwrite each element’s innerText with its capitalized version.
The getElementsByClassName() and getElementsByTagName() functions are great for accessing fairly standard elements and content. However, what if we have a unique or customized element that would not fit into either one of these categories or perhaps we needed to select just certain elements of the same type of class? In such cases, we can customize the selection mechanism to retrieve an individual element or an array of elements per our own needs using the document.querySelector() or the document.querySelectorAll() functions. The query selector functions take the same selector syntax as CSS selectors, which is beneficial for those developers who are comfortable using CSS selectors.
The key difference between querySelector() and querySelectorAll() is that querySelector() will only return a single element, that element being the first element that matches the selector argument. However, querySelectorAll() will return an array of all elements that match the selector argument. Another difference with querySelectorAll() is that the list of elements returned is somewhat static. While you can manipulate the existing elements, you cannot add or remove elements returned by querySelectorAll() as it is only a static array of elements. If you want to add a new item to the list, you would get a handle to the list container, not the items.
EXAMPLE
Retrieving the li elements for processing
<ul id="FruitList">
    <li>Apple</li>
    <li>Banana</li>
    <li>Grapes</li>
</ul>
<button onClick="capsData()">Capitalize Items</button>
<script>
  function capsData()
  {
  let items = document.querySelectorAll("li");
      for(let i = 0; i < items.length; i++)
      ( items[i].innerText = items[i].innerText.toUpperCase());
  }
</script>
EXAMPLE
HTML code after execution
<ul id="FruitList">
    <li>APPLE</li>
    <li>BANANA</li>
    <li>GRAPES</li>
</ul>
In this challenge, and the previous challenge, some of the functions return an array of elements per the argument provided to the function. The truth is that these functions either return an HTMLCollection or a NodeList collection. While they are very much the same thing, they do not always behave exactly like an array. While the while loop worked fine treating the collection as an array, we are unable to use the array.forEach() function.
A callback function is a function that gets passed into another function and then executed by the function in which it was passed. For example, if we have a function that we need to call, but that function is contained within a script located on the web, we would first issue a request to retrieve the script from the web. This may take a few seconds for the file to be received. In the meantime, our JavaScript will continue to execute within the browser. If our JavaScript code tries to make a call to the target function, we will incur an error since the script has not yet been loaded and thus the function does not exist . . . yet.
Once the script is received and loaded by the browser, the function can be called, although it would be too late to avoid the error. This is a common concern when developing a site to use and create dynamic content, especially if the content comes from other servers or data providers. As a result, we either end up with scripts that slow down because of pausing and waiting for calls to be completed, or we end up with a lot of AJAX requests, which can slow down development.
To resolve this, we have a couple of options. Originally, we would use a callback function, which would get called once the script has been loaded.
EXAMPLE
Passing a callback function to handle the asynchronous call to the loaded scriptfunction loadScript(src, callback) {
let script = document.createElement('script');
script.src = src;
script.onload = () => callback(script);
document.head.append(script);
}
loadScript( '', (script) => {
alert(`Cool, the script ${script.src} is loaded`);
special(); // special() is a function declared in the loaded script.
});
In the example above, we have a loadScript function that accepts the URL of a script to load and a callback function to be executed once the script is loaded. The callback is used as the event handler function for the script object’s “onload” event. At the time that the script is loaded into memory, the onload event is fired and the callback executed. The callback itself issues an alert stating that the script was loaded and then makes a call to the target function that belongs to the script.
This mechanism works well for simple implementations. However, when we need to load multiple files and chain together multiple callbacks, we can run into complexity issues. Thankfully, JavaScript has provided developers with the “promise” object, which can simplify multiple call stacks.
A JavaScript promise is a type of JavaScript object that is returned in response to a function prefixed with “async” that executes and returns either a “Promise.resolve()” or “Promise.reject()”. So, if we need to execute a function that will make a request to another system, that is, using an asynchronous request mechanism such as requesting a script from a server, we can use an async function to make the request.
Once the request has been fulfilled, either successfully or unsuccessfully, the async function will call either the resolve() or reject() method and provide a value or error message as the argument.
A fully expanded version of an async function that creates and returns a promise will look like this.
EXAMPLE
Async function returning a promise
async function loadScript(src)
{
    let promise = new Promise( (resolve, reject) => {
        if( true )
            return Promise.resolve("Done loading script.");
        else
            return Promise.reject("Error loading script.");
    } );
}
In the example above, we define an async function and explicitly create a Promise object, which accepts an arrow function as the argument. The arrow function is what carries out the request operation, which will eventually produce results or a failure and finally will issue either a Promise.resolve() if successful or a Promise.reject() if the request fails.
A simplified version of the async function, which only represents a resolve, omits the creation of the promise object and calls to resolve or reject.
EXAMPLE
Simplified async function syntax
async function loadScript(src)
{
    return 1;
}
As you can see from this version, it looks like a typical function. The only thing that gives away the fact that it returns a promise is the inclusion of the “async” prefix. However, the return does in fact create and return a promise using the resolve method. The argument given to the resolve method is what gets returned by the promise itself. For example, let us take a look at an async function that returns a message as the argument for the resolve method after a 3-s timer.
EXAMPLE
The async function that resolves a message after 3 s
<div id="demo1"></div>
<script>
  async function displayMessage()
  {
     let myPromise = new Promise(function(resolve) {
        setTimeout(()=> {resolve("Welcome!!")}, 3000);
     });

    document.getElementById("demo1").innerHTML = await myPromise;
  }
  displayMessage();
</script>
In the example above, we used an async function to create a promise that sets a timer and resolves the promise with a welcome message after 3 s. Next, inside of the async function and after the promise was initiated, we set the value of an element with an id of “demo1”, the value returned by the promise.
Did you notice the keyword “await”? Await is a special operator that only works within an async function and is used to pause the script and wait for the promise to resolve. If you run the example from above, you will see that the welcome message does not populate until 3 s after the page loads. Await does not block the page from continuing to load, but it does pause the script to allow the request to finish.
View the following video for more on dynamic and interactive webpage content.
JavaScript Promise
A type of JavaScript object that is returned in response to a function prefixed with “async” that executes and returns either a “Promise.resolve()” or “Promise.reject()”.
Source: This Tutorial has been adapted from "The Missing Link: An Introduction to Web Development and Programming " by Michael Mendez. Access for free at https://open.umn.edu/opentextbooks/textbooks/the-missing-link-an-introduction-to-web-development-and-programming. License: Creative Commons attribution: CC BY-NC-SA.