Table of Contents |
One of the challenges with web development for developers is that once a webpage is delivered to the user’s browser, the server is no longer involved or connected. Essentially, the webpage is on its own. Any additional get requests (remember that HTTP methods include GET, POST, PUT, and DELETE request types) to the server will result in the current page being wiped and replaced with the new data returned by the server. To address this, JavaScript introduced Asynchronous JavaScript And XML (AJAX), which uses the asynchronous architecture of JavaScript to issue a get request to the server without forcing the webpage to reload. Then, because of the asynchronous nature, whenever the server transmits the requested data, AJAX senses the response and then triggers a handler function. The handler function is what processes the returned data and uses it somehow, usually to update content on the current page. This way, we can update just one section of a webpage. This tutorial discusses the basics of AJAX requests and how we handle the returned data.
Note that the X in AJAX stands for XML, which is a standard for defining complex data structures. While AJAX does not exclusively use XML, this tutorial will discuss using AJAX to access non-XML data. XML will be discussed in a later Challenge.
Handler Function
A function assigned to listen for and handle an event or response.
When preparing an AJAX request, we need to create an XHR object. XHR stands for XMLHttpRequest (XHR), which is the actual name of the object used to create and send AJAX requests. To begin, we create a new const variable and declare a new XHR object.
EXAMPLE
Creating an XHR object
const xhttp = new XMLHttpRequest();
Next, we can configure the handler function by providing the xhttp.onload event with a callback function. This is the function that jumps into action when the server’s response is received. It can be used to parse out the data into an HTML or something else according to the needs of the application.
EXAMPLE
Adding an event listener to handle the response data
xhttp.onload = function()
{
	document.getElementById("placeholder").innerHTML = this.responseText;
};
The onload event occurs when the response comes back from the server. We give it the callback, which can access the xhttp object’s responseText, containing the server’s response. The example above simply posts the returned data as the content of an element with the id attribute of “placeholder.” However, if we know that the server is going to return an array, we can replace the function’s logic to generate a table of values, a dropdown menu, and so on.
The onLoad function, while simple and effective, does not take into account any potential errors in response to the original request. As such, we can instead provide the xhttp.onreadystatechange event with a callback function, which also tests for status codes and responds accordingly. The onreadystatechange event property is used to specify a function that should be executed when the state of the XMLHttpRequest object changes.
EXAMPLE
Setting a handler function to handle theonreadystatechange event
xhttp.onreadystatechange = function()
{
	if( this.readyState == 4 && this.status == 200)
	{
		document.getElementById("placeholder").innerHTML = this.responseText;
	}
};
In this case, we tested two attributes, the XHR.readyState and the XHR.status of the XHR object. The readyState attribute indicated the status of the XHR object:
| Status Code | Outcome of the Requests |
|---|---|
| 1xx | Indicates the request was received and is currently being processed |
| 2xx | Indicates the request was successfully received and accepted |
| 3xx | Indicates that additional actions are needed to fulfill the request |
| 4xx | Indicates a client error due to bad syntax or the request not being fulfilled |
| 5xx | Indicates a server error while processing an otherwise valid request |
By testing the value of the XHR’s readyState and status attributes, we can determine that the request was completed (readyState == 4) and that it was successful (status == 200) before processing the response to the webpage. This way, if either of these were not the case, then we can either ignore the response and do nothing or execute a different sequence of commands to either log the type of error to the console or produce an error message to the screen.
Once we have configured the XHR object and its callback function, we can then prepare the request using open() and then transmit using send(). The XHR’s open() function requires two arguments, but it can accept up to five.
EXAMPLE
Checking for completion and success before processing response data
const xhr = new XMLHttpRequest();
xhr.onreadystatechange = () =>
{
	if(xhr.readyState == 4 && xhr.status == 200)
	{
		//insert xhr.responseText or xhr.responseXML into the DOM
	}
	else
	{
		//report or log the error based on status and readyState values.
	}
};
xhr.open("GET", "/scripts/handleRequest.php");
xhr.send();
However, if sensitive data needs to be transmitted, it needs to be secured using the “POST” method. This request requires a slightly more complicated setup as we need to prepare the XHR object with request headers. To do this, we use the xhr.setRequestHeader() method, which accepts two arguments, the string header name and a string header value. Headers are values that are pre-fixed to a request or response and are used to tell the other party about the type of request, authentication data, content type, and so on.
EXAMPLE
Using the POST method and setting request headers
const xhr = new XMLHttpRequest();
xhr.open("POST", "/scripts/handleRequest.php");

xhr.setRequestHeader( "content-type", "application/x-www-form-urlencoded" );

xhr.onreadystatechange = () =>
{
	if(xhr.readyState == 4 && xhr.status == 200)
	{
		//insert xhr.responseText or xhr.responseXML into the DOM
	}
	else
	{
		//report or log the error based on status and readyState values.
	}
};
xhr.send("user=jDoe&pass=123456");
Notice the capitalization of the XHR attributes versuss its event listeners. Functions and attributes that hold data values use camel-case such as xhr.setRequestHeader() and xhr.readyState, while event listeners are all lowercase such as xhr.onreadystatechange.
There are only three differences here:
XMLHttpRequest (XHR)
The object used in JavaScript to prepare and transmit an AJAX request.
XHR.readyState
The attribute of the XHR object that indicates the current status of the AJAX request process.
XHR.status
The attribute of the XHR object that indicates the received response status code from the server.
Request Headers
Parts of an HTTP request that are communicated to the server prior to the rest of the request that provides helpful data and information to the server.
Given that AJAX gives us the ability to make a request to a resource on the server, we can use this functionality in a wide range of ways. Some examples are as follows:
When we point an AJAX request to a script file, the server will execute the script and return any data produced by the script. The script file can be programmed to do just about anything we need, such as connecting to a database and issuing SQL commands, writing data to a basic text file, and even forwarding data and information to other scripts or information management systems for further processing.
When a script is done processing, it will prepare a response object and transmit it back to the awaiting AJAX handler function. This is done by calling the scripting language’s response function. When calling a script written in PHP, which will be discussed later, we use the echo or print command to return text-based content to the requesting browser. In a webserver running the NodeJS framework, we can use JavaScript scripts as the server-side scripting language and use the send() function or the json() function to return data to the requesting browser. Recall that NodeJS is a powerful JavaScript framework and run-time environment that enables the use of JavaScript as a server-side programming language.
Directions: Now that you have learned about AJAX, let us practice by programming a function that will accept a URL and target element’s id value and initiate an AJAX request. The request will retrieve data from a text file on the server and insert the text into the target element. We will also trigger a simple PHP script, which will echo a response back to the page.
1. Start by logging into your StackBlitz account and making a fresh new project using the "Static HTML/JS/CSS" template.
2. Create a new file called msgdata.txt and write a message inside to yourself, something like “Hi, this is a message from inside of the data file on the server.” Name and save the project.
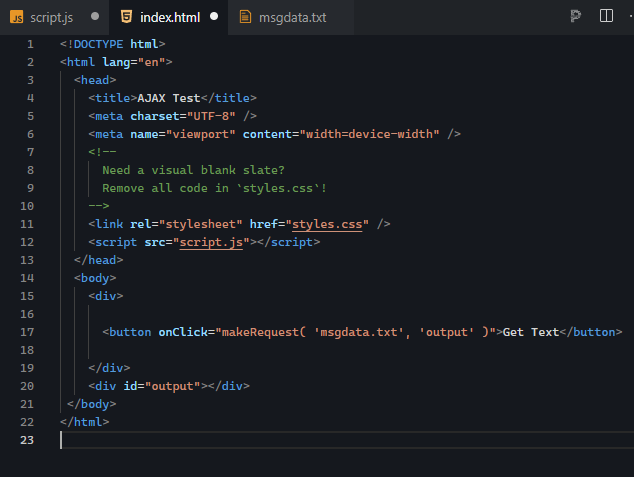
3. Open the index.html, and remove the default code between the two body tags. Create two sets of divisions. In the first, add two button elements with the labels “Get Text” and “Trigger Script.” We will link these two buttons to the JavaScript function later. In the second division, simply give it an id attribute of “output.”
<body>
<div>
<button>Get Text</button><button>Trigger Script</button>
</div>
<div id="output"></div>
</body>
4. In the head of the HTML page, link to the script.js file using a script tag and the src attribute.
<head>
<meta charset="utf-8">
<meta name="viewport" content="width=device-width">
<title>AJAX Test</title>
<link <link rel="stylesheet" href="styles.css" />
<script src="script.js"></script>
</head>
Note: StackBlitz should already place code in to link to the .js file, you can just overwrite it.
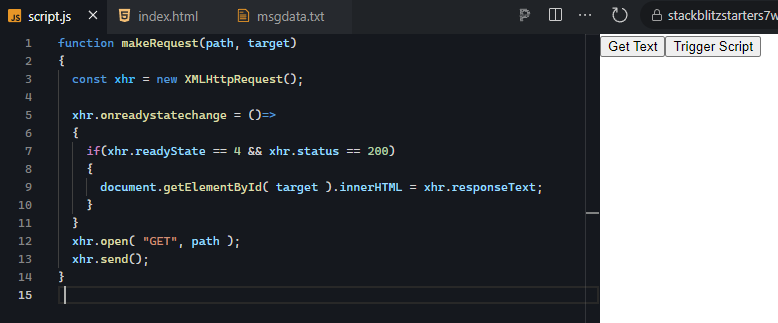
5. Open the script.js file and add a new function called “makeRequest()” using the traditional function declaration. In the parentheses, add two parameters called “path” and “target.”
function makeRequest(path, target)
{

}
6. Within the function’s curly brackets, let us go ahead and declare a new XHR object and set up the request using the open() function. We will use the “GET” method for this exercise, and we will use the “path” parameter as the URL argument for open().
const xhr = new XMLHttpRequest();
xhr.open( "GET", path );
7. Next, we will prepare the request’s handler function by assigning the onreadystatechange event with an arrow function. This function will test for a successful response. Then, we will get a handle to the target HTML element using getElementById("id") and pass in the value from the “target” parameter. We will use this to then insert the responseText value into the target element’s innerHTML attribute.
xhr.onreadystatechange = ()=>
{
    if(xhr.readyState == 4 && xhr.status == 200)
    {
        document.getElementById( target ).innerHTML = xhr.responseText;
    }
}
The final step in the makeRequest() function is to add the XHR’s send() function call, which triggers the request to be sent to the server.
xhr.send();
This is the expected code:
8. At this point, we have our resource in place, the script file linked, and the JavaScript function prepared to make our AJAX request. The final step is to tie the button to the function and send the two arguments to the function for processing. We will do this using the “onClick” HTML attribute event listener and set it equal to a call to the function makeRequest(). Note that we will use the “Trigger Script” button in the next challenge, which will cover the PHP server-side scripting language.
<button onClick="makeRequest( 'msgdata.txt', 'output' )">Get Text</button>
In the index.html, place this code overtop the existing button elements.
Remember, if you use double quotes around the attribute value, then you need to use single quotes around the two arguments.
This is the expected code:
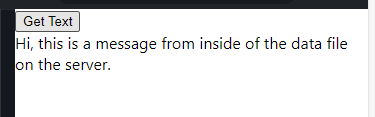
9. Refresh the project and then test the button. Give it a click and see if your text message from the file appears on the page.
This is the expected code:
At this point, if we do not see anything change on the screen after clicking the button, then we need to do a little troubleshooting. One easy way to see whether our code is even being triggered is to place an alert() function at different places in the code. This will give us an indication as to whether or not the JavaScript function we wrote is even being called in the first place. Then, we can place one in the callback function assigned to the onreadystatechange event to see if that is being triggered.

If we see that only the first alert appears, then we know the button is linked to the function properly and that there is something wrong with the onreadystatechange. This may also be a result of improper function declaration syntax.
A common mistake is camel-casing onReadyStateChange. This is wrong as events are all lowercase in JS.
If we receive the first two alerts (you will see the second alert four times since onreadystatechange gets called four times because the value changes four times), then this means the request is being sent and received; however, we do not succeed in getting the data. This could be due to a 400 error (likely a 404, “resource not found”) or a 500 error if we are trying to access a script. In this case, a 500 error is an error within the server related to the script being executed. In these cases, we want to know the status code and we have two options to find that out.
If you are receiving “undefined” as the status or responseText, then this is likely due to using the “this” keyword within an anonymous function.
EXAMPLE
Removing the reference tothis in the creation of the XHR handler function
document.getElementById(target).innerHTML = this.responseText
-vs-
document.getElementById(target).innerHTML = xhr.responseText
This has to do with the type of function declaration used when assigning a callback to the onreadystatechange event. If you use the function expression like the following, then you can use “this” to represent the object:
xhr.onreadystatechange = function() { alert(this.response); };
However, if you use an arrow function, then you need to use the object’s identifier like so:
xhr.onreadystatechange = ()=>{ alert(xhr.response); };
Source: This Tutorial has been adapted from "The Missing Link: An Introduction to Web Development and Programming " by Michael Mendez. Access for free at https://open.umn.edu/opentextbooks/textbooks/the-missing-link-an-introduction-to-web-development-and-programming. License: Creative Commons attribution: CC BY-NC-SA.