Table of Contents |
Before you explore object-oriented programming and classes, consider a few concepts that were discussed in previous tutorials.
In Units 1 and 2, you learned the four basic programming structures for writing code. They include:
String myVar = “Hello World”;. You also explored various uses of data structures such as arrays and different collection types (ArrayList, Set, and HashMap).
You saw and discussed some poorly written code and practiced writing good code. You also optimized good code. It took three iterations for the Tic-Tac-Toe game, but in the end, it was a much better game and provided a much better player experience. Hopefully, at this point in the course, you are starting to see that there is an art and an aesthetic to writing code.
Finally, you have seen that your programs are getting longer and longer, as you continue to learn new functionality that exists within Java. As you become more experienced writing programs, and the solutions dictate the need, you will continue writing longer programs.
Some programs can get to be millions of lines long! The average modern high-end car can contain up to 100 million lines of code. Here is a fun statistics site that references average lines of code per application:
https://www.informationisbeautiful.net/visualizations/million-lines-of-code/
Why is it important for us to recap the previous challenges and tutorials at this point? For starters, up to this point in the course, you have relied more on static methods and logic coding. As you have used the four structures of code, you have defined your own variables and methods. You have also explored the use of common data collection types. You will now begin to consider and look at new strategies for organizing code. This includes bundling data and methods into objects.
Second, as your programs get larger, it becomes increasingly important to write code that is easy to understand and structured in a way to optimize it as best as possible. If you are working on a large program, you can never keep the entire program in mind at the same time. You will need to think of ways to break large programs into multiple smaller pieces. This allows you to focus on smaller pieces when solving a problem, fixing a bug, or adding a new feature. You noticed when optimizing previous coding examples and projects, it was performed to reduce repetition, clean up code, and thus help make the structure and functionality of the code clearer.
That is the art and aesthetic to writing code. Keep it clean and simple.
Finally, all of the variables, data structures, and methods that you have been using will all be used again in this next model of programming. It was essential that you knew the basics before moving into Lesson 3. Remember when you called out the first term “object”? You learned that an object is an instance of a class that has properties and methods that are encapsulated or part of it. Up to this point, you have actually been using objects and classes. As you learned, a Java program always consists of at least one class.
Turning to object-oriented programming, OOP for short, it is a programming model that organizes the design of code by bundling objects. Programming languages like Java, as well as Java, C++, Ruby, and others, are based on the OOP model.
Why use OOP? The structure and organization of the object-oriented programming model make code more reusable, more scalable, and more efficient. To do this, OOP structures programming into reusable pieces of code, or classes, that create individual instances of objects from. The goal of this challenge is to develop a basic understanding of how objects are constructed and how they function. Further, you will learn how to make use of the capabilities of objects that are provided to by Java. The basics of OOP will be touched on later, but know that there is much more capability to it than those capacities found in Java.
Object-Oriented Programming
Object-oriented programming (or OOP for short) is a programming model that organizes the design of code by bundling objects.
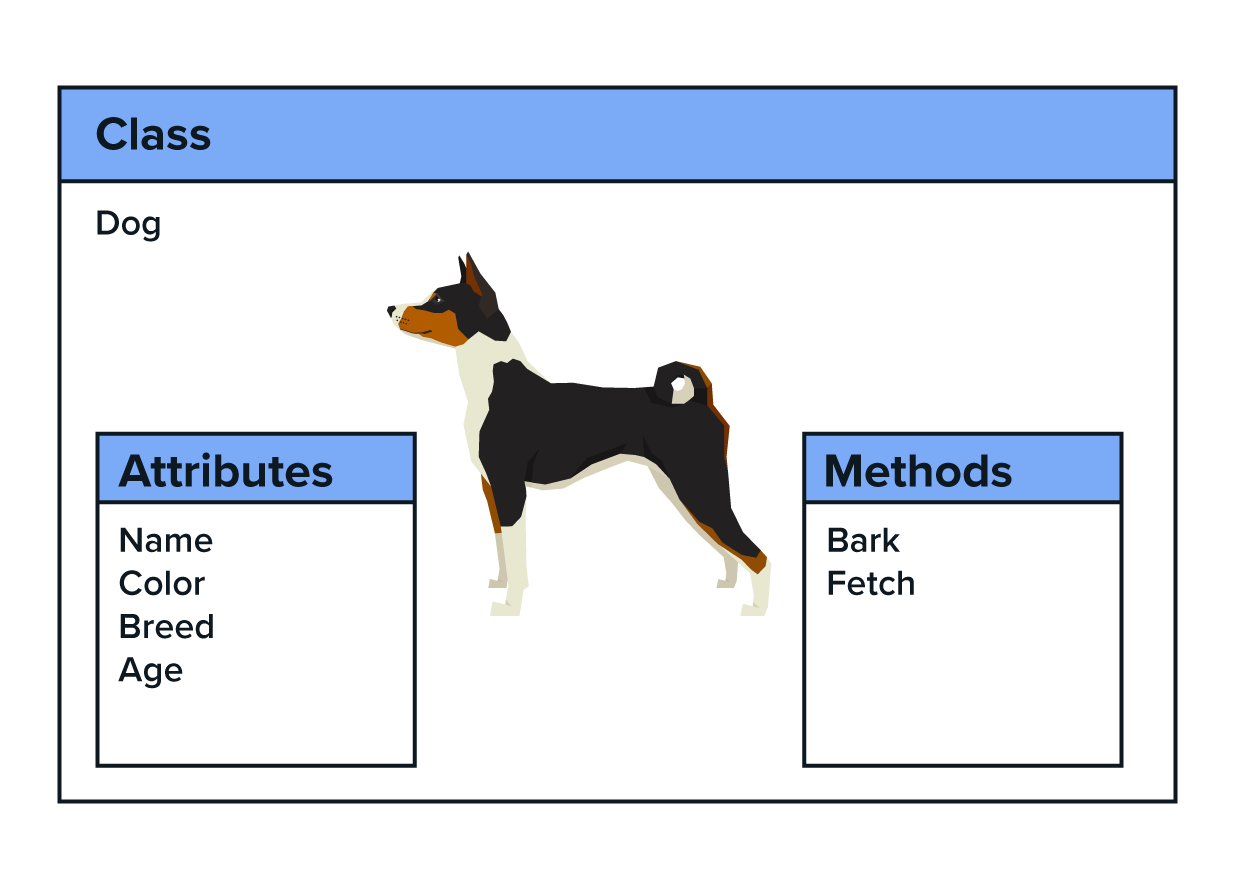
A class is a template for creating objects. Think of classes as a blueprint. In the example above, Dog is a class. However, it doesn’t contain any actual data. Classes contain fields for attributes and methods. The class, Dog, contains only the attributes and methods, or behaviors that are common to all dogs. The Dog class does specify that names, color, age, etc., are important to define a dog and that dogs should have behaviors like barking and fetching. However, it does not have any specific data about any particular dog.
A class has a name, and typically contains attributes and methods as demonstrated in the following graphic:
You will learn more about the code in upcoming tutorials.
For now, consider the following class:
// Note that the class is explicitly marked public
public class Dog {
  // Private attributes
  private String name;
  private String breed;
  private int age;
  private String color;

  // Public constructor with parameters
  public Dog(String name, String breed, int age, String color) {
    this.name = name;
    this.breed = breed;
    this.age = age;
    this.color = color;
  }

  // Accessor methods to provide read access to data in attributes
  public String getName() {
    return name;
  }

  public String getBreed() {
    return breed;
  }

  public int getAge() {
    return age;
  }

  public String getColor() {
    return color;
  }

  // Methods for behaviors
  public void bark() {
    System.out.println("Woof!");
  }

  public void fetch() {
    System.out.println(name + " went to fetch.");
  }
}
In order to use a class, you will need to create an instance of that class, called an object. This process is called class instantiation. Therefore, objects are an instance of a class that has properties (attributes) and methods that are encapsulated or part of it. The object, or instance, is uniquely created from the class and has data attributes that contain values that are unique to it. If you created an instance of the Dog class, this instance (object) is no longer a blueprint. This instance now contains actual data like a dog's name (Fluffy, for example), who is brown, a beagle, and is two years old.
The code that you have worked with so far in this course has been in a single class, in a single .java file. This single class has contained a main() method that runs when the program starts. The class with the main() method for an application is known as the program's "driver class."
It is a standard procedure when using a class like the Dog class above, that the code for the class is put in a separate .java file. It also includes a name matching the name of the class (Dog.java).
Note that the class is explicitly marked public.
The code for the application's driver class (in this case, DogExample) is then put in its own .java file.
Directions: Type in the following code in a file inside src/main/java folder named DogExample.java::
public class DogExample {
  public static void main(String[] args) {
    // Call constructor using keyword new.
    // Assign new Dog object to variable myDog.
    // Class names starts with capital letter
    // but variable name starts with lowercase
    Dog myDog = new Dog("Fluffy", "Beagle", 2, "Brown");
    // Call "get" methods to access data.
    // All methods called via the Dog object created above
    System.out.println("Name: " + myDog.getName());
    System.out.println("Breed: " + myDog.getBreed());
    System.out.println("Age: " + myDog.getAge());
    System.out.println("Color: " + myDog.getColor());
    System.out.print(myDog.getName() + " says ");
    // Call bark() method
    myDog.bark();
  }
}
Running this code in Replit is a two-step process. Additionally, to work with multiple classes it is recommended to run the commands in the same folder as the files are created. To change to the current folder the following command needs to be executed in the Shell:
EXAMPLE
cd src/main/java
This will be followed throughout Unit 3 and Unit 4.
Move on to the next Try It to continue.
Directions: Compile the Dog class using the following command in the Shell:
EXAMPLE
cd src/main/java
javac Dog.java
Assuming there are no errors in the code for the Dog class, this will create a binary Dog.class file containing the Java byte code for a Dog object.
Directions: Once the Dog.java file has been compiled, run the driver class (and thus the program) using the Java command as usual (make sure that you are inside the src/main/java folder):
EXAMPLE
java DogExample.java
The results should look like this:
~/.../main/java$ javac Dog.java
~/.../main/java$ java DogExample.java
Name: Fluffy
Breed: Beagle
Age: 2
Color: Brown
Fluffy says Woof!
~/.../main/java$
Directions: After running the code, delete the Dog.class file by running the following command in the Shell:
EXAMPLE
rm Dog.class
While the Dog.java file is not directly executable, the presence of a .class file in the directory can prevent using the Java command to run a .java file with the same name.
So, what is the purpose of a class? Think of the class like a cookie-cutter and the objects created using the class are the cookies. You wouldn’t likely put frosting on the cookie-cutter; you would put frosting on the cookies. And, you can put different frosting on each cookie. The frosting in this case represents the attributes or properties within the object. Each individual cookie with the frosting is considered as an object/instance of the class.
In the example of the Dog class, a template for creating dogs will not change. However, each instance created from it can. Because of this, you could create other instances like these:
EXAMPLE
Dog myDog1 = new Dog("Fluffy", "Beagle", 2, "Brown");
Dog myDog2 = new Dog("Mochi", "Mutt", 5, "White");
Dog myDog3 = new Dog("Wolfie", "Malteses", 10, "Black");
Of course, you could create instances like these, using an array:
EXAMPLE
Dog[] myDog = new Dog[3];
myDog[0] = new Dog("Fluffy", "Beagle", 2, "Brown");
myDog[1] = new Dog("Mochi", "Mutt", 5, "White");
myDog[2] = new Dog("Wolfie", "Malteses", 10, "Black");
In each one of these instances, it is not required to redefine the attributes and methods, since they were originally defined in the Dog class.
Class
The class keyword defines the data and code that will make up each of the objects. When defining a class, it starts with the class keyword and is then followed by the name of the class and a colon.
Class Instantiation
The process of creating an instance of a class, which is called an object.
In object-oriented programming, encapsulation is an important concept. It helps us describe the foundation that wraps attributes and methods that work on data in a single class. This allows us to add some restrictions to the access of attribute variables and methods directly. To prevent attributes from being directly changed, a class’s attributes can be set to only be changed by its own class's method(s).
If you had a numeric grade attribute in a grade book object, you may want to force it to only be set between the numbers 0 and 100. A user should not be able to make a change to allow a negative number or have bonus points as part of the rules of encapsulation.
Back to our class example:

Now that you know that a class is a blueprint or template from which objects or instances are created, and that a class contains fields for attributes and methods, let's dive into those.
Attributes are sometimes also called properties of an object. Attributes are variables that are defined in a class template and are the characteristics or properties of an object. In the example, color, breed, and age will be properties of the class Dog. In a Java class, the attributes must always be explicitly declared private to ensure correct encapsulation. They should never be declared public, though the class itself should be declared public. The access modifier (private) should also never be left off.
Methods are specialized types of procedures that are directly associated with an object. They are called to perform a specific task by using the object name, a period, and then the method name. When individual objects are created from the class, these objects can call a method that was defined in the class. Since methods perform actions, a method might change or update an object’s data (attribute) or possibly return some information. In our example, some behaviors or actions of the Dog class are methods, including barking and/or fetching.
The public methods that provide appropriate access to the data in the attributes have names that usually begin with "get" and are technically named accessor methods.
A Java class often includes a particular kind of method called a constructor. The constructor is used to initialize the attributes in an object when an instance of the class is created. The constructor is typically a public method. The constructor's name matches the name of the class in spelling and capitalization (this is important). The initial values for the class's attributes are passed via the parameters for the constructor.
Understanding the basics of a class is key to utilizing the OOP model.
Next, let’s see a class and get to know some of the syntax aspects of it. Here is an example that you would break down.
public class PeopleCounter {
  private long count = 0;

  public void anotherOne() {
    count++;
    System.out.println("So far " + count);
  }
}
In the first line of code, you could use the class keyword and give the class the access modifier public. A class that is defined as public can be used by any other code. By convention, a Java class name always begins with a capital letter. The name of the file in which the public class is defined must match the name of the class (with the .java file extension). The attributes and methods that make up the class are then defined within the pair of curly brackets that mark the beginning and end of the class.
The PeopleCounter class then declares a private attribute named count. The count attribute is declared as a long integer and is given an initial value of 0. The correct initialization of count is important because this allows the use of increment (++) operator later in the code.
Remember that correct data encapsulation requires that count be explicitly declared private.
There is no explicitly defined constructor, so the PeopleCounter class relies on the default constructor.
Next, you would declare a method and name it “anotherOne”. So, this class has one attribute (x) and one method (anotherOne).
This anotherOne() method is taking the attribute x and adding 1 to it each time the method is called.
You have defined a class called PeopleCounter. What’s next? Does something happen if you run the code? No.
Just as the definition of a method does not cause the method code to be executed, the class keyword does not create an object. Instead, the class keyword defines a template (remember blueprints) indicating what data and code will be contained in each object of the class PeopleCounter. There are no executable lines of code so far in this program. Right now, just the class is defined with what attributes and methods you will want the instances of this class to use.
Remember the cookie-cutter analogy used earlier? You described a class as the cookie-cutter and what was created from it are cookies. Now, let’s take a look at how you can make a cookie from that cookie-cutter or, in this case, a “people” instance of the PeopleCounter class that was defined above. Remember that the PeopleCounter class needs to be defined in a file named PeopleCounter.java:
public class PeopleCounter {
  private long count = 0;

  public void anotherOne() {
    count++;
    System.out.println("So far " + count);
  }
}
Before you can use the class, it needs to be compiled using this command:
EXAMPLE
javac PeopleCounter.java
The code in the application's main() method makes use of the PeopleCounter class. The driver class for the application is put into a file called PeopleCounterProgram.java.
class PeopleCounterProgram {

  public static void main(String[] args) {
    // Construct a PeopleCounter
    PeopleCounter pc = new PeopleCounter();
    // Count 3 people one by one
    pc.anotherOne();
    pc.anotherOne();
    pc.anotherOne();
  }
}
If you run this code now (using the command java PeopleCounterProgram.java), you would see the following output showing So far 1, So far 2, So far 3, and So far 4.
~/.../main/java$ java PeopleCounterProgram.java
So far 1
So far 2
So far 3
~/.../main/java$
Continuing to break down this code, focus on this section of the code in the main() method in the driver class:
EXAMPLE
// Construct a PeopleCounter
PeopleCounter pc = new PeopleCounter();
// Count 3 people one by one
pc.anotherOne();
pc.anotherOne();
pc.anotherOne();
As you continue to look at this program, consider the first executable line of code:
EXAMPLE
PeopleCounter pc = new PeopleCounter();
This is where you tell Java to construct, or create, an object/instance of the class PeopleCounter. This line gives the object the variable name pc. An object can be given any valid variable name. It looks like a method call to the class itself. Java constructs the object with the right attributes (data) and methods (behaviors) and returns the object, which is then assigned to our variable pc.
When the PeopleCounter class is used to construct an object, the variable pc is used to point to that object. Use the variable pc to access the methods to access the data and behaviors for that particular instance of the PeopleCounter class.
Each PeopleCounter object/instance contains within it a variable x and a method named anotherOne(). Call the anotherOne() method on this line:
EXAMPLE
pc.anotherOne()
Notice that the standard method call structure is using the dot operator (.) before the method name.
Directions: Try typing in the PeopleCounter.java and PeopleCounterProgram.java files above. Remember that you need to compile the PeopleCounter class before you can use it by running this command:
EXAMPLE
javac PeopleCounter.java
To run the program that uses the PeopleCounter class, run this command:
EXAMPLE
java PeopleCounterProgram.java
The output should look like the screenshot above.
It is important to notice the relationship between the PeopleCounter class and the application's driver class. The code in the PeopleCounter class does not change, but the code in the main() or other method that uses PeopleCounter creates instances and uses them in ways that vary depending on what the code needs to do.
Attributes
Attributes are data defined in the class template and are the characteristics or properties of an object.
Operator
The dot (.) operator connects the object (instance of a class) to the attributes and methods of that object.